

A Practical First Step for Concrete Floor Resurfacing Near Me
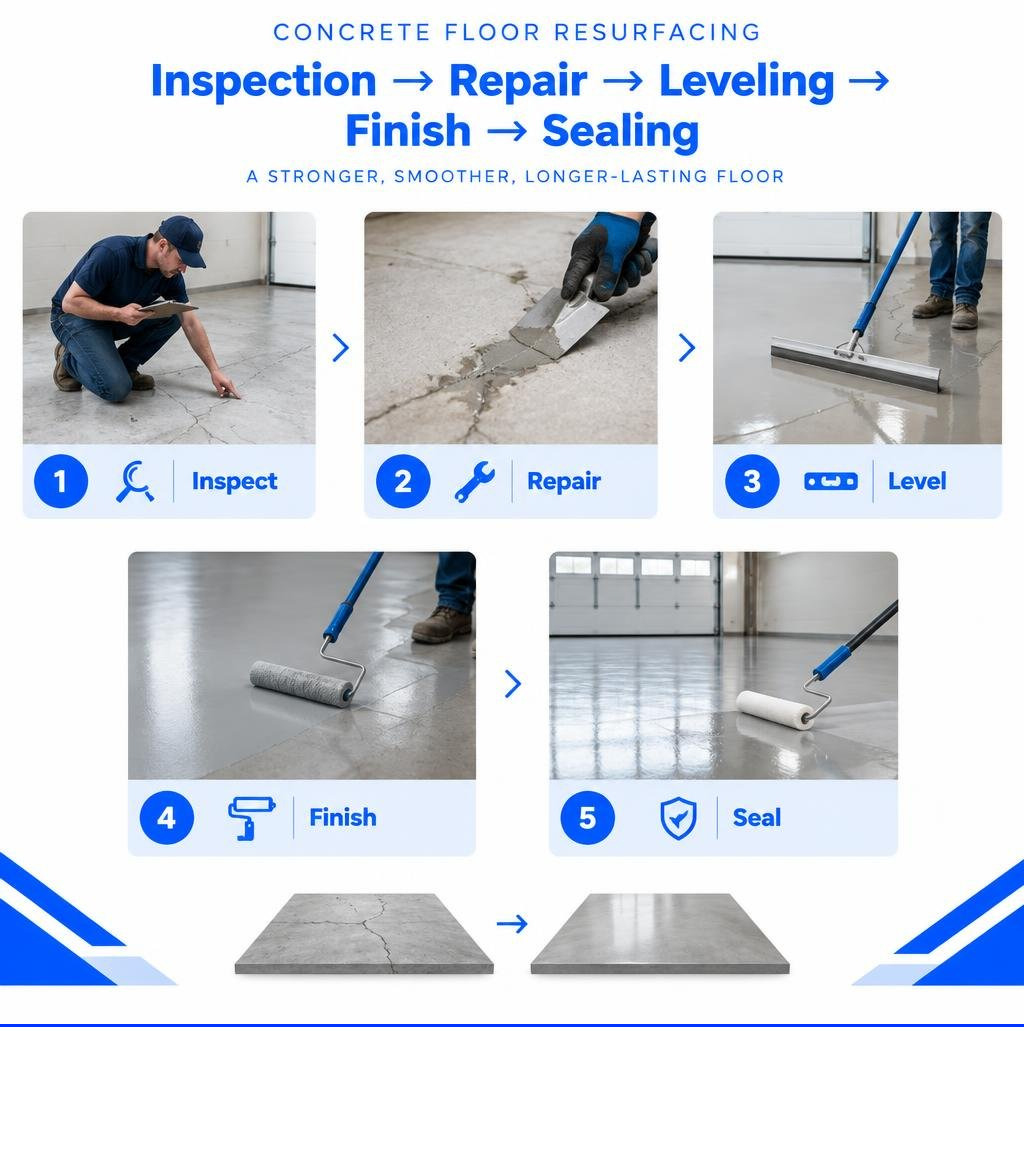
If you are searching for concrete floor resurfacing near me, start by checking whether the slab is stable. Clean surface stains, small cracks, rough patches, and light spalling can often be repaired and covered with an overlay, coating, or refinishing system. But if the concrete is sinking or badly uneven, level and stabilize it first so a new finish does not crack or fail with the moving slab.
A simple plan is:
- Inspect the floor for cracks, loose concrete, moisture, and low spots.
- Repair cracks and remove weak or contaminated concrete.
- Level sunken areas before applying a resurfacing material.
- Choose a finish that fits the space, such as a decorative overlay, epoxy, polyaspartic coating, or polished concrete.
- Prepare the surface properly by mechanically grinding or profiling it, then follow the product’s cure and sealing requirements.
Resurfacing can give a worn garage, basement, patio, or workshop floor a cleaner, more durable surface without automatically tearing out the whole slab. For sunken concrete, polyurethane foam injection can lift and support the slab for 30% to 50% less than replacement in many cases. Most FoamWorks repairs take only a few hours, with little excavation, debris, or damage to nearby landscaping.
I am Trey McNamee, owner of FoamWorks Concrete Leveling, and our family-owned team serves Northwest Ohio, Southeast Michigan, and Northeast Indiana with concrete leveling, crack repair, and sealing. With more than 30 years of combined industry experience, we help homeowners make smarter decisions when comparing concrete floor resurfacing near me options, beginning with the condition of the slab beneath the finish.
Concrete floor resurfacing near me terms at a glance:
Understanding Concrete Resurfacing and Popular Floor Finishes
Concrete floor resurfacing involves applying a new bonded layer over an existing concrete slab to restore its profile, improve its structural surface density, and elevate the overall room aesthetic. Instead of paying for destructive demolition, property owners can renew pitted, stained, or aged concrete with high-performance overlay systems. For a broader overview of how resurfacing compares with other restoration methods, the concrete resurfacing entry explains common overlay categories and application principles.
Different areas demand distinct functional properties. A residential garage requires high impact and chemical resistance against road salt and hot tires, while a basement needs moisture tolerance and a seamless finish. Exterior pool decks demand thermal comfort underfoot and slip resistance.
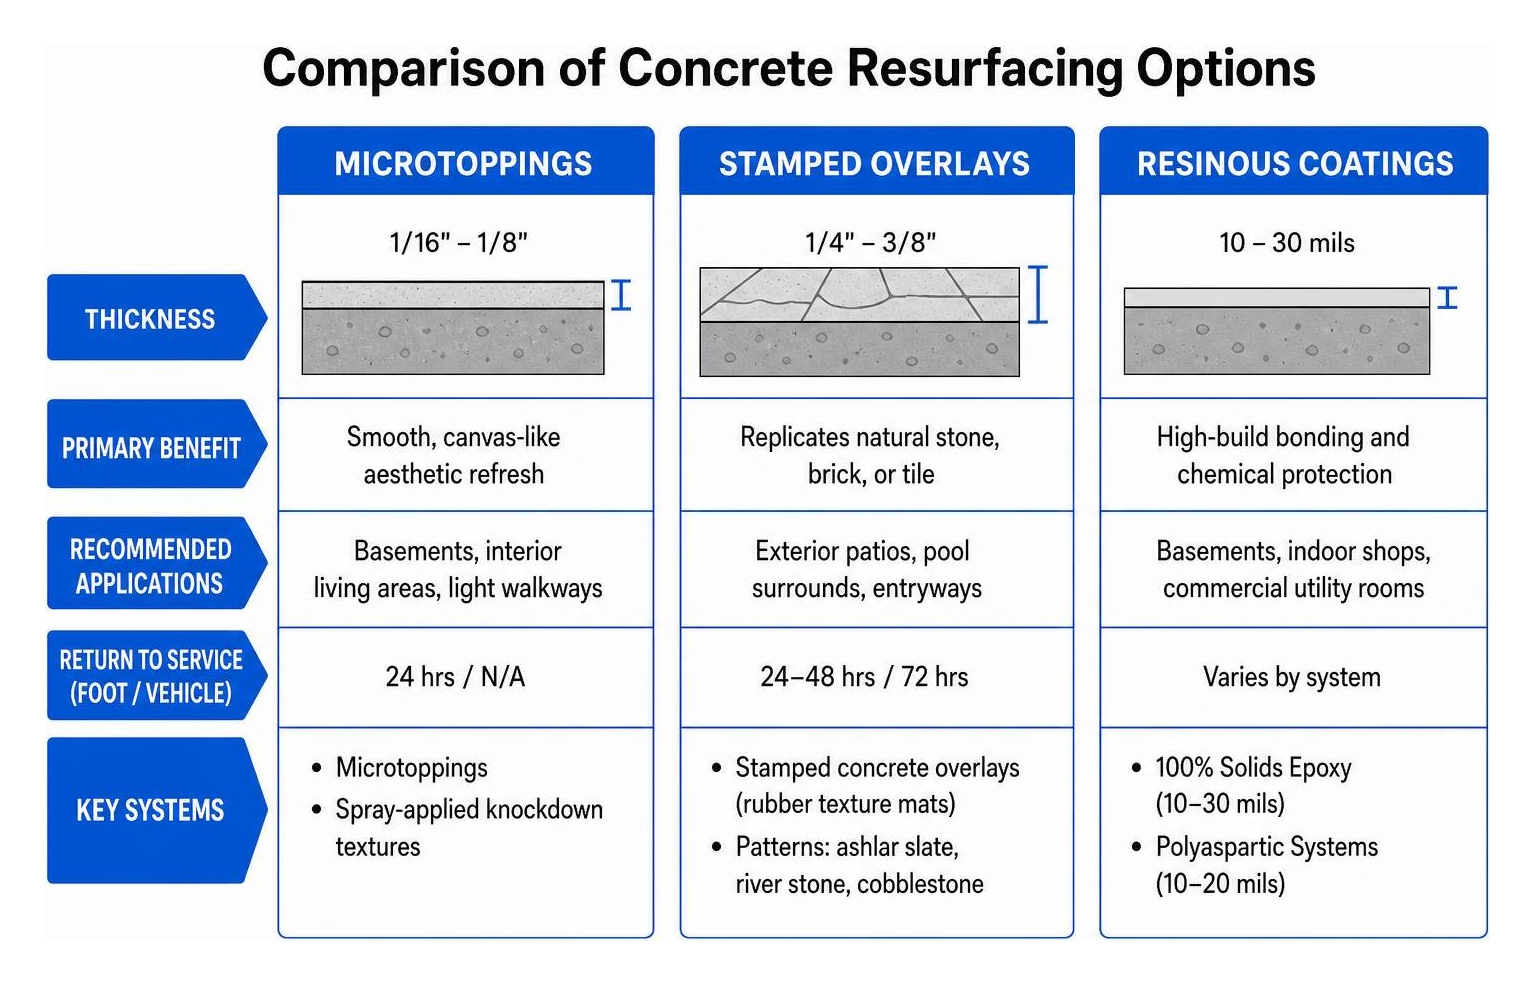
| Coating/Finish System | Typical Thickness | Primary Benefit | Recommended Applications | Return to Service (Foot / Vehicle) |
|---|---|---|---|---|
| Microtoppings & Skim Coats | 1/16″ to 1/8″ | Smooth, canvas-like aesthetic refresh | Basements, interior living areas, light walkways | 24 hrs / N/A |
| Stamped Overlays | 1/4″ to 3/8″ | Replicates natural stone, brick, or tile | Exterior patios, pool surrounds, entryways | 24–48 hrs / 72 hrs |
| 100% Solids Epoxy | 10 to 30 mils | High-build bonding and chemical protection | Basements, indoor shops, commercial utility rooms | 24 hrs / 72 hrs |
| Polyaspartic Systems | 10 to 20 mils | Rapid cure, non-yellowing UV stability | Garages, outdoor porches, heavy-use shops | 4–6 hrs / 24–48 hrs |
| Hone and Guard Refinishing | Penetrating profile | Economical dust-proofing and sheen | Warehouses, workshops, budget basements | 12 hrs / 24 hrs |
Another popular option is hone and guard refinishing—often referred to as a cost-effective alternative to full mechanical polishing. This process uses fewer abrasive grinding passes before saturating the concrete pores with a penetrating chemical densifier (such as lithium or colloidal silica) and a stain-resistant protective guard. It creates a hardened, low-sheen finish that dramatically curbs concrete dusting without the higher cost of multi-stage mirror polishing or thick resinous topcoats.
Microtoppings and Stamped Overlays
When a concrete surface suffers from extensive surface scaling, aggregate pop-outs, or discoloration, cementitious overlays offer a complete visual reset. Polymer-modified mortars blend Portland cement, graded silica sand, and liquid polymer resins to form a high-adhesion layer that bonds securely to properly prepared substrates.
Microtoppings and spray-applied knockdown textures are applied between 1/16-inch and 1/8-inch thick. Spray-applied knockdown finishes are particularly effective for pool decks because their textured profile reduces surface temperatures under direct sunlight and provides wet-slip resistance that meets modern safety benchmarks, such as a 0.42 Dynamic Coefficient of Friction (DCOF).
Stamped overlays require a thicker profile, usually 1/4-inch to 3/8-inch, allowing rubber texture mats to imprint realistic impressions of ashlar slate, river stone, or cobblestone into the semi-cured mortar.
High-Performance Resinous Coatings
Resinous coating systems protect concrete from moisture intrusion, automotive fluids, deicing chemicals, and everyday wear.
- 100% Solids Epoxy: This thermosetting polymer forms an exceptionally durable base layer with strong adhesion to the open pores of mechanically profiled concrete. Because it contains no evaporating water or solvents, 100% solids epoxy cures into a thick build that fills micro-fissures and minor surface voids.
- Polyaspartic Aliphatic Polyurea: Polyaspartic chemistry cures through cross-linking, resulting in a finish that is up to four times more abrasion-resistant than traditional epoxy. Polyaspartics are 100% UV-stable, meaning they will not amber, yellow, or chalk when exposed to sunlight through open garage doors or on outdoor patios.
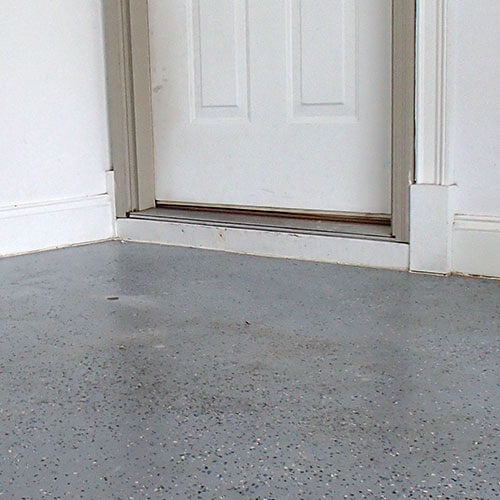
- Hybrid Systems: The most reliable garage installations use an epoxy base coat for substrate adhesion combined with embedded decorative vinyl flakes, sealed beneath a clear polyaspartic topcoat for UV protection, rapid cure times, and chemical resistance.
Step-by-Step Guide: How to Resurface Damaged Concrete Floors
A successful resurfacing project depends on proper mechanical preparation. Coating or overlaying over weak, contaminated, or moving concrete leads to premature peeling, blister formation, and telegraphing cracks.
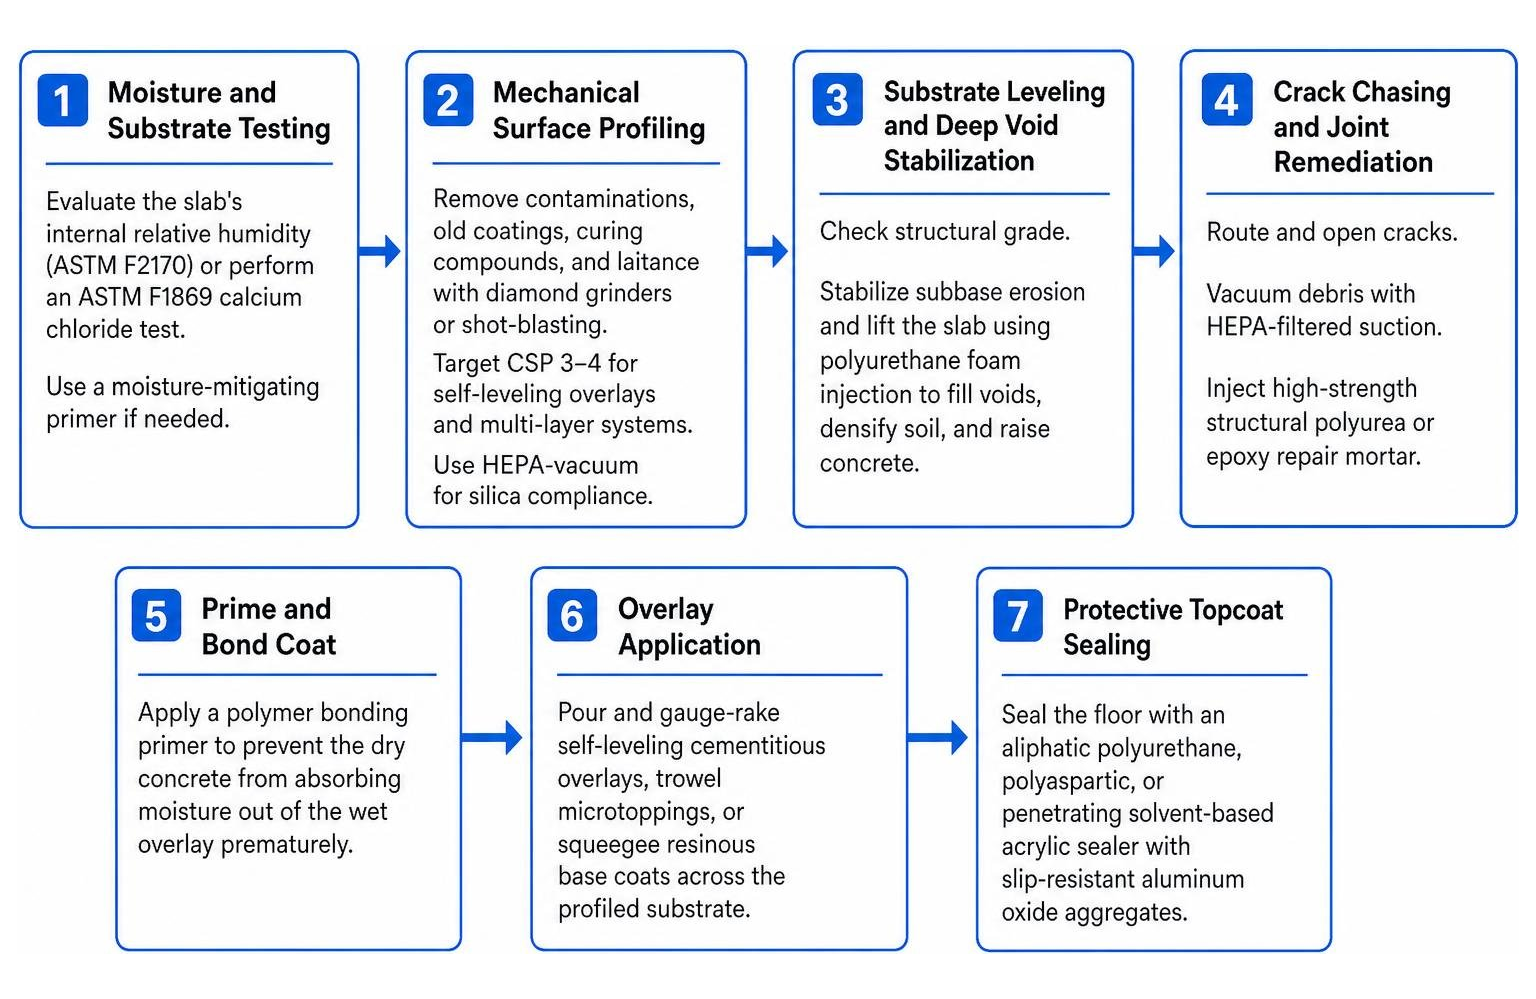
- Moisture and Substrate Testing: Evaluate the slab’s internal relative humidity following ASTM F2170 standards or perform an ASTM F1869 calcium chloride test. Excess moisture vapor moving upward through the slab will de-bond impervious overlays unless a dedicated moisture-mitigating primer is used.
- Mechanical Surface Profiling: Remove surface contaminations, old coatings, curing compounds, and laitance using planetary diamond grinders or shot-blasting equipment. The target surface roughness should match the International Concrete Repair Institute (ICRI) Concrete Surface Profile (CSP) standards:
- CSP 1–2 (Light Acid Etch / Diamond Grind): Suitable for thin-mil sealers and microtoppings.
- CSP 3–4 (Medium Grind / Light Shot Blast): Required for self-leveling mortars, high-build epoxies, and multi-layer broadcast flake systems.
- OSHA Silica Compliance: All dry grinding operations must use industrial vacuum shrouds fitted with certified HEPA filtration systems to meet OSHA 29 CFR 1926.1153 safety rules for respirable crystalline silica.
- Substrate Leveling and Deep Void Stabilization: Before applying cosmetic products, check the structural grade. If subbase erosion or soil compaction has caused the slab to sink, the void must be stabilized and the concrete lifted.
- Crack Chasing and Joint Remediation: Open and chase dormant hairline cracks, vacuum the debris, and inject high-strength structural polyurea or epoxy repair mortars.
- Prime and Bond Coat: Apply a polymer bonding primer to prevent the dry concrete slab from absorbing moisture out of the wet overlay prematurely.
- Overlay Application: Pour and gauge-rake self-leveling cementitious overlays, trowel microtoppings, or squeegee resinous base coats across the profiled substrate.
- Protective Topcoat Sealing: Finish the floor with an aliphatic polyurethane, polyaspartic, or penetrating solvent-based acrylic sealer containing slip-resistant aluminum oxide aggregates.
Substrate Leveling and Deep Void Stabilization
Applying a decorative coating or microtopping over a sinking slab will not fix underlying soil instability. Slabs settle when the subbase washes away or compacts beneath the weight of the structure. When unaddressed, settling leads to shear stress cracks that travel directly through your new finish.
For sunken basement floors or interior living areas, interior slab leveling lifts settled concrete back to its original grade. The modern, low-impact approach uses polyurethane foam lifting rather than traditional heavy cement slurries.
We drill small 5/8-inch injection holes through the concrete and inject high-density expanding polyurethane foam beneath the sunken slab. As the liquid foam expands, it flows into subgrade voids, densifies weak soil, and raises the concrete with controlled hydraulic force.
Polyurethane foam reaches 90% of its ultimate compressive strength within 15 minutes, allowing surface preparation and resurfacing to proceed without the days of downtime required by traditional repairs.
Crack Chasing and Joint Repair
To keep cracks from reappearing through a new overlay, every fracture must be treated prior to coating application.
Dormant structural cracks should be routed open using an angle grinder equipped with a diamond “V-trap” or crack-chaser blade. After cleaning out loose concrete dust with HEPA-filtered suction, fill the crack with a low-viscosity, fast-curing polymer repair mortar to restore slab continuity. You can learn more about these stabilization methods in our guide to professional cracked concrete repair.
Control joints and expansion joints designed to accommodate seasonal freeze-thaw slab movement must be respected. Never coat directly over moving expansion joints with a rigid overlay without rebuilding the joint lines. Scorelines or flexible polyurea joint fillers should be placed along existing relief cuts to prevent random stress fractures across the new floor finish.
How to Evaluate Concrete Floor Resurfacing Near Me for Your Property
If you live in the Midwest—across Northwest Ohio, Southeast Michigan, or Northeast Indiana—your concrete floors experience harsh winters, seasonal freeze-thaw cycles, high summer humidity, and exposure to deicing road salts. Choosing the right resurfacing system means selecting materials formulated to handle these regional conditions.
Outdoor concrete flatwork requires breathable coatings or low-permeability penetrating sealers that block water and salt intrusion while allowing internal moisture vapor to escape. Applying an unbreathable, rigid film over exterior concrete will cause the coating to blister and delaminate during seasonal freeze-thaw transitions. Using a high-grade protective concrete sealant protects exterior broom-finished or decorative concrete from premature surface spalling.
Assessing Slabs Before Concrete Floor Resurfacing Near Me
Not all concrete is a good candidate for simple surface refinishing. Before investing in a decorative finish, assess whether your floor needs stabilization, repair, or full slab replacement.
If the slab has degraded into deep, crumbly rubble, applying a thin cosmetic overlay will only mask problems temporarily. To avoid recurring expenses, take time to review why preventing temporary patches is better than repeatedly covering over structurally compromised concrete.
Questions to Ask When Booking Concrete Floor Resurfacing Near Me
When vetting local concrete resurfacing and leveling contractors, ask the following questions to verify their technical expertise:
- What mechanical surface preparation method do you use? Professional teams use planetary diamond grinders or shot blasters to achieve an ICRI CSP 2–4 profile. Avoid contractors who rely only on quick acid washing, which often fails to open tight concrete pores.
- Do you test for moisture vapor emissions prior to coating? Installers should measure slab moisture levels or use moisture-tolerant epoxy primers to prevent future delamination.
- How do you address underlying voids or uneven slabs? If your floor has settled, ensure the contractor can lift and stabilize the substrate using high-density polyurethane foam before applying the finish.
- What are the warranty terms? Ask if the warranty covers adhesion failures, peeling, and delamination.
- What is the return-to-service timeline? Polyaspartic coatings allow foot traffic within 4 to 6 hours and vehicles in 24 to 48 hours, whereas standard epoxy and thick cementitious overlays often require 48 to 72 hours to fully cure.
Contact our team today to schedule an on-site evaluation and free estimate.
Frequently Asked Questions About Concrete Floor Resurfacing
How long does concrete resurfacing last?
When applied over a stable, properly profiled substrate, a high-performance concrete overlay or polyaspartic garage coating system typically lasts 8 to 15+ years.
Its service life depends on surface preparation, traffic volume, and routine maintenance:
- Sweep away abrasive grit and road debris regularly.
- Clean surfaces using pH-neutral floor cleaners rather than aggressive acid solutions.
- For exterior decorative acrylic overlays or pool deck knockdown textures, plan to apply a fresh clear topcoat every 2 to 3 years to maintain color depth and moisture protection.
What is the difference between epoxy and polyaspartic coatings?
While both options provide durable protection, their underlying chemistries and performance characteristics differ:
- Cure Time: Epoxies usually require 12 to 24 hours between coats and 72 hours before handling vehicle weight. Polyaspartic coatings cure rapidly, allowing foot traffic within 4 to 6 hours and full vehicle parking in 24 to 48 hours.
- UV Stability: Standard epoxy resin ambers, chalks, and yellows when exposed to direct sunlight over time. Polyaspartic aliphatic coatings are 100% UV-stable, retaining their crystal-clear finish indefinitely.
- Thermal and Chemical Resistance: Polyaspartic formulations offer greater flexibility, high impact resistance against hot-tire pickup, and enhanced tolerance against sudden temperature swings.
Can severely cracked or uneven concrete be resurfaced?
Yes, provided the underlying subbase is stabilized and cracks are properly repaired first.
If concrete has settled due to void formation beneath the slab, applying an overlay without leveling will cause the new material to crack along the same stress lines. Sunken slabs should first be lifted back into alignment using expanding polyurethane foam injection. Once the foundation is stable, cracks can be routed, filled with structural polymer repair compounds, and smoothed flat to create an even, long-lasting surface for your new finish.
Conclusion
Tired, spalled, and stained concrete surfaces do not have to remain an eyesore. Modern concrete resurfacing options—from decorative microtoppings and hone-and-guard finishes to high-performance polyaspartic flake systems—allow you to transform your floors without the high cost and disruption of complete slab replacement.
A successful, long-lasting finish starts with a stable foundation. At FoamWorks Concrete Leveling, our family-owned team brings more than 30 years of combined industry experience to properties across Northwest Ohio, Southeast Michigan, and Northeast Indiana. We specialize in precision polyurethane foam injection to lift sunken slabs, fill hidden voids, and repair structural cracks for 30% to 50% less than full replacement—often in just a few hours.
If you are ready to fix your damaged floors, explore our comprehensive concrete repair services and schedule your free on-site estimate today.