

Concrete Ceiling Repair Starts With Safety and a Clear Diagnosis
Concrete ceiling repair can be a DIY project when the damage is small, stable, and limited to a surface crack or shallow spall. But loose overhead concrete, rusted exposed rebar, an active leak, or a crack that is widening can point to a deeper problem that needs professional evaluation before you begin.
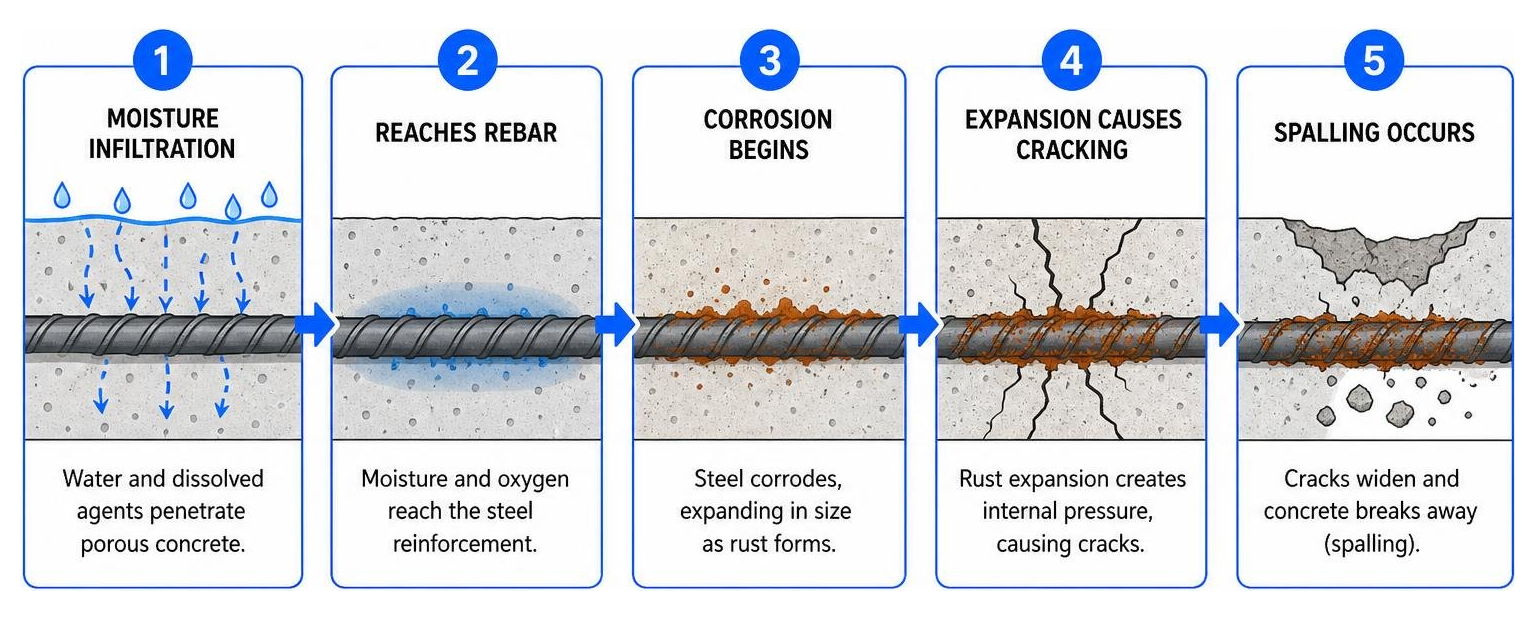
Concrete is porous, so water and oxygen can reach the steel inside the slab. As rebar corrodes, it expands and pushes against the surrounding concrete, causing cracks, rust stains, and pieces of concrete to break away. The first rule is simple: do not patch over damage until you know what caused it.
For a quick assessment:
- Likely cosmetic: Fine, stable hairline cracks with no rust, moisture, sagging, or hollow-sounding concrete.
- Needs prompt repair: Spalling, flaking concrete, rust streaks, exposed steel, or recurring paint failure.
- Call a professional first: Falling concrete, visible slab deflection, active water flow, exposed corroded rebar, or cracks that are widening or displaced.
I am Trey McNamee, owner of FoamWorks Concrete Leveling, with more than two decades of experience in building-material strategy, product development, and concrete repair solutions. In this guide, I will help you understand when concrete ceiling repair is safe to tackle yourself and when the damage calls for an experienced repair professional.
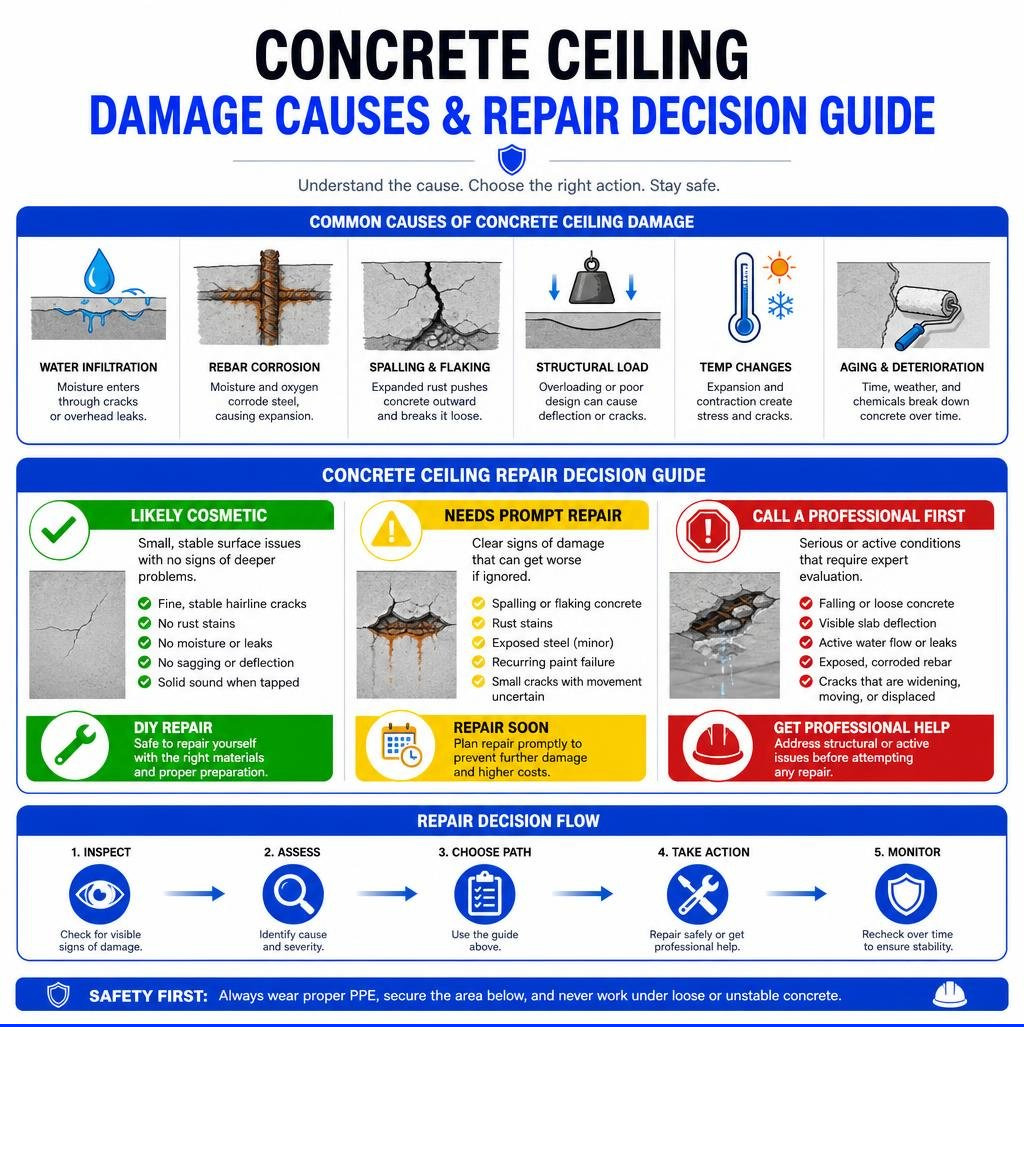
Diagnosing Overhead Concrete Damage: Causes and Assessment
Before you grab a trowel and a tub of patch material, let’s play detective. Working overhead means gravity is constantly working against both you and your repair material. To make sure your hard work doesn’t end up landing on your floor six months down the road, you have to understand what is happening inside the concrete slab.
Causes of Overhead Spalling and Cracks
The most common culprit behind overhead concrete deterioration is a natural chemical process known as carbonation, often teamed up with chloride attack. Concrete is naturally highly alkaline, with a pH usually above 12 or 13. This high alkalinity creates a protective passive oxide film around embedded steel reinforcing bars (rebar), shielding them from rust.
Over time, atmospheric carbon dioxide penetrates the porous concrete structure, reacting with calcium hydroxide. This drops the concrete’s pH below 9 or 10, destroying that protective passivating layer. When moisture and oxygen enter the equation, the internal steel begins to corrode.
When steel corrodes, it expands—sometimes up to seven times its original volume. This expansion exerts massive internal tensile pressure (often exceeding 10,000 psi) against the concrete. Because concrete has incredible compressive strength but relatively weak tensile strength, it splits, fractures, and eventually pops off in chunks. This process is called spalling. In coastal environments or regions where de-icing salts wash off vehicles in elevated parking structures or garages, chloride ions accelerate this pit corrosion even faster.
For a complete look at how this mechanism operates over long periods, check out this Permanent guide to repairing spalled concrete ceilings.
Structural vs. Cosmetic Concrete Ceiling Repair
How do you know if you are dealing with a quick weekend cosmetic touch-up or a serious structural issue? At FoamWorks Concrete Leveling, we always urge homeowners to perform a rigorous safety check first.
- Cosmetic Cracks: Hairline cracks under 1/16 inch (1.5 mm) wide that show no vertical displacement, no rust staining, and no signs of active water leakage are generally non-structural. These often stem from initial drying shrinkage when the building was constructed or minor thermal expansion cycles.
- Structural Spalling & Deflection: If you notice significant slab bowing (deflection), active structural movement, wide diagonal fractures, or chunks of concrete flaking off to reveal corroded steel, gravity has compromised the structural cover.
To test for hidden hollow zones (delamination) that haven’t dropped off yet, gently tap the ceiling with a small metal hammer or drag a light chain across the surface. A sharp, clear “ping” indicates sound, solid concrete. A dull, hollow “thud” means the top layer of concrete has separated from the core and must be removed.
Essential Materials and Tools for Overhead Repairs
Working on a horizontal slab above your head is entirely different from patching a basement floor. Standard sand-and-cement mixes will slump, sag, or drop straight onto your safety glasses. You need specialized, zero-slump, high-bond formulations.
Overhead Patching Compounds and Resins
For overhead concrete repairs, materials are engineered with thixotropic properties—meaning they hold their shape under gravity until you apply mechanical force with a trowel, then set rapidly.
- Fiber-Reinforced Cementitious Mortars: Formulations like MEADOW-CRETE OV are modified with glass fibers and silica fume. They exhibit high compressive strengths (reaching 3,800 to 4,700 psi at 28 days) and shrinkage-compensating properties that prevent debonding.
- Non-Sag Epoxy Mortars: Knife-grade epoxy paste systems, such as zero-slump Non-sag vertical and overhead epoxy systems, offer rapid adhesion and tensile pull-off strengths exceeding 2.4 MPa (350 psi). They cure reliably even in humid or damp environments.
- Hybrid Urethanes & Anchor Adhesives: Extremely low-viscosity urethanes like Hybrid Urethane for Repairing Cracks in Concrete Slabs and Floors excel at flat slab repairs, but for overhead anchorage or structural patching, fast-curing high-strength adhesives and non-sag polyurethanes (such as Sikaflex Mortar Fix) prevent sagging while sealing cracks.
Here is a handy comparison of overhead repair products to help you pick the right tool for the job:
| Repair Product Category | Key Features & Strengths | Ideal Application | Typical Cure Time |
|---|---|---|---|
| Fiber-Reinforced Mortar (e.g., Meadow-Crete OV) | Glass fibers, silica fume, shrinkage-compensated, compressive strength >4,200 PSI | Deep spalls (1/4″ to 2″ lifts) on ceiling soffits | Working time 15-20 mins; full cure 28 days |
| Non-Sag Epoxy Paste (e.g., ZDSpoxy) | Zero-slump, high pull-off bond (>2.4 MPa), moisture tolerant | Structural overhead repairs, exposed rebar zones | Initial set 2-4 hrs; full cure 24-48 hrs |
| Hydrophobic Polyurethane Resin | Hydro-active expansion (up to 20x), flexible seal, stops running water | Active leaks in ceiling cracks via injection ports | Sets in 15-30 mins; full cure 24 hrs |
| Non-Sag Polyurethane Sealant (e.g., Sikaflex) | Flexible, textured finish, economical ($8-$15/tube), non-sag | Minor hairline ceiling joint crack sealing | Tack-free in 2 hrs; full cure 3-7 days |
Safety Gear and Surface Preparation Equipment
Overhead repair work generates fine, highly alkaline dust and flying chips. Breathing in concrete dust or getting alkaline cement slurry in your eyes can cause chemical burns. Assemble the following equipment before starting:
- PPE: Full-face splash protection shield, N95 or P100 dual-cartridge respirator, heavy-duty nitrile or neoprene gloves, and a long-sleeve work shirt.
- Surface Prep Tools: Electric rotary hammer drill with narrow cold-chisel bits, an angle grinder equipped with a diamond V-groove blade and HEPA vacuum dust shroud, a wire wheel attachment or needle scaler, and a stiff bristle brush.
- Chemical & Injection Equipment: Zinc-rich epoxy primer, acrylic bonding agent, high-pressure mechanical injection ports (zerk packers), and a manual or hydraulic grease gun pump.
Step-by-Step Concrete Ceiling Repair Process for Spalled Surfaces
If you are dealing with spalled concrete overhead caused by rusted rebar, a quick surface patch will fail within a year (often called the “halo effect”). You must treat the underlying steel mechanically and chemically.
Step 1: Chiseling, 20mm Rebar Undercutting, and Rust Neutralization
- Contain the Area: Lay plastic drop cloths and seal off nearby doorways to catch dust and chips.
- Chisel to Sound Concrete: Use a hammer drill with a cold chisel bit perpendicular to the surface. Chisel out all loose, cracked, or hollow concrete. Sawcut the outer perimeter of the repair area to a depth of 1/4 inch (6 mm) to 3/4 inch (20 mm) at a 45-degree outward angle. Never taper or feather edge your patch edges, as feather edges crack easily overhead.
- Undercut the Rebar: This is the most crucial step for a structural mechanical anchor! Chisel completely around any exposed rebar until you have at least 20 mm (3/4 inch) of clear space behind the bar, and extend the concrete removal along the bar until you expose at least 50 mm (2 inches) of clean, uncorroded steel on both ends. This allows the new mortar to encase the bar fully, locking it in place.
- Clean the Steel: Use a wire wheel on an angle grinder, a needle scaler, or sandblasting to clean the rust off the rebar until it reaches a bright metal finish.
- Apply Sacrificial Zinc Primer: Coat the exposed steel thoroughly with two coats of a zinc-rich epoxy primer. The zinc acts as a sacrificial anode, preventing future corrosion cycles from attacking the steel inside the slab.
Step 2: SSD Surface Conditioning and Non-Sag Mortar Layering
Once the steel is protected and the surrounding concrete is clean and free of laitance, you are ready to place the repair mortar.
- Achieve a Saturated Surface Dry (SSD) Condition: Wet the concrete substrate thoroughly with clean water for several hours or keep a damp sponge against it. Prior to applying mortar, blow away standing water with oil-free compressed air. The concrete should be dark and damp, but with no glistening water on the surface. If the substrate is bone dry, it will suck the moisture out of your repair mortar, ruining the bond strength!
- Apply a Bonding Slurry: Mix a small batch of your polymer-modified repair mortar into a creamy liquid, or use an acrylic bonding agent. Scrub this slurry coat vigorously into the damp concrete using a stiff bristle brush, making sure to work it into all pores and behind the undercut rebar.
- Pack the Repair Mortar in Lifts: While the slurry coat is still tacky (do not let it dry!), force your non-sag repair mortar firmly into the cavity using a steel trowel or rubber-gloved hands. Work from the back of the rebar forward to avoid leaving air pockets behind the steel.
- Build Up Layers (Lifts): Apply the mortar in layers between 20 mm and 30 mm thick (approx. 3/4 inch to 1 inch). If your repair is 2 inches deep, apply the first lift, score the surface with a trowel to give it a rough texture, wait 10 to 15 minutes for it to firm up, and then apply the second layer.
- Finish with a Wood Float: Once the final layer is flush with the ceiling, finish it with a wood or sponge float. Avoid over-troweling with a steel blade, as this draws water to the surface and causes micro-shrinkage cracking.
- Cure Properly: Cover the patch or spray it with an ACI 308-compliant curing compound or keep it damp-cured with plastic sheeting for 48 to 72 hours.
For structural overhead restorations requiring high-volume pneumatic application, contractors often rely on standards outlined in Concrete Repair by Shotcrete Application.
Fixing Active Leaks and Overhead Painting Problems
Moisture dripping through a concrete ceiling is a recipe for building decay. Applying a superficial coat of hydraulic cement on the bottom surface of a wet ceiling rarely works long-term because water under hydrostatic pressure will simply find another path through the slab.
Polyurethane Injection Methods for Active Concrete Ceiling Repair
To cure an active ceiling leak, you need to seal the crack through its entire thickness using high-pressure resin injection.
- Prepare the Crack: Clean efflorescence salt deposits, paint, and dirt off the crack line using an angle grinder fitted with a V-groove diamond blade.
- Drill Port Holes: Drill holes along both sides of the crack at a 45-degree angle pointing toward the center of the crack line. Space the holes 6 to 12 inches apart, alternating sides. Drilling at 45 degrees ensures you cross the crack path midway through the concrete slab depth.
- Install Mechanical Packers: Insert metal injection packers equipped with one-way zerk fittings into the drilled holes and tighten them with a wrench until the rubber sleeve expands tightly against the concrete.
- Inject Hydrophobic Polyurethane Resin: Connect a high-pressure injection pump (capable of reaching 1,000 to 3,000+ PSI) to the lowest packer. Pump hydrophobic polyurethane resin. The resin reacts instantly with water inside the crack, expanding up to 20 times its liquid volume into a dense, closed-cell waterproof foam. Once resin flows out of the adjacent port, move to that port and repeat the process until the full length is sealed.
- Remove Ports & Seal: After 24 hours, knock off the mechanical packers with a hammer and patch the drill holes with non-shrink hydraulic cement.
For a deeper structural perspective on stopping aggressive internal slab leaks, consult this Structural guide for leaking concrete ceiling injection.
Resolving pH and Moisture Barriers When Ceiling Paint Won’t Stick
Have you ever repaired and painted a concrete ceiling only to have the paint peel off in large sheets a year later? This common frustration usually stems from two issues: trapped moisture or high surface alkalinity (alkali burn).
- High Surface pH: New repair mortars and wet concrete carry a high pH (12–13). High alkalinity breaks down standard latex or oil-based primers, saponifying the paint film into a gooey paste that loses adhesion. Always wait at least 28 days for new patch materials to cure, then test the surface pH with damp pH paper. If the pH is above 10, rinse the concrete with a mild neutralizing wash or use an alkali-resistant masonry sealer.
- Restoring the Concrete Barrier Layer: Original concrete ceiling slabs frequently feature a paper-thin “concrete seal” powder coat applied during construction to serve as a moisture retarder. Scraping away water-damaged plaster often strips this layer. If you apply setting-type drywall mud straight over raw, bare concrete, the porous concrete sucks the water out of the mud before it can hydrate, causing it to flake off.
- The Solution: Clean the bare concrete, test moisture levels with a pinless meter, and seal the raw substrate with a heavy-duty alkali-resistant concrete sealer (such as a deep-penetrating silane-siloxane or dedicated masonry water-barrier coating like Zinsser Watertite) before applying any finishing joint compound or ceiling paint.
Frequently Asked Questions About Overhead Concrete Repair
What is the best repair mortar for overhead concrete ceilings?
The best repair mortar for overhead applications is a single-component, polymer-modified, polymer-fiber-reinforced cementitious compound (such as MEADOW-CRETE OV or Buildrite Concrete Patch V). These products contain silica fume and synthetic micro-fibers, which impart thixotropic (zero-slump) characteristics. This allows you to trowel material overhead up to 1 to 2 inches thick per lift without slumping or needing temporary wood forms.
How deep should I chisel behind rusted ceiling rebar?
You should chisel out enough concrete to create at least 20 mm (3/4 inch) of open clearance behind the entire circumference of the steel rebar. You must also extend the removal 50 mm (2 inches) past the visible rust into solid, uncorroded steel. This 20 mm cavity allows the new repair mortar to encase the rebar fully, creating a mechanical lock that anchors the patch and protects the steel from oxygen and moisture.
When should I consult a structural engineer for ceiling cracks?
You should pause work and consult a licensed structural engineer immediately if:
- Cracks are wider than 1/16 inch (1.5 mm) or show vertical displacement/shearing.
- You observe visible sagging or deflection in the concrete ceiling slab.
- Embedded rebar is severely rusted, flaky, or has lost a significant portion of its original diameter cross-section.
- Cracks continue to widen or change over time, indicating active structural movement.
Conclusion
A damaged concrete ceiling can feel overwhelming, but equipped with the right diagnosis, mechanical surface preparation, and non-sag materials, you can restore both safety and beauty to your overhead space. Always remember to put safety first: protect your eyes and lungs, undercut rusted steel to form a sound 20 mm mechanical anchor, and seal the substrate against future moisture ingress with breathable silane-siloxane penetrating sealers or anti-carbonation coatings.
While DIY fixes are great for localized, static spalls and cosmetic cracks, larger structural issues require professional equipment and experience. At FoamWorks Concrete Leveling, we know how important peace of mind is when it comes to concrete safety. As a family-owned contractor with over 30 years of experience, we serve homeowners and commercial properties across Northwest Ohio, Southeast Michigan, and Northeast Indiana—including communities like Toledo, OH, Fort Wayne, IN, Ann Arbor, MI, Fremont, OH, and Adrian, MI.
If you have sunken driveways, cracked garage aprons, uneven patios, or vertical concrete structures that need attention, our high-density polyurethane foam injection technology restores concrete quickly and cleanly. In fact, polyurethane foam leveling repairs sunken or uneven concrete slabs for 30% to 50% less than full tear-out and replacement costs, completing most jobs in just a few hours with zero lawn damage.
Protect your property before small concrete issues become major hazards. Contact us today to schedule your free estimate and explore our full range of Professional concrete repair services backed by our lifetime warranty.