
How to Repair a Concrete Pool Deck Edge
To repair a concrete pool deck edge, remove loose concrete until you reach solid material. Clean the area, apply a bonding agent if your patch requires one, then rebuild the edge with an outdoor concrete patch. Match the existing texture and let it cure as directed. Seal the gap between the deck and coping with a flexible joint sealant rather than filling it with rigid patch material.
A small chip may be a DIY fix. If the edge sounds hollow, keeps breaking, or sits beside a sunken slab, address the underlying problem before patching.
I’m Trey McNamee, owner of FoamWorks Concrete Leveling. My background in building-materials strategy and product development helps me explain how to repair concrete pool deck edge damage, starting with the signs that a simple patch may not be enough.
Repair concrete pool deck edge word list:
Signs It Is Time to Repair a Concrete Pool Deck Edge
A failing pool perimeter rarely breaks down overnight. Instead, concrete pool deck coping drops subtle hints before major structural problems develop. Ignoring these signs can turn a minor weekend touch-up into a major headache—nearly 30% of pool-related accidents are caused by tripping on uneven pool deck cracks or broken edges.
Here are the key warning signs we look for when assessing whether an edge needs attention:
- Crumbling or Rounding Cantilever Edges: If the crisp, square corner of your cantilever coping is flaking into the water, spalling has begun. This breakdown typically happens when treated pool water or freeze-thaw moisture penetrates unsealed concrete.
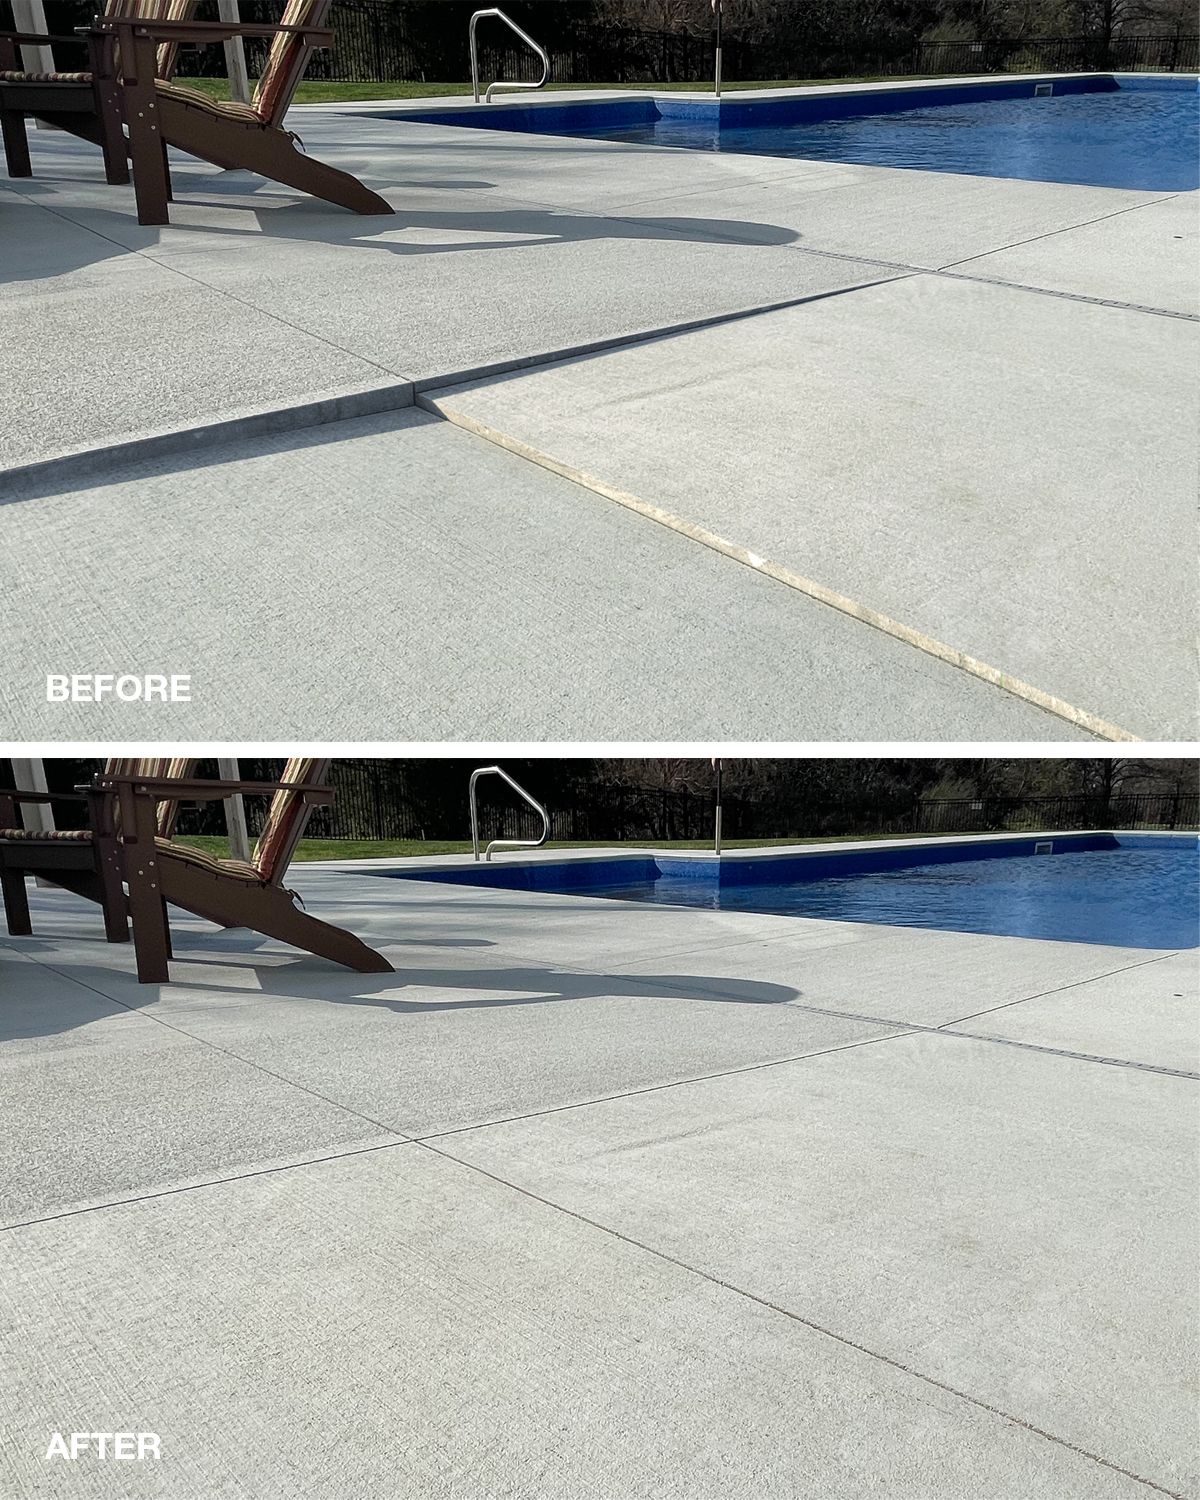
- Trip Lips and Vertical Offsets: A sudden ridge where the pool deck meets the coping is often referred to as a “trip lip.” When a slab settles just a fraction of an inch, it creates an unsafe walking surface and directs surface water straight toward your pool’s bond beam. If you notice these shifts, taking smart steps to determine if your pool deck is truly safe is an essential starting point.
- Hollow Delamination (The Tap Test): Take a small hammer, golf ball, or large screwdriver handle and lightly tap along the coping edge. A solid, healthy slab produces a crisp, high-pitched “ping.” A dull, hollow “thud” means the top layer of concrete has delaminated from the core aggregate and will break away under heavy foot traffic.
- Rust Staining and Exposed Rebar: If you spot reddish-brown streaks bleeding through the edge of the coping, water has reached the internal reinforcing steel. As steel oxidizes, it expands up to four times its original volume, bursting the surrounding concrete outward.
- Active Water Loss Behind the Coping: When water vanishes faster than normal, run a simple bucket test (filling a bucket to pool level and comparing water evaporation rates inside and outside the container). If water levels drop faster in the pool, failing expansion joints or cracked coping lines are letting moisture escape behind the pool wall.
Selecting the Right Patching and Sealing Materials
Not all concrete repair compounds can handle the harsh chemical and moisture conditions found at the edge of a pool. Standard masonry mortar or basic plaster lacks the adhesive strength and flexibility needed for cantilever corners.
| Material Type | Best Application | Strengths | Limitations |
|---|---|---|---|
| Polymer-Modified Patch (e.g., E-Z Patch 6) | Cantilever coping, edge rebuilds, chips | Excellent vertical cling, color matchable, incorporates pozzolans for moisture resistance | Requires precise mixing ratios and damp curing |
| Non-Sag Structural Epoxy | Deep anchor points, vertical cracks, stone resetting | Tremendous tensile strength (95%+ structural restoration), waterproof | Leaves a slick surface that must be broadcast with sand; rigid |
| Hydraulic Cement | Emergency active water leaks, deep void filling | Expands as it sets, cures in minutes | Poor aesthetic finish, brittle on thin feathered edges |
| Thinset Mortar | Resetting coping stones and tile grout lines | Forgiving workability, solid shear bond | Lower structural strength on free-standing vertical edges |
| Hybrid Silane-Polyether Sealant | Pool expansion joints (deck-to-coping) | Bonds to damp concrete, high UV resistance, 7–10 year lifespan | Higher upfront product cost than standard silicone |
For rebuilding chipped corners, specialized formulations like E-Z Patch 6 combine acrylic modifiers and pozzolans (volcanic ash minerals) to reduce water absorption while maintaining vertical cling. Alternatively, commercial mixes that meet Atlas Concrete Pool Patch specifications provide compressive strengths up to 3,800 psi.
When working on flat deck cracks or expansion lines, flexibility is paramount. For simple surface cracks, check out this guide on fixing patio cracks for advice on applying UV-stable sealants. For the critical expansion perimeter between the deck and pool coping, always avoid standard bathroom silicone, as chlorine quickly breaks it down.
Complete Methods to Restore Damaged Coping and Expansion Joints
Restoring an edge involves two distinct jobs: rebuilding the rigid concrete profile and sealing the moving perimeter joint. Taking the time to fix unsightly pool deck cracks before summer starts prevents winter water from wreaking havoc on your pool’s concrete structure.
Step-by-Step Guide to Repair Concrete Pool Deck Edge Damage
Rebuilding broken cantilever coping requires solid mechanical prep and a structured application:
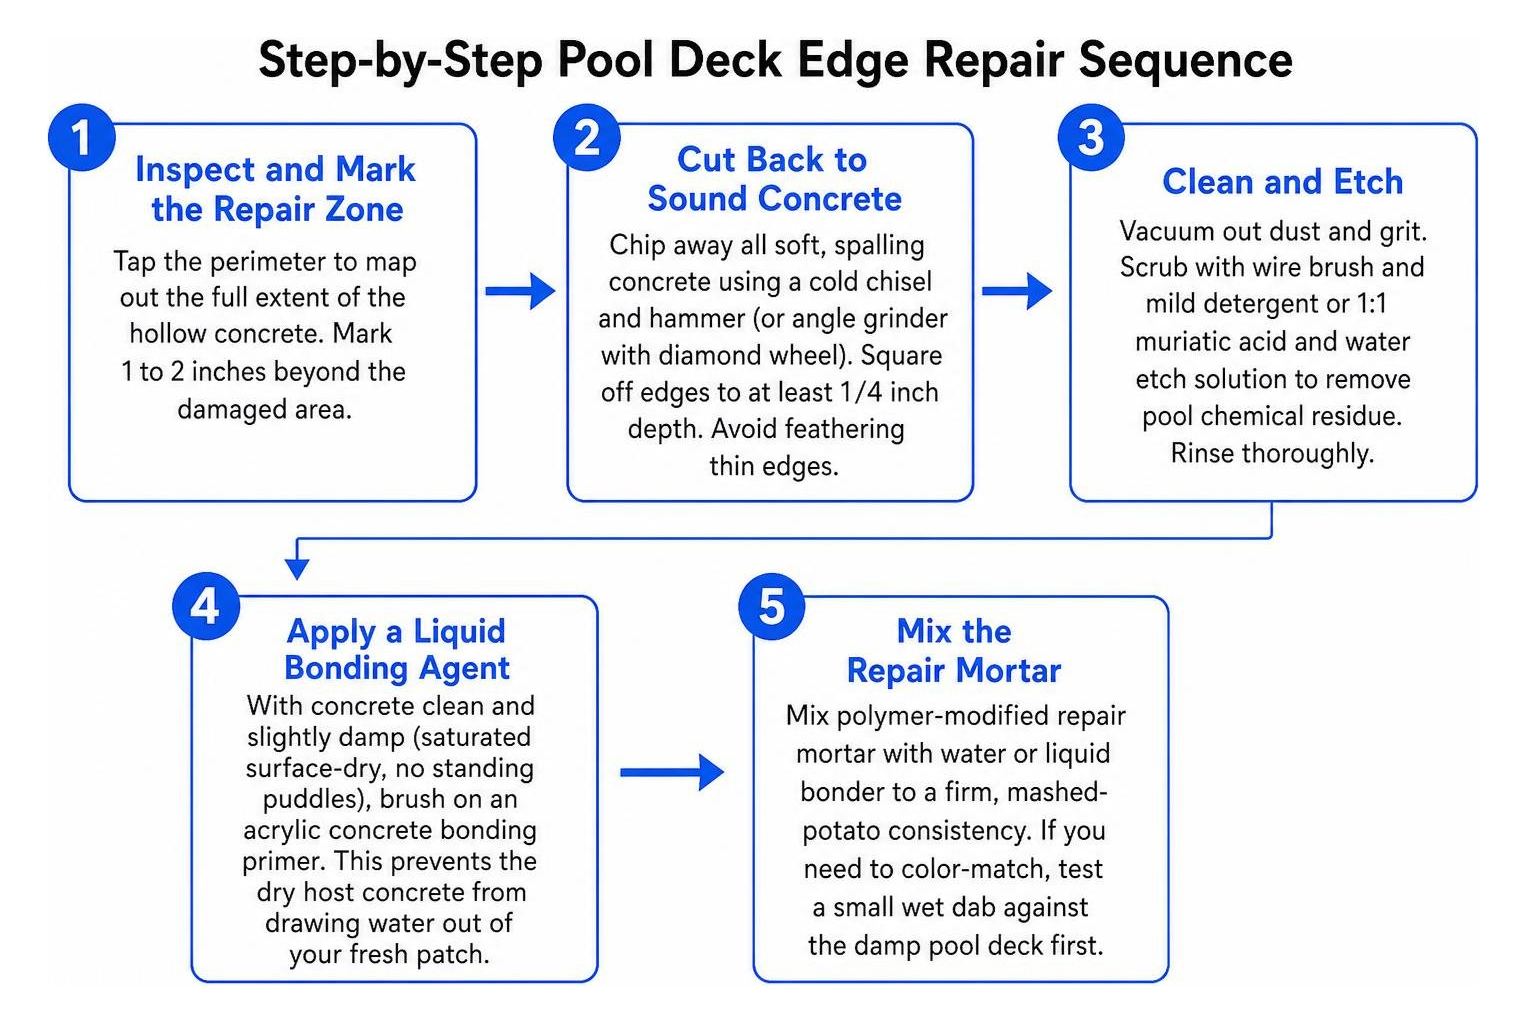
- Inspect and Mark the Repair Zone: Tap the perimeter to map out the full extent of the hollow concrete. Mark 1 to 2 inches beyond the damaged area.
- Cut Back to Sound Concrete: Using a cold chisel and hammer (or an angle grinder with a diamond wheel), chip away all soft, spalling concrete. Square off the edges to a minimum depth of 1/4 inch. Avoid feathering edges down to paper-thin margins, as thin edges quickly flake off.
- Clean and Etch: Vacuum out all dust and grit. Scrub the area with a wire brush and a mild detergent or a 1:1 muriatic acid and water etch solution to remove pool chemical residue. Rinse thoroughly with clean water.
- Apply a Liquid Bonding Agent: While the concrete is clean and slightly damp (saturated surface-dry, with no standing puddles), brush on an acrylic concrete bonding primer. This prevents the dry host concrete from drawing water out of your fresh patch.
- Mix the Repair Mortar: Mix your polymer-modified repair mortar with water or liquid bonder to a firm, mashed-potato consistency. If you need to color-match, test a small wet dab against the damp pool deck first.
- Apply a Scratch Coat and Build the Profile: Press a thin layer of mortar firmly into the pores of the repair zone to establish a mechanical bond. Immediately build up the patch in 1/2-inch to 1-inch layers until it extends slightly beyond the original edge profile.
- Shape and Texture: Use a margin trowel or cantilever coping tool to shape the patch flush with the surrounding concrete. Once the mix begins its initial set (typically 10 to 20 minutes depending on air temperature), run a lightly dampened sponge across the surface to blend the texture and ensure a slip-resistant finish.
- Cure Completely: Protect the repair from direct sun exposure and foot traffic for at least 24 hours before swimming or stepping on the edge.
How to Seal Pool Expansion Joints and Stop Coping Leaks
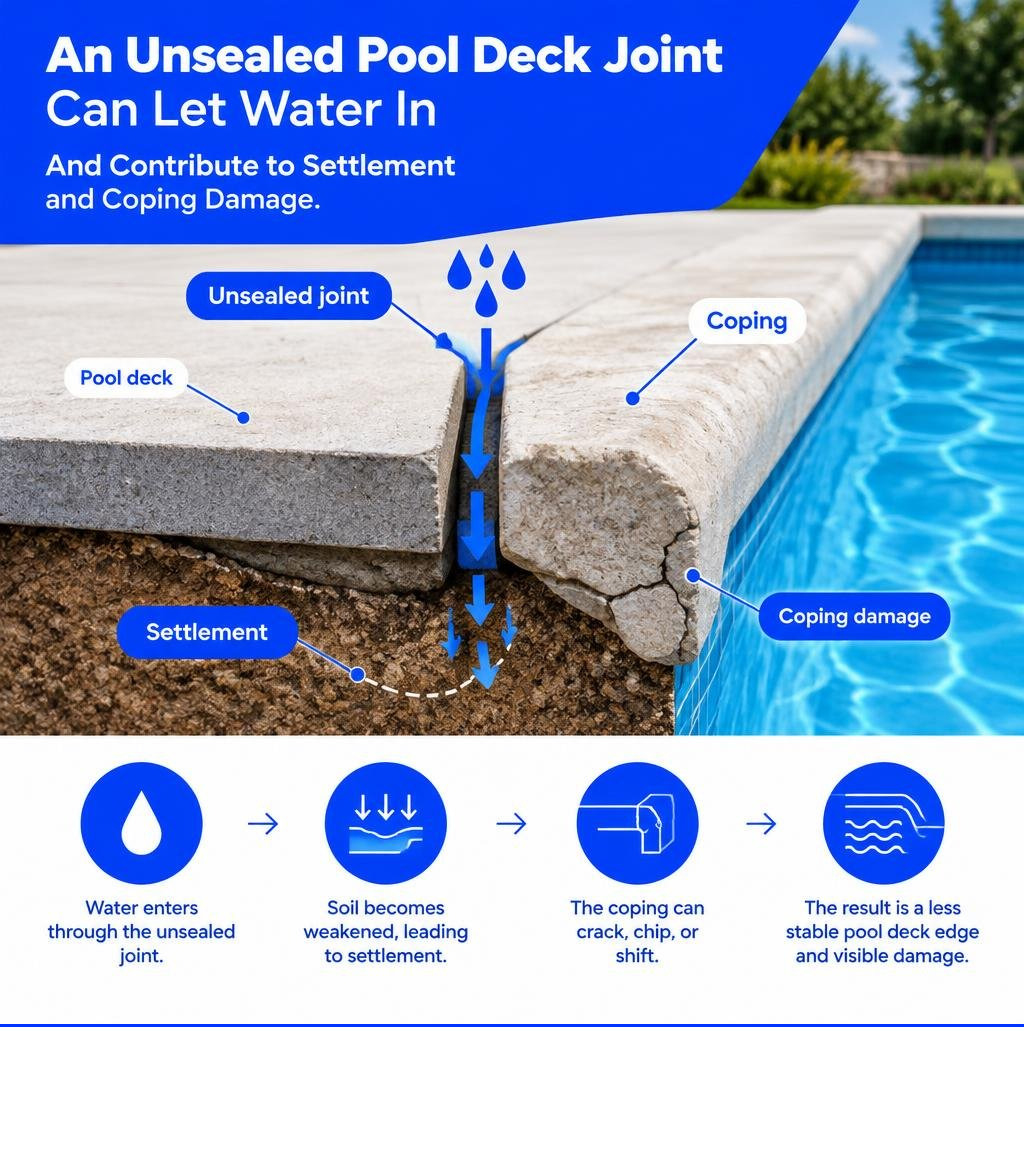
The gap between your pool coping and the concrete deck is an expansion joint designed to absorb thermal movement. When this mastic seal fails, water seeps beneath the pool deck, washing out soil and leading to costly structural leaks.
- Remove Old Mastic: Slice out deteriorated sealant using an oscillating multi-tool or utility knife. Scrape the vertical walls of the pool beam and deck slab clean.
- Clean the Channel: Blow out dirt and organic debris using compressed air or a high-pressure washer. Ensure the sidewalls are completely free of oil, algae, and crumbling mortar.
- Insert Closed-Cell Foam Backer Rod: Press a foam backer rod into the joint. Choose a backer rod roughly 25% wider than the joint gap, setting it at a uniform depth of 1/4 to 3/8 inch below the deck surface. The backer rod prevents three-sided adhesion, allowing the sealant to stretch freely with seasonal movement.
- Apply Joint Sealant: Gun in a premium sealant along the joint channel. According to this hybrid pool expansion joint sealant guide, hybrid silane-polyether formulas perform exceptionally well because they cure in damp environments and resist chlorine degradation.
- Tool the Surface: Immediately smooth the bead using a curved spatula or gloved finger dipped in soapy water, creating a slight concave profile that sits just below the pool deck level. Sealing this joint correctly is vital for stopping structural pool leaks before moisture degrades the bond beam.
Costs, Climate Factors, and Long-Term Durability
Addressing edge wear and joint damage early saves thousands in major renovations. A small gap near the coping ignored for just one season can allow soil washout, leading to deck heaving and repair bills that climb from $200 up to $4,000.
Typical professional evaluation and repair of multiple deck cracks runs between $200 and $500, while DIY patch kits cost between $35 and $120. Professional expansion joint sealing on a standard residential pool generally costs $5 to $8 per linear foot.
When pool slabs sink and shift away from the coping, simple patching cannot solve the problem. If you are dealing with uneven slabs, reviewing how to fix a sinking pool deck can help you identify the right leveling approach. You can also view our concrete repair before and after gallery to see how lifting settled slabs restores coping alignment.
How Weather and Soil Accelerate Edge Deterioration
Here in the Midwest—serving homeowners across Northwest Ohio, Southeast Michigan, and Northeast Indiana—our regional climate puts intense stress on pool perimeters:
- Freeze-Thaw Cycles: Water expands by roughly 9% to 10% in volume when it freezes. When unsealed joint lines allow water to collect behind pool coping, winter freezing creates enough lateral force to split coping stones and crack underlying bond beams.
- Clay Soil Dynamics: The expansive clay soils common around the Great Lakes basin swell when wet and shrink drastically during summer dry spells. This cyclical movement causes pool deck slabs to settle, pulling the expansion joint apart and placing uneven shear pressure on cantilever edges.
- Chlorine and UV Exposure: Sun exposure breaks down standard caulks, while chlorinated splash-out slowly dissolves weak calcium bonds in basic concrete mixes.
When shifting clay causes slabs to drop, patching the cracked edge repeatedly will not stop future breaks. FoamWorks Concrete Leveling uses high-density polyurethane foam injection to repair sunken concrete for 30% to 50% less than the cost of full tear-out and replacement. Most leveling repairs are completed in just a few hours, leaving your pool deck ready for use almost immediately while preventing future edge fractures.
When to DIY vs. Hire a Pro to Repair a Concrete Pool Deck Edge
Minor cosmetic edge chipping (under 3 inches in length) and stable hairline surface cracks are straightforward DIY projects using standard polymer kits.
However, calling a specialist for professional concrete repair is necessary when:
- The pool deck has settled below the coping line, creating a severe trip hazard.
- The concrete sounds hollow across broad sections of the pool perimeter.
- Cracks extend clean through the coping and into the pool’s structural bond beam.
- Water is actively disappearing behind the pool wall.
Frequently Asked Questions About Pool Coping Repair
What is the best product to patch chipped pool coping?
The best product for repairing chipped pool coping is a polymer-modified concrete repair mortar (such as E-Z Patch 6 or an equivalent acrylic-modified pozzolan blend). These mixes provide the vertical cling needed to shape cantilever edges, bond securely to existing concrete, and resist splash-out chemicals. For small anchor holes or structural bonding, a non-sag two-part epoxy is also an effective choice.
How much does it cost to repair pool deck edges and expansion joints?
DIY patch and sealant kits generally cost between $35 and $120. Professional crack repair typically runs from $200 to $500 for multiple problem areas, while professional joint sealing costs about $5 to $8 per linear foot. If the underlying slabs have settled, polyurethane foam lifting costs 30% to 50% less than a full deck tear-out and replacement.
How long does a concrete pool deck edge repair last?
A well-applied polymer-modified patch on a stable base will last 5 to 10 years. Premium hybrid silane-polyether expansion joint sealants typically last 7 to 10 years in temperate climates, whereas standard polyurethane or silicone sealants exposed to heavy freeze-thaw cycles and UV rays usually need refreshing every 3 to 5 years.
Conclusion
A well-maintained pool perimeter keeps your outdoor living space safe, attractive, and structurally sound. By catching hollow spots early, choosing the right polymer patching materials, and keeping expansion joints sealed, you can protect your pool coping against seasonal shifting and water intrusion.
If your deck has settled or your coping edges are cracking due to moving concrete slabs, our family-owned team at FoamWorks Concrete Leveling is here to help. With 30+ years of experience and a lifetime warranty on our leveling services, we restore sunken decks quickly and cleanly. Contact us today for a free estimate on pool deck repair and get your pool ready for safe summer fun!