

Stop Pool Leaks Before They Undermine the Concrete Shell
Concrete pool leak repair starts with finding the exact source before sealing anything. First, use a 24-hour bucket test to confirm water loss exceeds normal evaporation. Then, with the pump off, use leak-detection dye near cracks, skimmers, return jets, light niches, and drains. A small surface crack or fitting gap may accept an underwater epoxy patch, but a crack that runs through the shell, moves, or is paired with settling concrete needs professional diagnosis and structural repair.
Even a small leak can waste thousands of gallons each month. More importantly, escaping water can wash out supporting soil, create voids, and contribute to cracked or sinking pool decks. In Northwest Ohio, Southeast Michigan, and Northeast Indiana, seasonal ground movement and freeze-thaw cycles can make these problems worse.
I am Trey McNamee, owner of FoamWorks Concrete Leveling, with more than two decades of experience in marketing, strategy, and building-material product development, plus a team with over 30 years of concrete repair experience. That background helps us understand how concrete pool leak repair, soil movement, and uneven surrounding slabs can connect – and why early action matters.
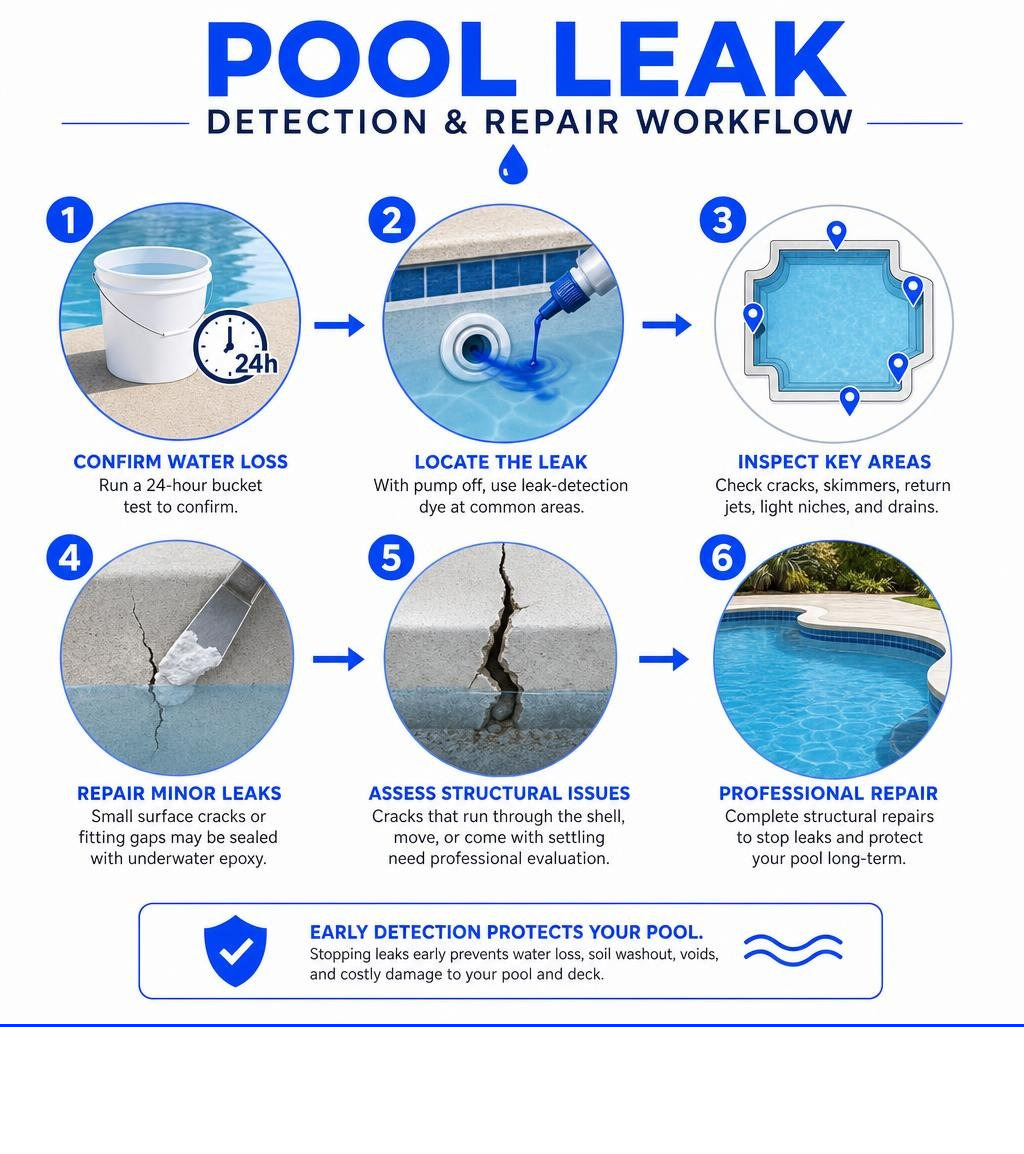
Concrete pool leak repair basics:
Identifying and Diagnosing Concrete Pool Leaks
Finding an active leak in a concrete swimming pool requires a methodical approach. When water escapes a gunite, shotcrete, or poured concrete pool shell, it rarely leaves an obvious trail on the surface. Instead, pool owners often notice indirect symptoms: water levels dropping faster than usual, chemical consumption suddenly spiking, automatic pool autofills running continuously, or mysterious wet patches forming around the equipment pad and lawn.
Left unchecked, escaping water saturates the sub-base soil surrounding the structure. This saturation washes away critical foundation bedding, leading to sunken coping, deck misalignment, and severe structural stress. Diagnosing the issue early prevents catastrophic damage to your pool structure and surrounding patio. Following proven methods like those detailed in How to Repair Concrete Pool Leaks will help you pinpoint the breach before digging or applying repair compounds.
The 24-Hour Bucket Test and Equipment Check
Before assuming your concrete shell is cracked, you need to rule out natural evaporation. In particularly hot weather, a swimming pool can lose upwards of 1.5″ to 2″ of water per week due to environmental exposure, wind, and low humidity. As a general industry rule, up to 1/4 inch per day due to evaporation is considered normal; anything more indicates a structural or plumbing leak.
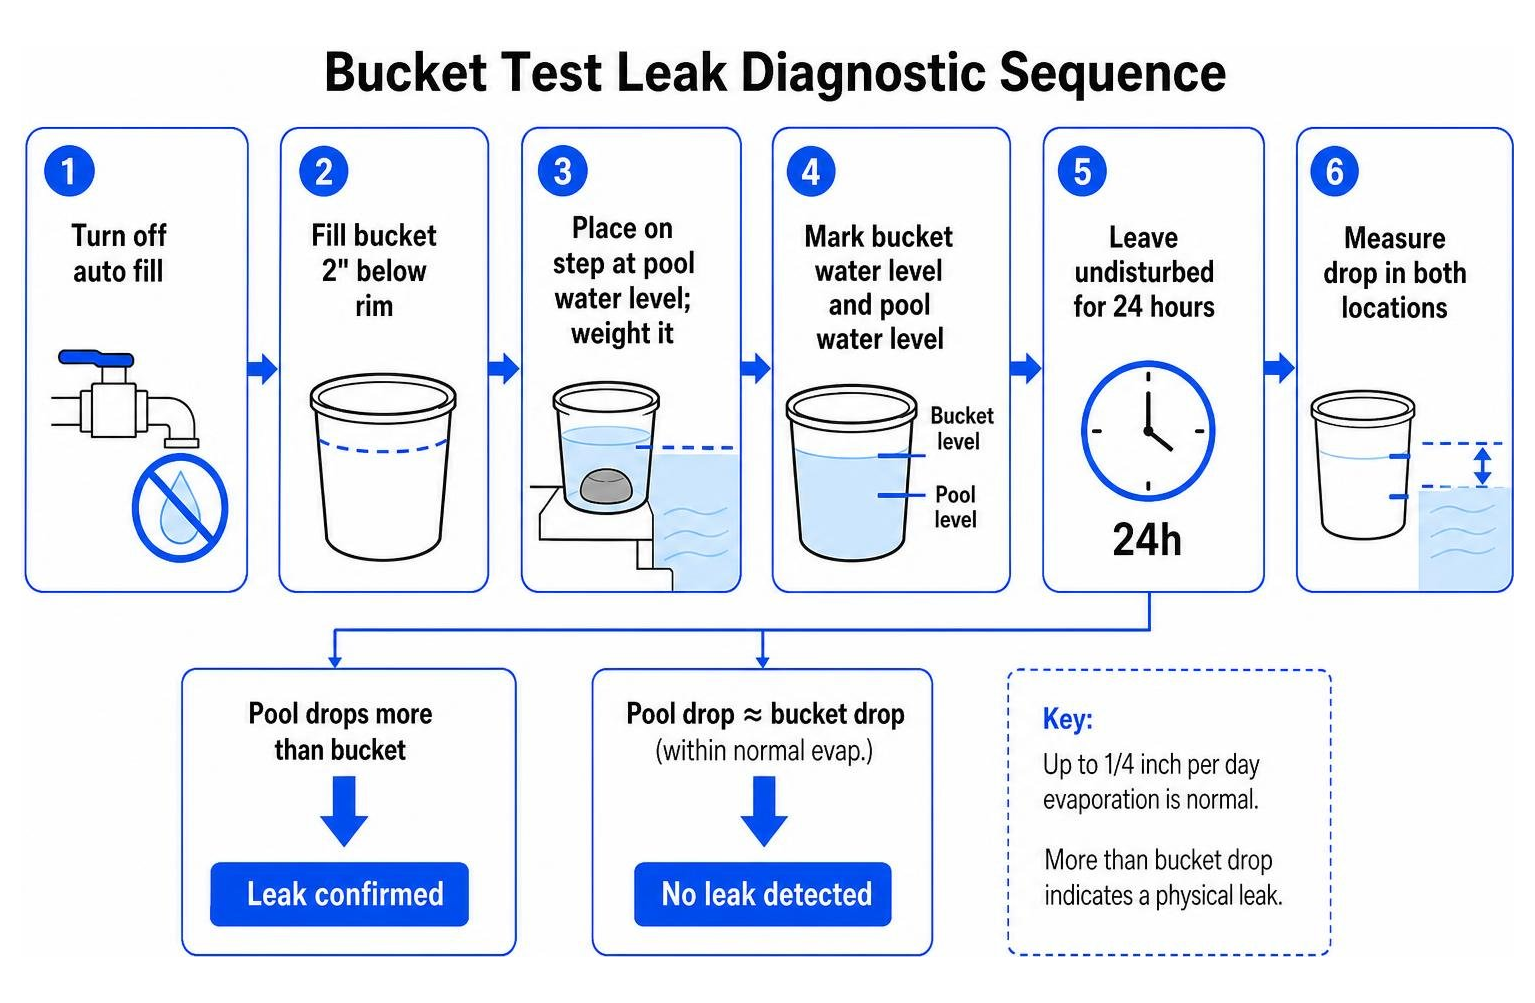
To confirm an active leak, run a standard 24-hour bucket test:
- Turn off the automatic pool fill valve so no municipal water enters the pool during testing.
- Fill a standard 5-gallon plastic bucket with pool water to roughly two inches below the rim.
- Place the bucket on the first or second pool entry step so the water inside the bucket is submerged to roughly the same level as the pool water. Submerging the bucket equalizes water temperatures between both bodies, eliminating temperature-related evaporation differences. Weight the bucket with a smooth stone or brick so it does not float.
- Use waterproof tape or a grease pencil to mark the water level inside the bucket. Then mark the pool’s exterior water level on the outside wall of the bucket.
- Leave the system untouched for 24 hours under normal operating conditions.
- Measure the drop in both locations. If the pool water level has dropped significantly more than the bucket water level, you have confirmed a physical leak.
Once a leak is confirmed, run an equipment check to determine whether the failure lies in the plumbing system or the physical structure. Run the pool pump continuously for 12 to 24 hours and record water loss. Next, shut the entire pump system off at the breaker for an identical 12- to 24-hour window and record the drop again.
If your pool loses water faster with the pump running, the breach is likely on the pressurized return lines or within a damaged filter multi-port valve leaking water out through the backwash line. If water loss accelerates when the equipment is turned off, the leak is usually located on the suction side (such as skimmer throats and main drains) or within the structural shell itself, where lack of active pressure allows water to drain freely into the surrounding soil.
Precision Dye Testing for Shell and Fitting Leaks
Once you have narrowed down the leak’s behavior, precision dye testing lets you pinpoint the exact fissure. Dye testing relies on fluid dynamics: water leaving a closed vessel creates a localized micro-current that pulls nearby suspended liquid directly into the breach.
To execute an accurate dye test:
- Turn off the pool pump, autofill, and all water features. The water must be completely calm and still; surface ripples disperse the dye plume before you can spot suction.
- Put on a pair of swimming goggles or a diving mask to view underwater fittings clearly.
- Fill a narrow-tip syringe or applicator with a concentrated, pH-neutral pool leak detection dye (or dark food coloring).
- Slowly submerge the syringe and position the tip within 1/4 inch or less of suspect areas: hairline plaster cracks, the perimeter seam around skimmer throats, light niche conduit openings, return jet faceplates, and hydrostatic relief valves at the bottom main drain.
- Gently press the plunger to release a small, tight cloud of dye.
- Watch the cloud closely. If the dye drifts aimlessly, there is no active water flow. If the dye is abruptly drawn in a ribbon into a crack or fitting seam, you have identified the exact point of structural water loss.
Cosmetic vs. Structural Cracks in Concrete Pools
Not every crack in a concrete pool means your shell is failing. Distinguishing between cosmetic surface flaws and true structural failures is critical for choosing the right repair strategy.
| Crack Characteristic | Cosmetic Plaster Cracking (Crazing) | Structural Shell Crack |
|---|---|---|
| Depth of Penetration | Superficial; limited to top plaster/finish layer (< 1/8 inch) | Penetrates through plaster and deep into gunite/shotcrete shell |
| Primary Cause | Rapid plaster drying, shrinkage, minor thermal surface stress | Soil shifting, ground settlement, hydrostatic pressure, freeze-thaw cycles |
| Water Loss | Minimal to none (impermeable shell remains intact behind plaster) | Moderate to severe; active suction confirmed during dye testing |
| Rebar Involvement | Steel rebar grid unaffected | Often exposes internal rebar to moisture, creating rust expansion |
| Repair Method | Plaster patching, smoothing, or aesthetic refinishing | Mechanical stabilization (staples), deep V-grooving, structural injection |
| Impact on Decks | Negligible | Can cause severe sub-base soil washout and sunken pool decks |
Evaluating Crack Depth and Shell Integrity
Cosmetic cracks, often called check cracks or crazing, are fine hairline fractures that appear in the pool plaster coating. Plaster is simply a decorative and waterproofing barrier applied over the structural gunite or shotcrete base. Crazing occurs when plaster dries too quickly during application or experiences mild thermal expansion. These cracks do not extend into the reinforced concrete shell beneath and rarely cause water loss.
Structural cracks, by contrast, represent a physical fracture through the structural concrete shell itself. These fissures are typically wider than 1/8 inch, run across entire pool planes (such as extending from the floor up through a wall or across the bond beam), and pull dye rapidly during testing.
Structural cracks occur when external forces exceed the tensile strength of the concrete. Common causes include uncompacted backfill, ground settlement, heavy freeze-thaw cycles in Midwestern winters, and elevated hydrostatic groundwater pressure pushing against an empty or under-filled pool shell.
When structural cracks leak water continuously, the escaping moisture erodes surrounding foundation soil. Over time, this creates subterranean voids that cause the concrete patio around the pool to settle, tilt, or crack. If your perimeter pool deck has begun dropping or separating from the pool coping, addressing the problem requires professional Pool Deck Repair alongside structural shell sealing to stabilize the entire footprint.
Step-by-Step Methods for Concrete Pool Leak Repair
Repairing structural concrete cracks requires deep mechanical locking and chemical bonding rather than a superficial surface patch. When done correctly, the repair restores structural integrity and prevents water from reaching internal reinforcing rebar.
Surface Preparation for Concrete Pool Leak Repair
Successful concrete pool leak repair depends almost entirely on surface preparation. Simply spreading epoxy or cement over a crack creates a weak surface seal that will quickly fail under hydrostatic pressure.
- Safely Lower or Drain the Pool: For major structural crack repairs requiring mechanical excavation, the pool water must be lowered below the crack level. Caution: In areas with high groundwater tables, opening the main drain’s hydrostatic relief valve is mandatory before draining to equalize subterranean water pressure and prevent the empty pool shell from lifting or floating out of the ground.
- Chisel an Inverted V-Groove: Using a hammer and cold chisel (or an angle grinder with a diamond masonry blade), cut a groove along the entire length of the crack. Cut the channel approximately 1 inch deep and 1 inch wide. Flare the channel slightly wider at the bottom than at the surface to create an inverted “dovetail” or V-shape. This geometry mechanically locks the cured patch material in place, preventing outward hydrostatic water pressure from dislodging it.
- Address Exposed Rebar: If the crack reveals rusted rebar, chip away the concrete around the steel until you have at least 3/4-inch clearance behind the bar. Wire-brush the rust away completely and coat the rebar with an anti-corrosion zinc-rich primer to stop internal oxidization.
- Clean and Etch the Substrate: Remove all loose debris, dust, and fractured aggregate using a stiff wire brush and a shop vacuum. Wash the excavated groove with a mild muriatic acid solution (diluted 1 part acid to 4 parts water) to remove mineral scale and open the concrete pores. Neutralize the acid wash immediately with baking soda and fresh water, then rinse thoroughly.
- Install a Backer Rod for Deep Structural Voids: If the fissure extends through the back of the shell, insert a closed-cell foam backer rod into the deepest gap to prevent injected patching resins from draining into the surrounding soil.
Sealing Cracks with Hydraulic Cement and Epoxy Injection
Once the channel is prepared, select the appropriate repair compound based on the crack’s characteristics:
- Hydraulic Cement: Hydraulic water-stop cement is a specialized blend that expands slightly as it cures through an exothermic (heat-generating) reaction. It sets in as little as 3 to 5 minutes and bonds tenaciously to damp masonry surfaces, making it ideal for filling chiseled dovetail grooves and sealing active weeping cracks. Always mix hydraulic cement in small batches that you can apply within two minutes. Dampen the concrete groove, pack the cement firmly into the void starting from the deepest point outward, and smooth it flush with a damp sponge.
- Structural Epoxy & Polyurethane Injection: For narrow structural cracks that extend through thick gunite walls, low-pressure polyurethane foam or high-strength epoxy injection provides an elastomeric, watertight seal. Injected polyurethane foam expands up to 25 times its liquid volume, filling microscopic voids through the entire shell thickness while flexing during freeze-thaw cycles.
- Stress-Proof Structural Stitching: When a structural crack is subject to ongoing ground movement, hydraulic cement alone will eventually re-crack. To permanently stabilize shifting concrete, install heavy-duty stainless steel or carbon-fiber staples across the crack line. Cut horizontal slots perpendicular to the fissure every 12 inches, drill anchor holes at each end, insert the tension staples, and encapsulate them in high-strength anchoring epoxy. Once cured, apply a color-matched pool plaster topcoat over the repair area.
Underwater Pool Patching Without Draining
If you are dealing with minor cosmetic cracks, small fitting gaps, or want an immediate temporary fix to stop water loss without draining thousands of gallons of balanced pool water, underwater epoxies offer a reliable solution. Homeowners can implement techniques outlined in Repairing Concrete Pool Leaks: Underwater Solutions to make durable submerged repairs:
- Clear the Surface: Use a wire brush or coarse abrasive pad underwater to scrub away algae, mineral scale, and loose plaster around the crack perimeter.
- Mix Two-Part Pool Epoxy Putty: Mix equal parts of the resin and hardener components out of the water at room temperature (around 70°F). Knead the putty thoroughly with gloved hands until the contrasting colors blend into a uniform, streak-free consistency.
- The Polyethylene Film Technique: For a neat patch on submerged vertical walls, roll the mixed epoxy putty into a rope and press it onto a piece of clear polyethylene (PE) plastic sheet cut slightly larger than the repair. Submerge the sheet smoothly to avoid water turbulence, press the putty firmly into the crack, and smooth it flat through the plastic film using a flat spreader. Feather the edges at least 1/2 inch beyond the crack boundary to maximize surface adhesion.
- Curing: Leave the plastic sheet in place while the adhesive forms an initial bond (typically 2 to 4 hours). Underwater epoxy putties achieve full structural cure within 24 hours directly beneath the water column.
Fixing Leaks Around Pool Fittings, Skimmers, and Expansion Joints
The majority of swimming pool leaks do not originate in the open floor or walls. Instead, they occur at the transitions between dissimilar materials—specifically where plastic skimmers, metal light fixtures, and PVC plumbing penetrate the concrete shell.
Sealing Skimmers, Light Niches, and Return Jets
Concrete and plastic expand and contract at completely different rates during temperature changes. Over several seasons, this differential movement breaks the plaster seal around penetration points:
- Plastic Skimmer Throats: Skimmer separation is one of the most common pool leak sources. When the seam between the plastic skimmer mouth and the gunite shell cracks, water leaks directly into the deck foundation. To repair this, chisel away cracked plaster around the inner throat perimeter, clean the plastic faceplate, and pack the seam with two-part underwater pool putty or a high-modulus, non-sag polyurethane structural adhesive. If the skimmer faceplate uses gaskets, replace the compressed gasket and hand-tighten the screws using a cross-pattern sequence to ensure even compression without cracking the faceplate.
- Light Niches and Conduits: Water frequently enters the pool light niche and escapes through the open conduit pipe where the electrical cord travels back to the junction box. Because light conduits are rarely fully winterized, freeze-thaw cycles can crack underground conduit lines. To seal a leaking conduit, remove the light fixture from the wall, pull it up onto the deck, and pack moldable underwater pool putty or a flexible silicone plug directly into the back conduit opening around the cord.
- Return Jet Fittings: Threaded return fittings can loosen or crack over time. When resealing threaded pool fittings, avoid standard thin PTFE plumbing tape, which degrades quickly in chlorinated water. Instead, apply a heavy-duty, pool-safe elastomeric thread sealant designed to resist pool chemicals.
Expansion Joint Mastic Replacement
The expansion joint is the crucial gap located between the top of the concrete pool coping and the adjacent concrete pool deck. This joint allows the deck slab to expand, contract, and shift during hot summers and freezing winters without transferring lateral pressure into the pool shell.
Pool expansion joint mastic should be replaced every 3–5 years to prevent water infiltration and soil movement damage. When expansion joint mastic hardens, dries out, or pulls away from the coping stone, rain and pool splash-out drain directly into the soil beneath the deck. In cold climates, this trapped water freezes, expands, and heaves the pool deck upward, shearing the pool’s bond beam.
To maintain your expansion joint correctly:
- Strip out the old, degraded silicone or urethane sealant completely using a utility knife and joint scraper.
- Clean the concrete edges with a wire wheel and blow away all remaining dust.
- Insert a closed-cell polyethylene foam backer rod into the joint cavity. The backer rod should be sized roughly 25% wider than the gap and pushed down to a consistent depth of 1/4 to 3/8 inch below the surface. Important: The backer rod prevents “three-sided adhesion,” ensuring the poured sealant bonds only to the coping and deck edges. This allows the joint to stretch and compress freely without tearing.
- Fill the joint with a commercial-grade, self-leveling Concrete Sealant designed for pool environments. For examples of properly sealed perimeter coping joints, see our project showcasing Sealing Joints on Patio and Around Pool Coping in Sylvania, OH.
Frequently Asked Questions About Concrete Pool Leak Repair
How can I tell if my pool is leaking or just evaporating?
Natural evaporation varies widely based on regional humidity, wind exposure, direct sunlight, and water temperature. On hot, dry summer days, pools routinely lose 1.5 to 2 inches of water per week (up to 1/4 inch per day). To distinguish evaporation from an active leak, perform a 24-hour bucket test on your pool steps with the autofill turned off. If the pool water level drops faster than the water inside the test bucket, you have an active leak that requires repair.
What is hydraulic cement and when should it be used in pools?
Hydraulic cement is a fast-setting, non-shrink patching compound engineered to cure and expand underwater through an exothermic reaction. It sets in 3 to 5 minutes and expands slightly as it hardens, creating a watertight mechanical plug against weeping cracks and joints. Hydraulic cement is ideal for filling chiseled dovetail grooves in drained concrete pools and sealing leaks around masonry pipe penetrations. Because hydraulic cement dries to an industrial gray finish, it is typically coated with color-matched pool plaster or pool paint for aesthetic consistency once cured.
When to Call a Professional for Concrete Pool Leak Repair
While minor cosmetic plaster cracks and accessible fitting gaps can be patched using DIY pool putty, major structural issues require professional intervention. Contact a licensed specialist when:
- Water loss exceeds several inches per day, and dye testing does not reveal a surface crack.
- Cracks run continuously across the pool floor and extend up vertical walls, indicating active structural shifting.
- You suspect subterranean plumbing line failure, which requires acoustic listening equipment and pressure-testing isolation.
- Soil washout behind a leaking wall or under the coping has caused surrounding pool deck slabs to sink, tilt, or crack.
When leaking pool water erodes the underlying soil base, repairing the pool shell is only half the battle. FoamWorks Concrete Leveling uses high-density polyurethane foam injection to lift and stabilize settled pool decks for 30% to 50% less than the cost of full concrete tear-out and replacement. The closed-cell foam fills subterranean washouts, densifies the sub-base, and restores deck alignment in just a few hours with minimal disruption to your landscape.
Conclusion
Promptly repairing concrete pool leaks protects your investment, eliminates costly utility spikes, and stops subterranean soil washout before it undermines your pool shell and surrounding concrete patio. Whether you are patching minor fitting seams with underwater epoxy or reinforcing major structural cracks with hydraulic cement and structural staples, taking action at the first sign of water loss preserves the strength and longevity of your pool.
If previous pool leaks or poor soil compaction have left your pool deck uneven, sinking, or cracked, our team at FoamWorks Concrete Leveling is ready to help. With more than 30 years of concrete repair experience across Northwest Ohio, Southeast Michigan, and Northeast Indiana, we provide clean, fast, and permanent polyurethane foam leveling backed by a lifetime warranty. Contact us today for a free estimate on comprehensive Concrete Repair and restore the beauty and safety of your pool deck.