
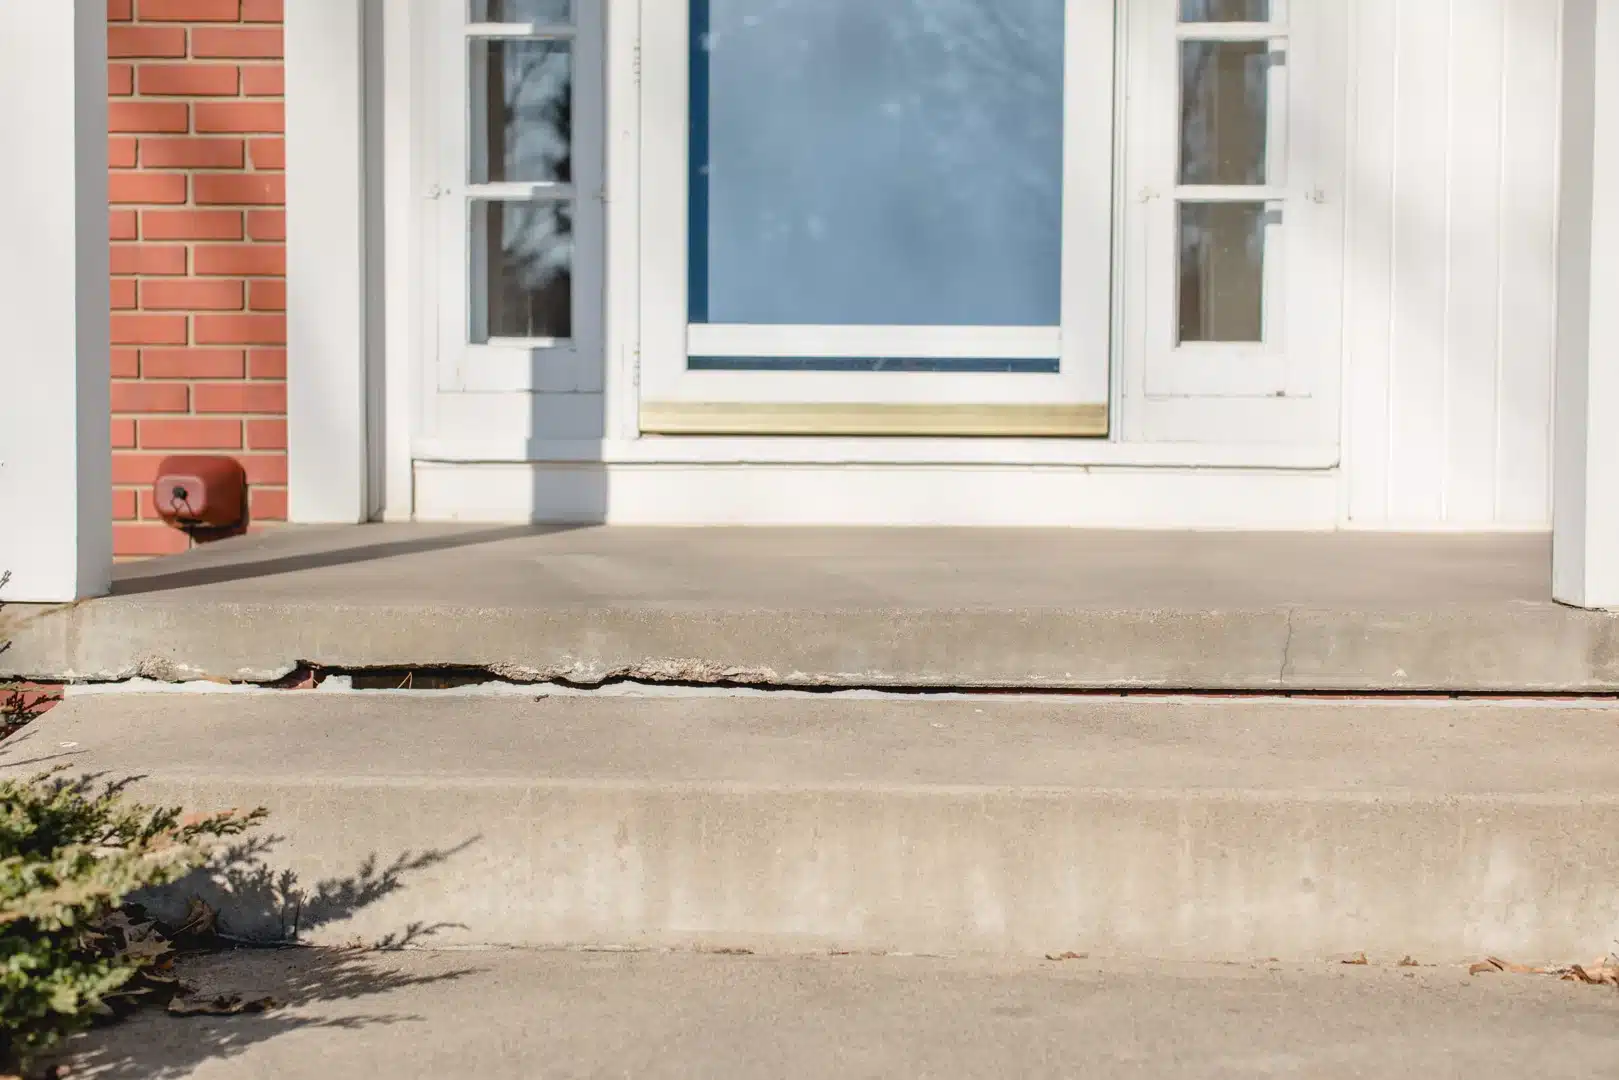
Start Cement Steps Repair Before Small Damage Becomes a Safety Problem
Cement steps repair starts with removing every loose piece of concrete, cleaning back to solid material, and using the right repair product for the damage. Seal hairline cracks with an exterior concrete crack filler. For flaking surfaces, chips, and shallow holes, use a polymer-modified patching mortar. Rebuild broken corners or front step edges with a simple wood form, a bonding agent, and a structural repair mix.
Do not patch over soft, hollow, or moving concrete. Crumbling often comes from water, freeze-thaw cycles, de-icing salts, and poor drainage. If the steps are sinking, uneven, deeply cracked, or separating from the porch, the problem may be below the concrete. Leveling the settled step can be a better fix than repeatedly patching the surface.
A durable repair depends on three basics:
- Chip away weak concrete until only solid concrete remains.
- Clean dust and debris, then dampen the surface without leaving standing water.
- Press the repair material firmly into place, add a non-slip broom texture, and protect it while it cures.
I am Trey McNamee, owner of FoamWorks Concrete Leveling, with more than two decades of experience in building-material strategy and product development and a team with over 30 years of concrete repair experience. In this guide, I will help you understand when cement steps repair is a practical DIY patch and when settled concrete needs professional leveling instead.
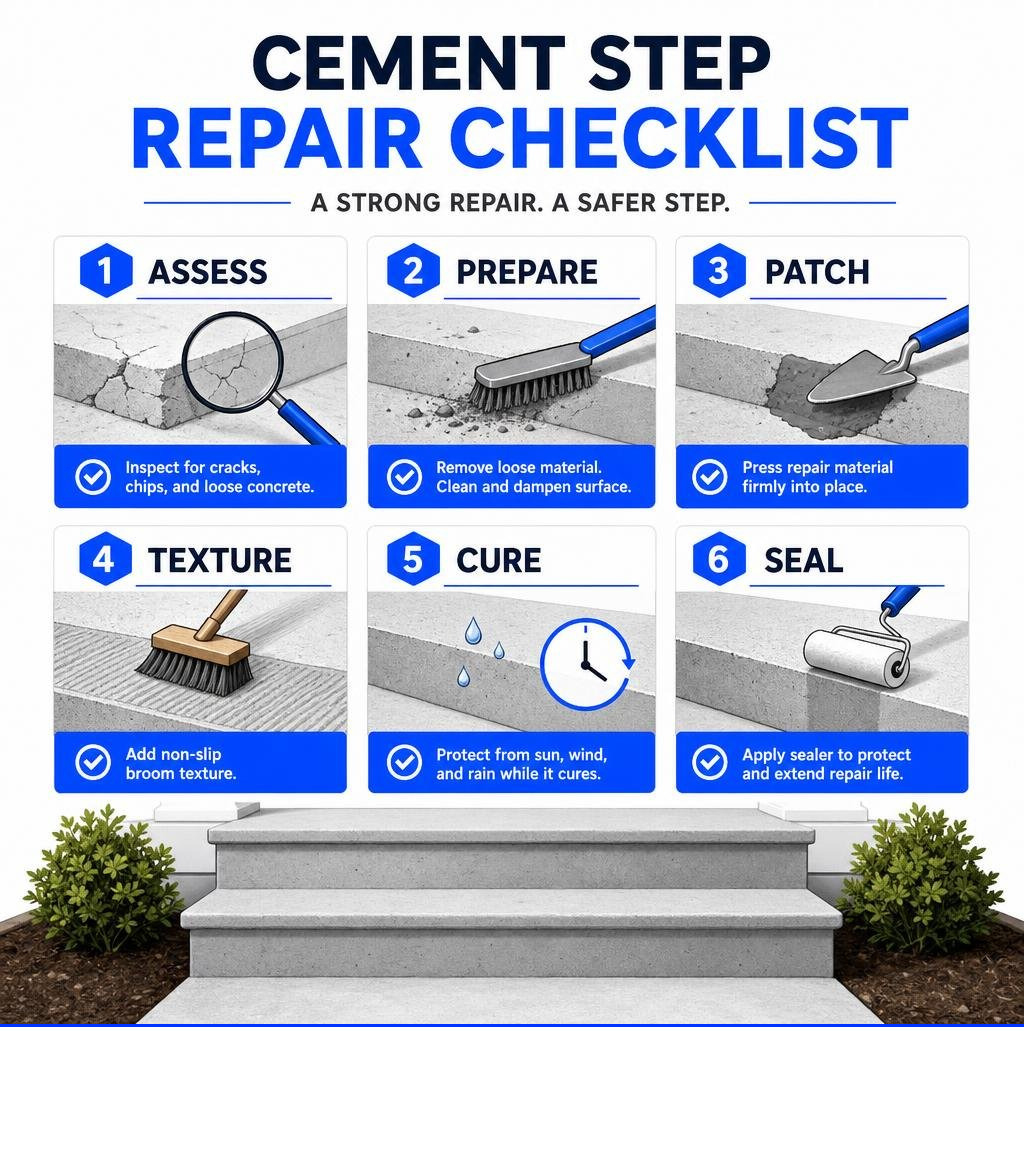
Basic cement steps repair terms:
Assessing the Damage: When Steps Need Repair, Leveling, or Replacement
Around 15% of homeowners experience some degree of concrete damage each year, and about 70% encounter cracks at some point. However, not every damaged staircase requires a sledgehammer and a full replacement. To choose the right repair approach, you must first evaluate the depth and cause of the deterioration.
A quick diagnostic check is the hammer sound test. Take a small masonry hammer and gently tap across the tread and riser surfaces. Solid, healthy concrete produces a sharp, high-pitched ringing sound. If you hear a dull, hollow thud, you have encountered subsurface delamination—meaning the top layer has detached internally and must be chipped away before any patch will hold.
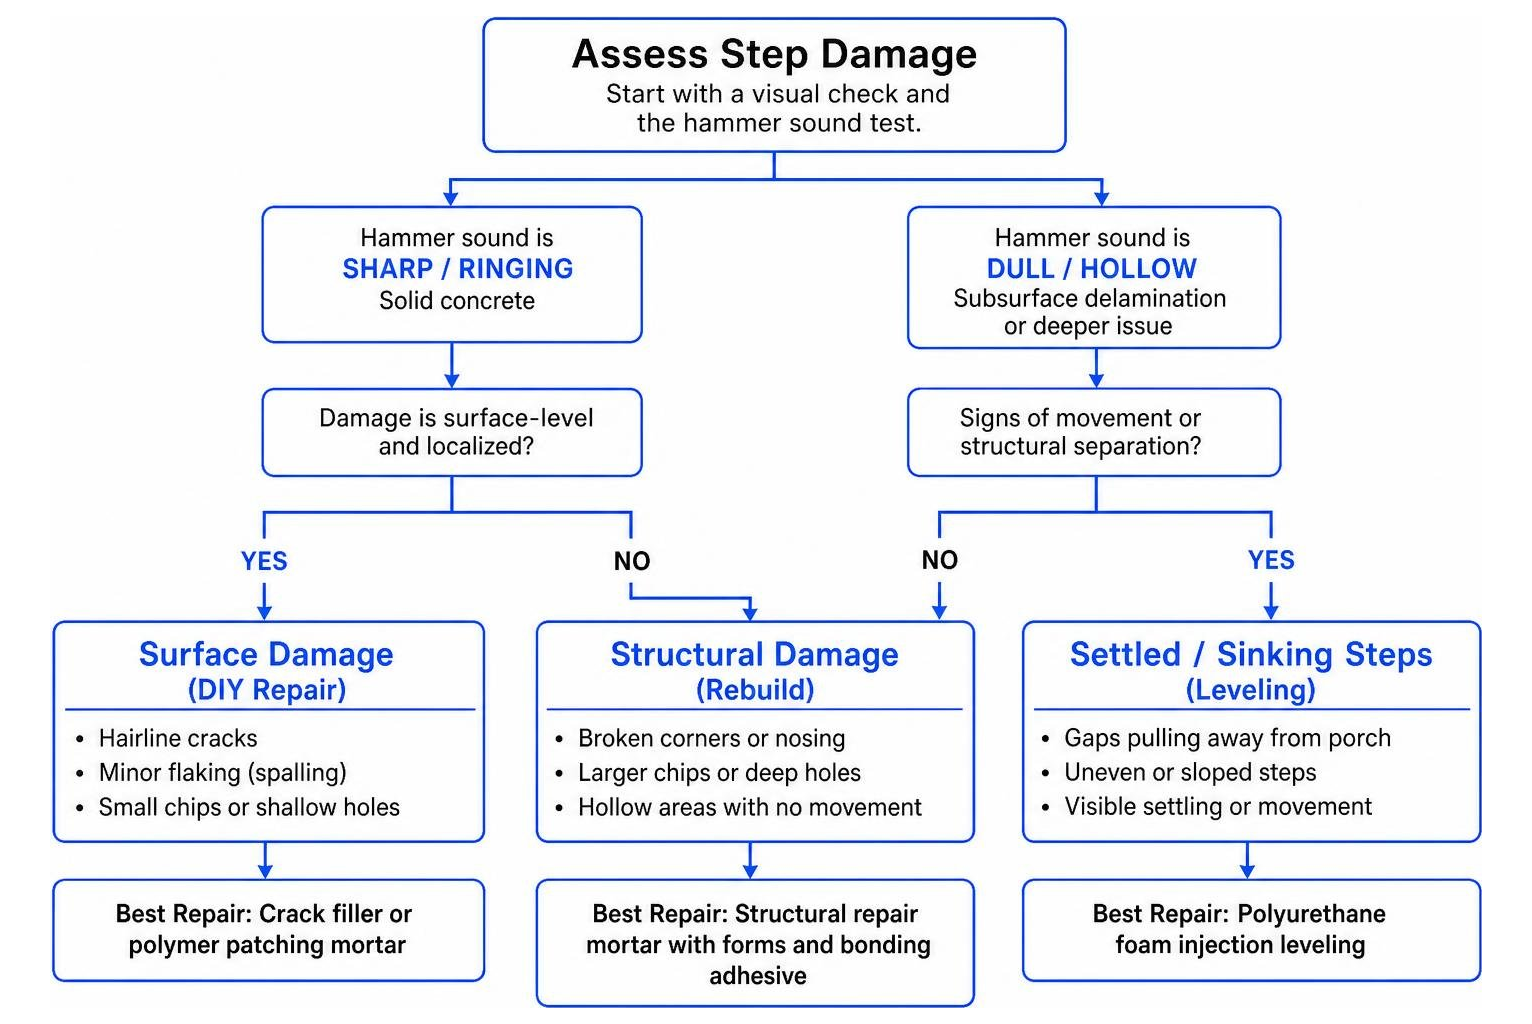
| Damage Type | Visual Symptoms | Best Repair Strategy |
|---|---|---|
| Hairline & Surface Cracks | Gaps under 1/4″ wide, minor surface flaking (spalling) | DIY elastomeric caulk, epoxy filler, or thin polymer patch |
| Broken Corners & Nosing | Chipped tread edges, shattered 90-degree corners | Structural repair mortar anchored with forms and bonding adhesive |
| Settled / Sinking Steps | Gaps pulling away from the porch, uneven risers, trip hazards | Polyurethane foam injection leveling (slab lifting) |
| Complete Structural Failure | Deep core fractures, crumbling base, severely tilted foundation | Full structural demolition and step replacement |
Before committing to a total tear-out, review our guide on lifting vs rebuilding concrete steps to save your porch to see how stabilizing the base can preserve your existing masonry structure.
Root Causes of Step Crumbling and Settling
Outdoor stairs face harsh conditions. Moisture enters the porous concrete matrix, and during winter, trapped water expands by roughly 9% in volume upon freezing. This internal expansion generates immense hydraulic pressure that breaks the chemical bonds of the cement paste, leading to surface flaking and spalled edges.
Chemical damage accelerates this process. Standard rock salt (sodium chloride) and harsh de-icers cause sub-florescence—a phenomenon where salt crystals recrystallize beneath the surface pores, prying the concrete apart from within. When water carries corrosive salts down to internal steel mesh or rebar, the metal oxidizes, expands, and blows out the face of the step.
Underneath the steps, poor downspout drainage and uncompacted soil create subterranean voids. As the supporting soil washes away or settles, the heavy concrete staircase shifts, cracks along stress lines, and pulls away from the home foundation. Learning more about the primary concrete repair causes helps prevent these issues from returning after you complete your repairs.
Step-by-Step Execution of Cement Steps Repair
Executing a long-lasting cement steps repair requires careful attention to safety, surface preparation, and timing. Always wear heavy-duty rubber gloves, eye protection, and an N95 dust mask when chipping or mixing dry cementitious powders.
Temperature is equally critical. Concrete repair compounds should be applied when ambient temperatures remain steadily between 50°F and 80°F for at least 24 to 48 hours. Applying patches during intense midday sun causes the mix to dry out prematurely, while freezing temperatures halt the chemical hydration reaction entirely.
Essential Tools and Materials for Cement Steps Repair
To ensure your patch holds under daily foot traffic, assemble the following tools and supplies before starting:
- Mechanical Prep Tools: Cold chisel, 2-lb sledgehammer, stiff wire brush, shop vacuum with HEPA filtration.
- Formwork Supplies: 1×2 or 2×4 lumber, wood screws, duct tape, release agent (vegetable oil or commercial form release), C-clamps or concrete paver weights.
- Chemical Bonding Agents: Exterior-grade acrylic-latex bonding adhesive or SBR (styrene-butadiene rubber) bonding slurry.
- Repair Mortars: Polymer-modified structural patching mortar or quick-setting cement (avoid standard gravel-heavy concrete mixes for thin patches).
- Finishing Tools: Margin trowel, magnesium float, concrete edging tool, and a stiff-bristled masonry texturing brush.
- Safety Gear: Heavy work gloves, safety glasses, knee pads, and dust mask.
For a detailed review of high-performance polymer mortars, check out the recommendations in How to Repair Crumbling Cement Steps.
Substrate Preparation and Bonding Primer
More than 80% of failed DIY patches fail because of poor surface preparation rather than a bad product. You cannot stick new mortar to loose gravel or powdery laitance.
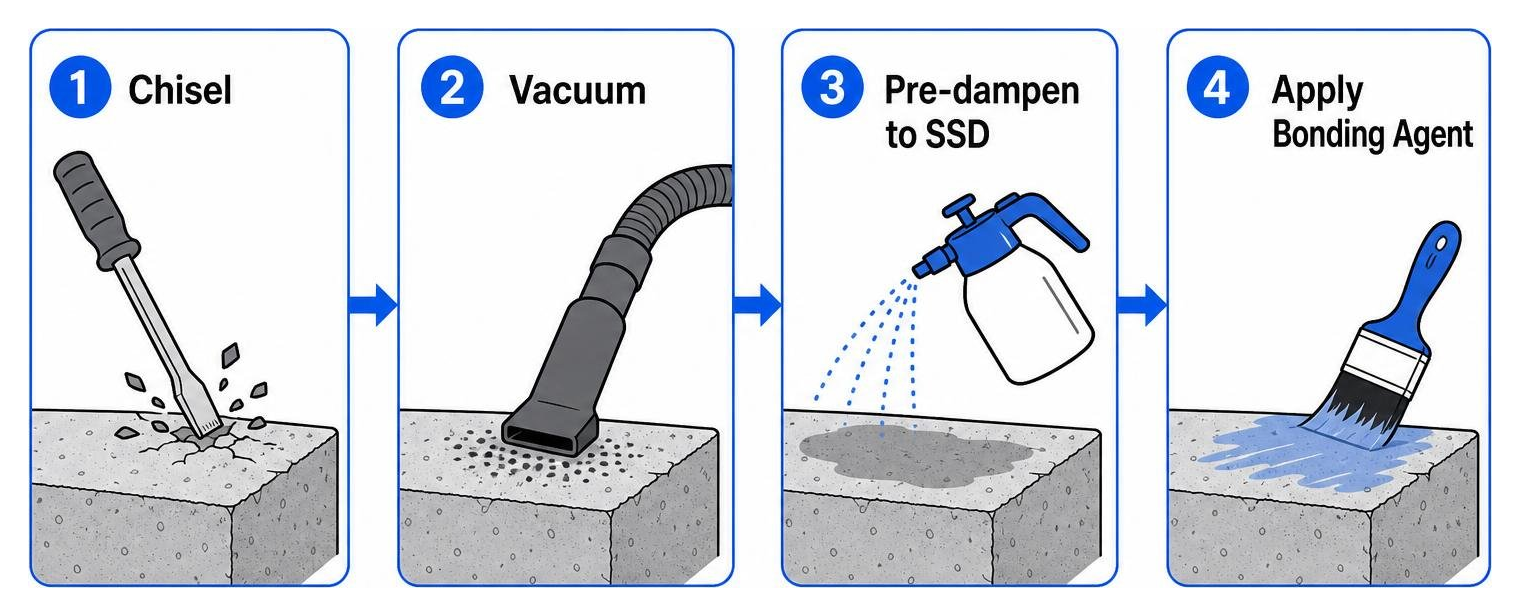
- Scabbling and Chiseling: Use your cold chisel and hammer to chip away all soft, deteriorated concrete until you expose sound, solid aggregate that rings clear when struck.
- Dust Removal: Vigorously scrub the area with a wire brush, then vacuum every trace of fine carbonation dust from the open pores using a shop vac.
- Degreasing: If motor oil, tree sap, or grime is present, wash the area with a mild degreaser or TSP solution, then rinse thoroughly.
- Saturated Surface Dry (SSD) Condition: Concrete acts like a rigid sponge. If you apply wet mortar to bone-dry concrete, the dry slab will instantly suck water out of the patch, ruining the cure. Mist the concrete with clean water until saturated, then wipe away any standing puddles.
- Applying the Bonding Primer: Paint a liberal coat of liquid acrylic bonding adhesive onto the damp surface. Apply the repair mortar while the bonding agent is still tacky to the touch (like the back of a Post-it note) using a “wet-on-wet” application technique.
Rebuilding Broken Corners and Nosings with Formwork
When a step corner breaks off, troweling mortar into free air will cause it to sag. Constructing a simple temporary form provides a rigid wall to pack against.
For a corner repair, screw two pieces of 1×2 or 2×4 lumber together to create an L-shaped corner bracket. Coat the inside face of the wood with cooking oil or commercial form release so the curing cement will not stick to the wood grain. Clamp the form against the side and riser of the step, or brace it firmly using heavy concrete blocks or sandbags, ensuring the top of the wood sits flush with the tread surface.
For voids larger than a baseball, install mechanical anchors. Drill two or three 3/8-inch pilot holes roughly 2 to 3 inches deep into the sound concrete face, and drive in stainless steel Tapcon screws, leaving about 1/2 inch of the screw head exposed. This creates a steel skeleton that anchors the new patch directly to the old step. Learn additional corner anchoring tricks from How to Repair Broken Corner of Cement Step.
Applying, Texturing, and Non-Slip Finishing
Mix your polymer-modified repair mortar with clean water according to the manufacturer’s exact specifications until it reaches a stiff, peanut-butter consistency.
- Back-Buttering: Take a small amount of mortar and firmly smear it into the pores of the host concrete using the flat edge of your margin trowel to eliminate microscopic air pockets.
- Packing the Void: Pack the mortar into the wooden form in 1- to 2-inch increments, tamping each layer firmly with the trowel handle to compress the mix.
- Screeding: Slightly overfill the form, then draw a straight wooden block or straight-edge trowel across the top of the formwork to level the surface flush with the existing step tread.
- Edge Rounding: Use an edging tool along the perimeter to create a slight radius; sharp 90-degree mortar corners chip easily under foot traffic.
- Non-Slip Texturing: After about 15 minutes, once the wet sheen has evaporated from the surface, pull a stiff-bristled masonry brush or clean broom lightly across the tread in a single direction perpendicular to foot traffic. A smooth trowel finish creates a dangerous slipping hazard when wet.
Curing and Preventing Future Damage
Portland cement does not harden through simple water evaporation; it gains strength through a chemical reaction called hydration, where microscopic calcium-silicate-hydrate crystals interlock within the mortar matrix.
If moisture escapes the patch too quickly, hydration stops, leaving behind a brittle, chalky repair prone to early cracking.
Curing and Sealing Protocols for Cement Steps Repair
Keep the repaired patch covered with plastic sheeting or damp burlap for at least 48 hours following application, lightly misting it with water twice daily if temperatures are warm. While the repair will handle light foot traffic after 24 to 48 hours, full structural compressive strength develops over a standard 28-day hydration period.
Once the 28-day cure is complete, protect your work by applying a penetrating silane-siloxane sealer. Unlike topical acrylic clear coats that trap moisture and peel, silane-siloxane chemically bonds within the pores of the concrete. It creates a hydrophobic barrier that stops liquid water and road salts from entering while remaining 100% vapor-permeable, allowing internal ground moisture to escape harmlessly. Reapply this sealer every 2 to 3 years to maximize durability.
Winter Protection and Salt-Free Maintenance
To protect your newly repaired steps through harsh winters across Northwest Ohio, Southeast Michigan, and Northeast Indiana, follow these seasonal maintenance habits:
- Avoid Rock Salt (Sodium Chloride): Never use standard rock salt on steps repaired within the past year. Use plain sand for traction or apply calcium magnesium acetate (CMA), which is far less corrosive to cementitious binders.
- Seal Seasonal Expansion Joints: Regularly inspect the joints where the steps meet the walkway or porch. Seal open gaps using high-grade polyurethane joint sealant to prevent water from running under the slab foundation.
- Divert Gutter Downspouts: Ensure gutters and roof valleys do not discharge water directly onto the top step or wash out the soil along the base of your stairs.
Frequently Asked Questions About Concrete Step Restoration
How long before I can walk on repaired concrete steps?
For minor polymer patches and thin crack repairs, avoid all foot traffic for at least 24 hours. For deep structural corner reconstructions and nosing pours, keep the wooden forms in place for 24 to 48 hours, and restrict heavy foot traffic for 48 to 72 hours to prevent disturbing the newly forming crystal bonds.
Can I use regular mortar mix to fix broken step corners?
No. Standard Type N or Type S masonry mortar is formulated strictly for laying brick or block joints. It lacks the tensile strength, adhesive polymers, and abrasion resistance required to withstand horizontal shear stress from descending foot traffic. Using standard mortar without polymer fortifiers almost always leads to edge shrinkage, bond failure, and premature cracking.
What should I do if my concrete steps are sinking away from the porch?
If your entire staircase is tilting forward, pulling away from the foundation wall, or creating an uneven bottom riser, surface patching will not solve the problem. The underlying soil has settled or washed out, leaving open voids beneath the concrete base.
Instead of expensive demolition and replacement, settled steps can be lifted back into their original position. We use high-density polyurethane foam injection—drilling penny-sized holes through the slab and expanding structural polymers beneath the steps. This process fills hidden voids, compacts the loose sub-base, and raises the heavy masonry back to its proper alignment in just a few hours.
Review our guide on raising sinking concrete steps before they downfall and see how high-density PolyLevel injection restores safety without disrupting your landscape.
Restoring Safety and Stability to Your Entryway
Taking care of chipped corners, spalled treads, and hairline cracks early protects your concrete steps from severe winter freeze-thaw damage while keeping your entryway safe for family and guests. With proper chiseling, surface saturation, acrylic bonding adhesives, and a non-slip broom finish, high-strength DIY repairs can easily last for years.
However, if you notice deep foundational cracks, hollow voids beneath the base, or steps pulling away from the porch, surface mortar alone cannot support the load. FoamWorks Concrete Leveling uses precision polyurethane foam injection to lift, level, and stabilize sunken steps for 30% to 50% less than the cost of full tear-out and replacement. Most lifting projects take just a few hours, cause no landscape damage, and can be walked on immediately.
If you are dealing with sunken, uneven stairs anywhere in Northwest Ohio, Southeast Michigan, or Northeast Indiana, contact our team today for a free inspection and discover our permanent concrete repair solutions.