

Why Concrete Steps Sink: Root Causes and Assessment
Concrete steps can weigh anywhere from several hundred to thousands of pounds. When the ground underneath those steps weakens, the heavy concrete shifts downward or tilts toward the house. Understanding how to fix sinking concrete steps begins with identifying the underlying soil conditions causing the movement.
The primary causes of step settlement include:
- Uncompacted Backfill Soil: During original home construction, workers excavate soil around the foundation. When backfilling that dirt, failure to compact it thoroughly in layers leaves loose soil. Over time, gravity pulls the dirt tight, creating empty voids under entry steps.
- Subsurface Water Erosion: Water running from downspouts or roof valleys washes away fine soil particles underneath the slab.
- Freeze-Thaw Cycles: Winter freeze-thaw cycles expand and contract soil moisture, causing the ground to heave and drop repeatedly.
- Expansive Clay Soils: In our region across Northwest Ohio and Southeast Michigan, heavy clay soils swell when wet and shrink during dry summer periods, leaving steps unsupported.
- Lack of Foundation Dowels or Footings: Steps poured without proper footings below the local frost line (or without steel rebar pinning them into the main foundation) sink independently as subgrade soils settle.
Identifying Soil Settlement, Erosion, and Drainage Issues
Soil erosion underneath entrance steps usually leaves visible clues. Look for hollow pockets around the base of the concrete, soil washouts after heavy rainstorms, or downspouts discharging within two feet of the stairs. Water flowing near the step seams causes an erosion process known as “piping,” where rushing water carves underground channels and carries away subgrade dirt.
To read a detailed breakdown on diagnosing soil erosion around entryways, review our How to Repair Sagging Steps on Settled Driveway Guide. Addressing nearby downspouts and landscape grading is an essential first step before executing structural repairs.
The Tape Test: Assessing Active vs. Stabilized Sinking
Before choosing a repair method, you must know whether your steps are actively sinking or if the movement stabilized years ago. You can perform a simple “tape test” at home:
- Clean the concrete surface across any prominent crack or expansion joint between the steps and your porch or foundation wall.
- Stretch a piece of durable, non-stretching tape (such as painter’s tape or structural masking tape) tightly across the crack.
- Date the tape and inspect it weekly over a period of 4 to 8 weeks.
If the tape tears, wrinkles, or stretches, ground movement is actively occurring, and the soil beneath requires deep stabilization. If the tape remains unchanged, the concrete has likely finished settling on its base. Additionally, place a long level straightedge across the step treads to measure total displacement in inches. Steps can sink as much as 4 to 6 inches over a 30-year period due to long-term soil consolidation.
How to Fix Sinking Concrete Steps: Choosing the Right Repair Method
Once you assess the damage, you must choose a structural repair strategy. Homeowners dealing with sunken steps generally weigh three main approaches: traditional mudjacking, polyurethane foam injection (polyjacking), or complete tear-out and repouring.
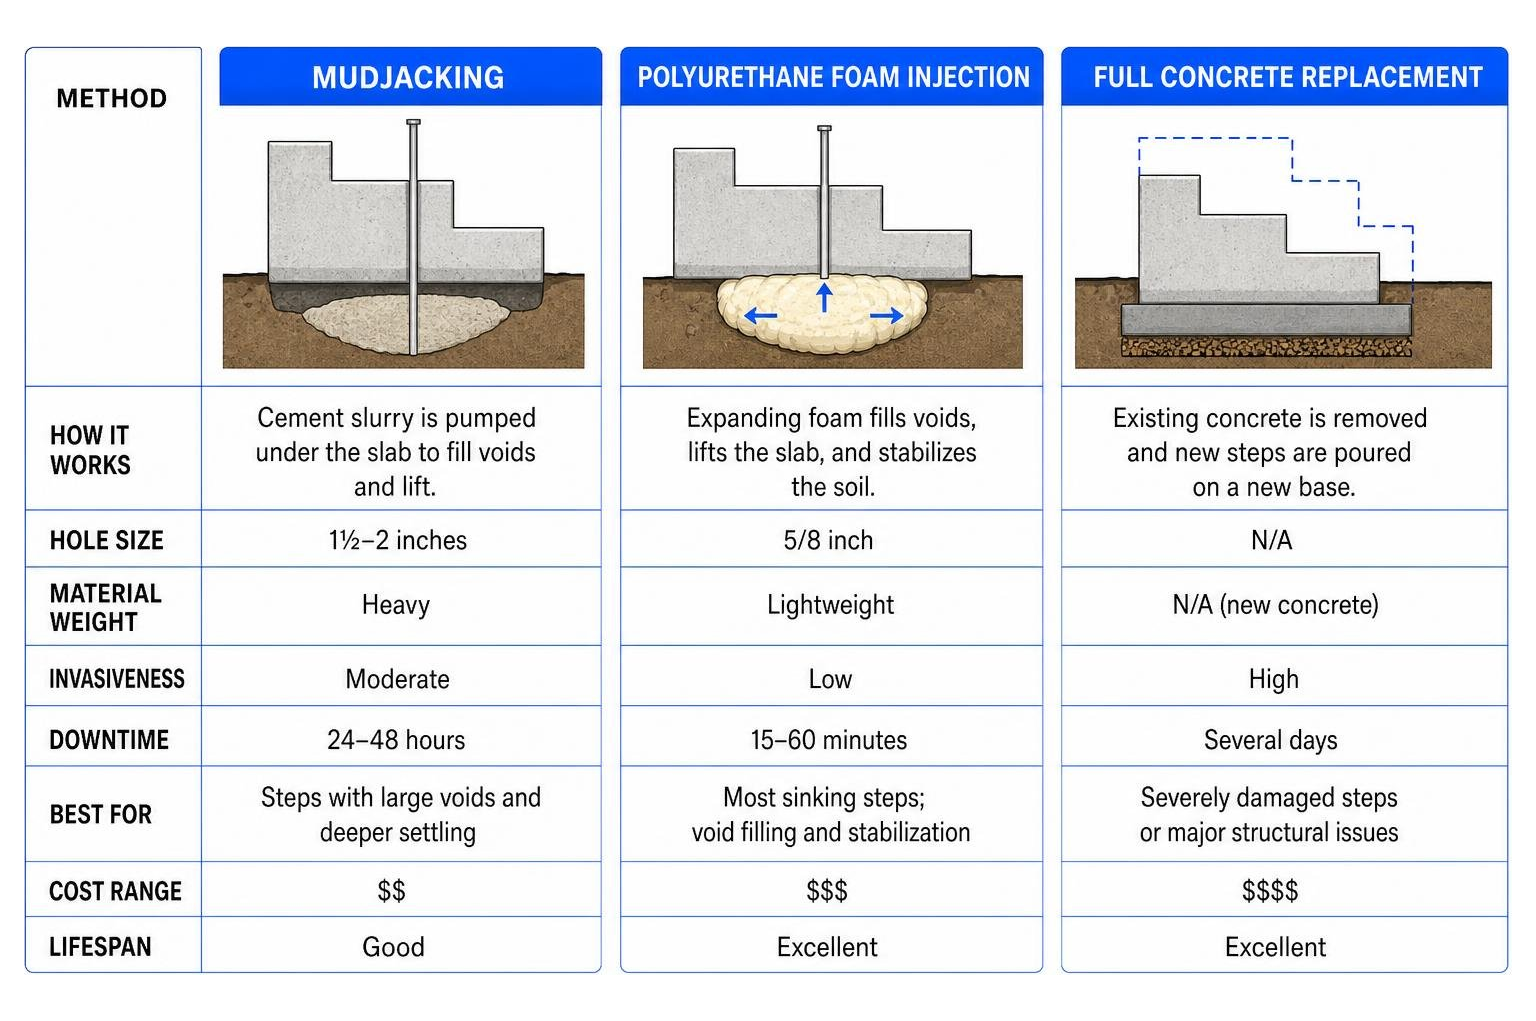
Comparing Mudjacking, Polyurethane Foam, and Total Replacement
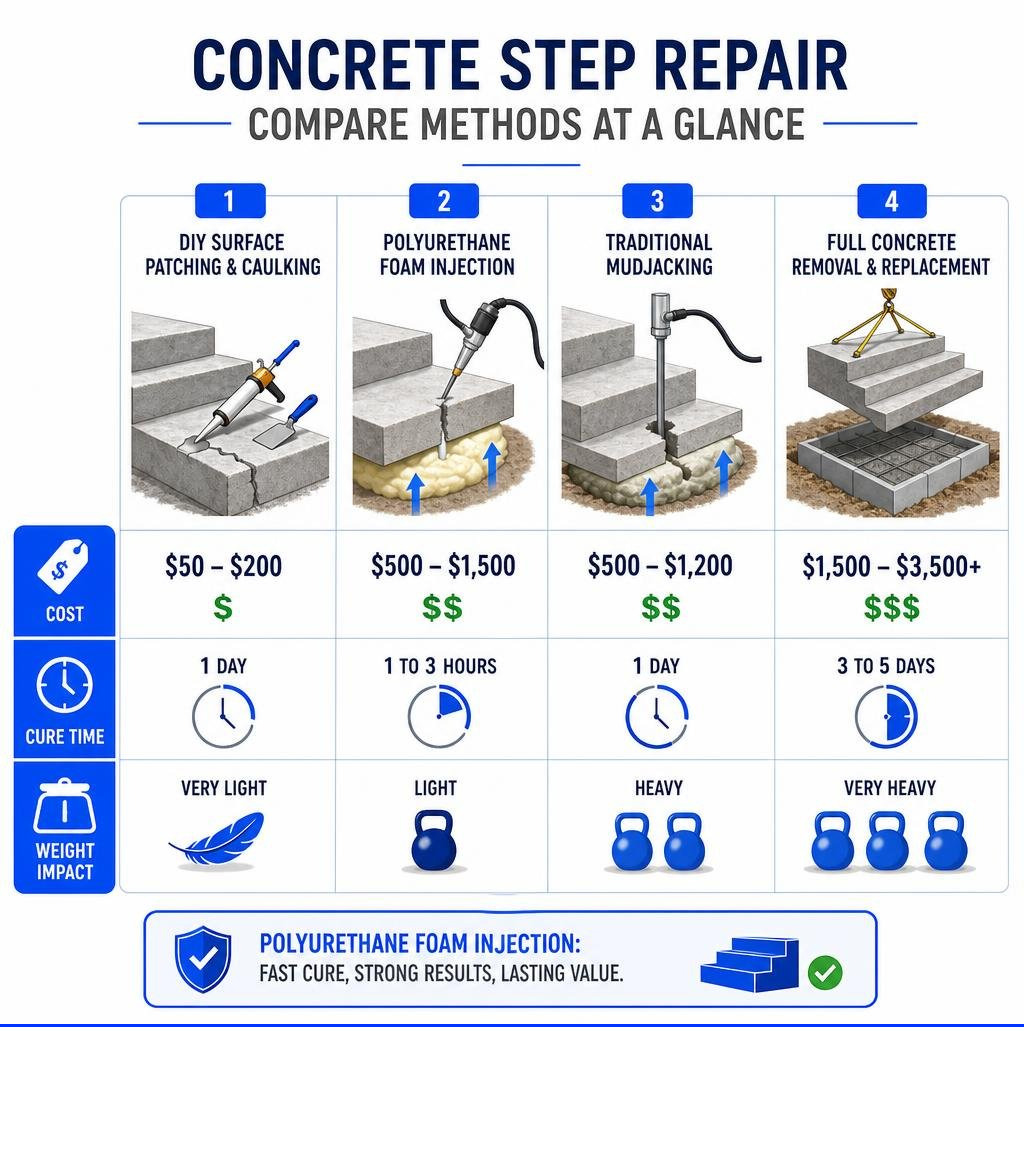
Choosing the best repair option requires looking at material weight, hole sizes, cost, and long-term performance:
- Polyurethane Foam Injection: High-density expanding resin is injected under the steps through tiny 5/8-inch holes. The lightweight foam expands, filling 100% of subsurface voids and lifting heavy concrete steps back to grade. Polyurethane weighs only 3 to 5 pounds per cubic foot, so it adds almost no extra load to weak subgrade soils.
- Mudjacking (Slabjacking): Pumping a slurry mixture of sand, cement, topsoil, and water beneath settled concrete requires drilling large 2-inch holes through your steps. Mudjacking slurry weighs over 100 pounds per cubic foot. Adding thousands of pounds of heavy slurry onto weak soil can trigger secondary settlement down the road.
- Total Demolition and Replacement: Ripping out old steps requires heavy jackhammers, excavation, complex wooden form building, high labor costs, and days of cure time. Total replacement costs significantly more and takes longer to complete.
To explore professional leveling options, check out our Concrete Leveling Services page. If you want to learn more about the step-by-step repair process, refer to this useful Fix Sinking Concrete Steps Guide.
Can You Build Wood Steps Over Sunken Concrete?
Homeowners often ask if they can cover sunken concrete stairs by building a set of wooden steps right over them. While it seems like a quick cosmetic fix, anchoring wooden framing directly onto unstable, sunken concrete is a risky idea.
If the underlying soil continues to erode, the wooden frame will sink and tilt right alongside the concrete base. Trapping wooden framing over wet, sunken concrete also holds moisture against the wood, causing rapid rot, mold growth, and insect infestation. If you choose to construct wooden steps over old concrete, the frame must be independently supported by structural side posts set into deep concrete footings beneath the frost line, rather than resting weight on the settled stairs. To learn more about fixing wobbly steps safely, read this guide on Repair Wobbly Concrete Steps Solutions.
Step-by-Step Guide: Lifting Concrete Steps with Foam Injection
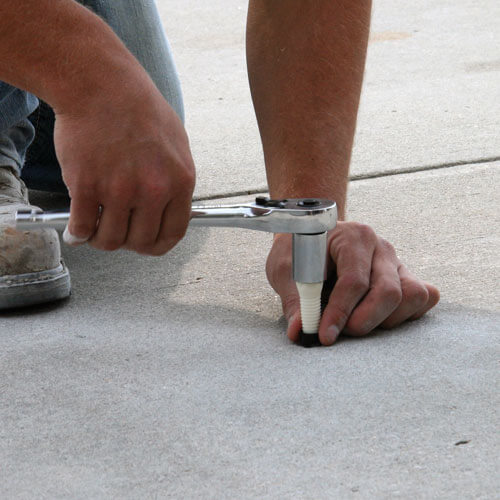
Polyurethane foam injection provides a precise, permanent method for raising sunken entry steps without damaging your surrounding yard. High-density closed-cell polyurethane resins expand with tremendous hydraulic force, stabilizing soft sub-grade soils while lifting multi-ton structures back into alignment.
How to Fix Sinking Concrete Steps with Polyurethane Foam Injection
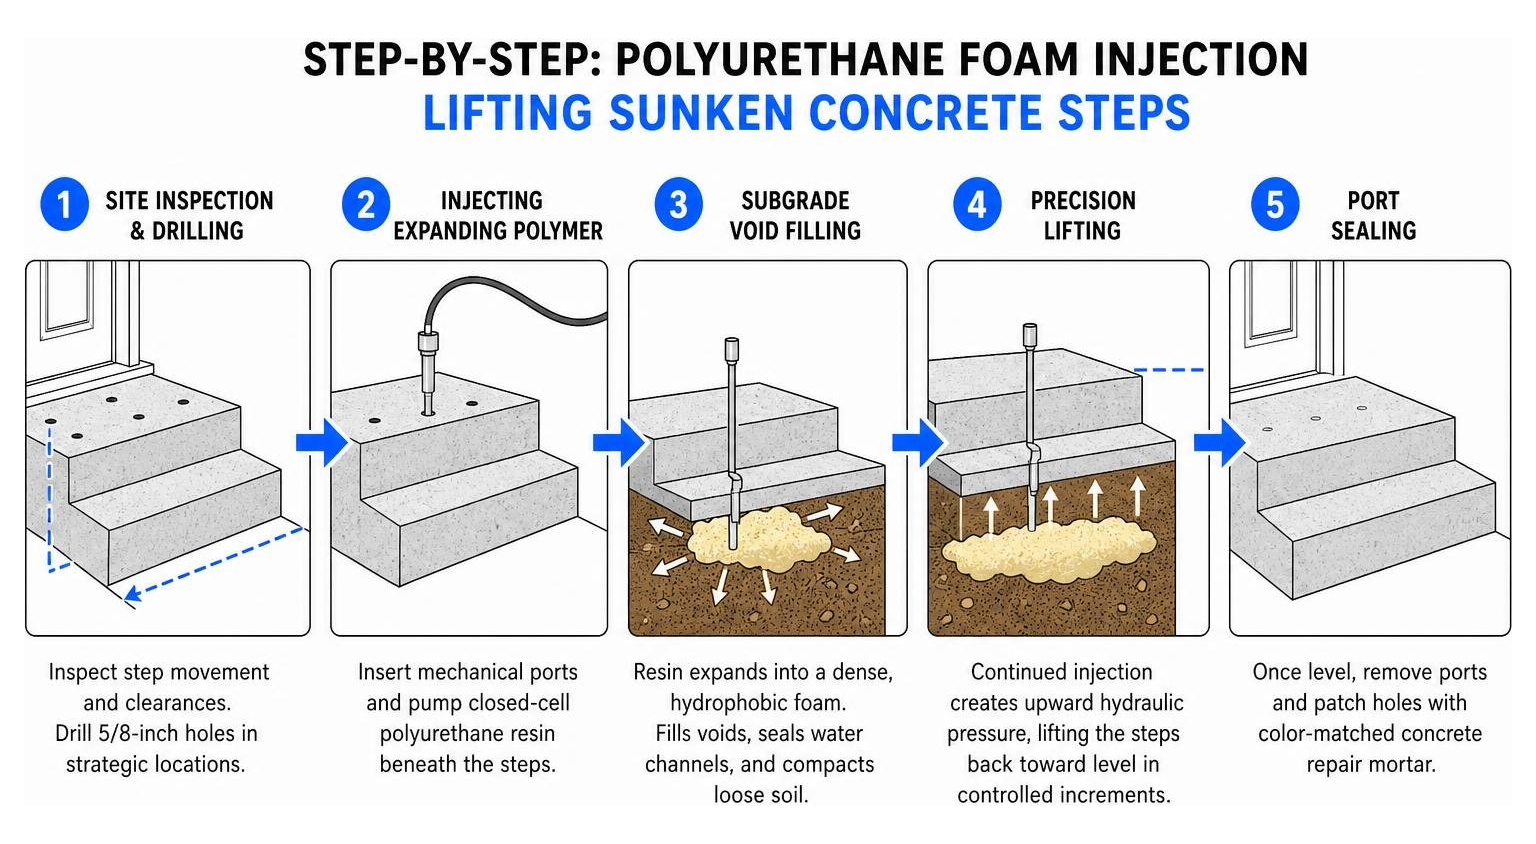
When our team arrives to lift settled steps, we follow a rigorous step-by-step stabilization process:
- Site Inspection & Drilling: We inspect step movement, check porch entry clearances, and drill discreet 5/8-inch injection ports into strategic locations on the concrete steps.
- Injecting Expanding Polymer: We insert specialized mechanical injection ports into the drilled holes. Our crew then pumps closed-cell polyurethane resin beneath the slab.
- Subgrade Void Filling: As the two-part liquid resin mixes beneath the steps, it rapidly expands into a dense, hydrophobic foam. It fills underground voids, seals off water channels, and compacts loose base soil.
- Precision Lifting: Continued injection creates upward hydraulic pressure, lifting the concrete steps back toward level in controlled increments.
- Port Sealing: Once the steps reach proper alignment and height, we remove the injection ports and patch the small drill holes using color-matched concrete repair mortar.
For a detailed breakdown of how our high-density resin works, visit our dedicated Polyurethane Foam Injection service page.
DIY Minor Concrete Step Repair vs. Professional Lifting
While structural step lifting requires specialized hydraulic machinery and expanding polymers, homeowners can easily complete minor cosmetic repairs, surface spalling patches, and crack sealing on their own.
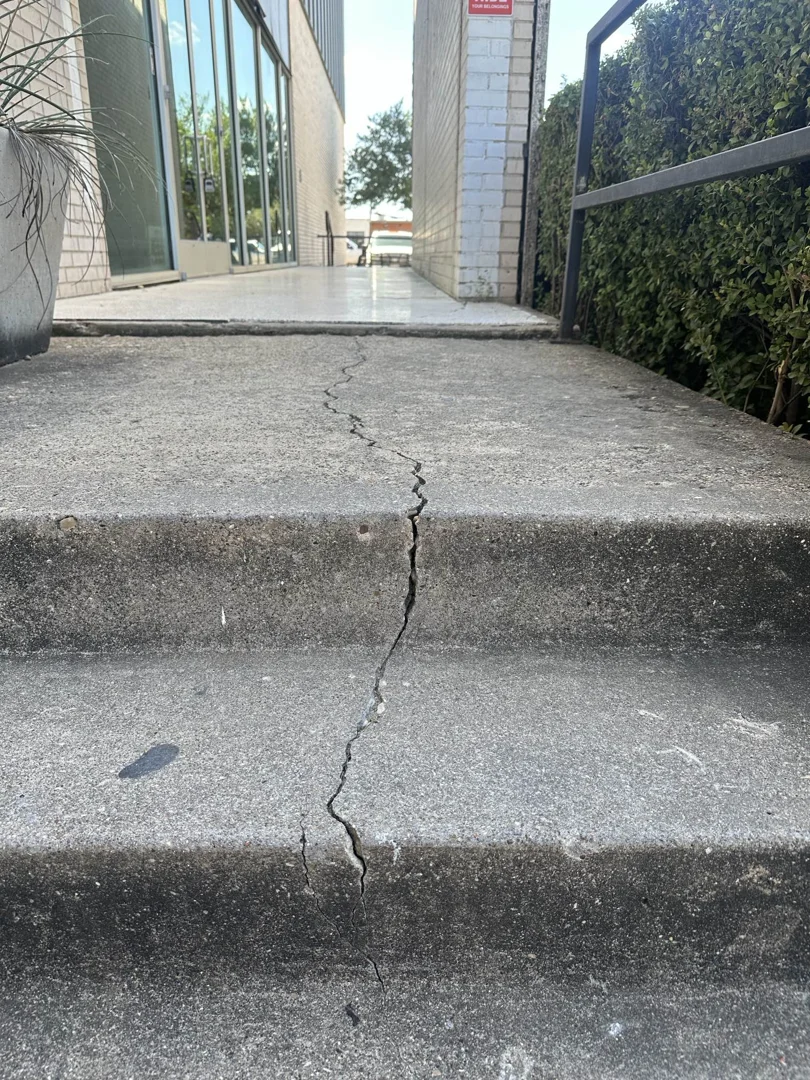
If your concrete steps have small hairline cracks, surface erosion, or chipped step noses, you can complete DIY repairs using basic tools:
- Personal Protective Equipment (safety goggles, dust mask, heavy work gloves)
- Cold chisel and hammer (or wire wheel attachment) to remove loose concrete debris
- High-pressure washer (minimum 2,000 PSI) to clean oil, dirt, and moss
- Polymer-modified repair mortar or high-strength structural epoxy filler
- Liquid acrylic bonding agent to prevent cold joints
- High-grade exterior polyurethane or silicone masonry caulk
- Steel trowel, margin trowel, and a damp texture sponge
For DIY surface repairs:
- Chisel away all flaking or crumbling concrete until you reach solid aggregate.
- Clean out cracks thoroughly using a vacuum or compressed air.
- Apply a liquid acrylic bonding agent over dry, clean concrete.
- Trowel polymer-modified repair mortar into damaged areas, pack it firmly, and shape the tread nose using a steel trowel.
- Seal joints and cracks using flexible polyurethane sealant to block rain and meltwater.
To learn more about tackling surface patches around your home, review our helpful guide on DIY Concrete Step Repair Guide.
Costs, Lifespan, and Preventive Maintenance
Understanding total project costs and expected repair lifespans helps homeowners make informed decisions for their properties.
Comparing Repair Costs and Expected Lifespan
DIY material repairs for crumbling step edges usually range from $50 to $200, but surface patches do not raise sunken structures. Professional step repairs vary depending on the method chosen, structural weight, and soil conditions:
| Repair Method | Average Cost Range | Typical Duration | Expected Durability / Lifespan |
|---|---|---|---|
| DIY Surface Patching & Caulking | $50 – $200 | 1 Day | 5 to 10 Years |
| Professional Polyurethane Foam Injection | $500 – $1,500 | 1 to 3 Hours | 10 to 15+ Years (or Lifetime) |
| Traditional Mudjacking | $500 – $1,200 | 1 Day | 5 to 10 Years |
| Full Concrete Removal & Replacement | $1,500 – $3,500+ | 3 to 5 Days | 20+ Years |
Polyurethane foam injection typically costs 30% to 50% less than complete demolition and repouring. Because foam cures within 15 to 30 minutes, homeowners can walk on their newly leveled steps almost immediately after work is completed. If you live near Toledo or surrounding communities, read our real-world case study on Porch Repair and Step Lifting in Maumee, OH.
Preventive Maintenance to Stop Future Step Settlement
After lifting or repairing your concrete steps, adopting routine maintenance prevents water erosion from undermining your subgrade soil:
- Seal Concrete Expansion Joints: Apply exterior-grade polyurethane or silicone concrete sealant across all open gaps between your steps, front porch, and house foundation.
- Apply Hydrophobic Penetrating Sealers: Coat exterior steps every 2 to 3 years with a breathable silane-siloxane sealer to block water penetration and protect against freeze-thaw spalling.
- Extend Downspout Discharges: Ensure downspout elbows discharge water at least 5 feet away from your entry steps and house foundation walls.
- Correct Landscape Grading: Maintain a positive landscape slope away from your concrete steps (aim for a slope drop of at least 1 inch per foot).
- Avoid De-Icing Salts: Use sand or cat litter for winter traction instead of aggressive chemical de-icers, which break down concrete matrices and sealants.
For a deeper dive into protecting concrete step surfaces from environmental damage, read this guide on Fixing Crumbling Concrete Steps Guide.
Frequently Asked Questions About Sinking Concrete Steps
Is concrete step sinking a structural emergency?
While a sunken entry step is rarely a house collapse hazard, it constitutes a serious safety issue and trip risk. Uneven step riser heights violate residential building safety codes and increase fall risks for guests and family members. Additionally, sunken steps tilt inward toward the house, directing rainwater and snowmelt into your porch foundation, crawlspace, or basement walls. Addressing sunken steps early prevents water intrusion and foundation damage down the road.
How long does polyurethane foam leveling last?
Polyurethane foam injection repairs generally last 10 to 15+ years, often outlasting the surrounding concrete slab itself. Closed-cell expanding foam is completely hydrophobic, meaning it will never wash away, dissolve in groundwater, or break down in wet soil conditions. At FoamWorks Concrete Leveling, our structural foam injection services come backed by a lifetime warranty, ensuring your steps stay level and stable.
Can I fill the gap under my sinking steps with mortar?
Filling subterranean voids beneath sunken steps with rigid cement mortar or quick-mix concrete is not recommended. Mortar adds substantial dead weight (over 100 pounds per cubic foot) onto already unstable subgrade soil without stabilizing the base underneath. Over time, that added weight accelerates soil settlement, causing the concrete steps to sink further while opening wider gaps beneath your entry porch. Lightweight polyurethane foam is required to lift the structure and support subgrade soils without adding excess weight.
Conclusion
Understanding how to fix sinking concrete steps boils down to fixing subgrade water erosion and restoring structural soil support beneath your entry porch. Attempting temporary cosmetic cover-ups or pouring heavy mortar into open gaps only delays necessary fixes and can accelerate ground settlement.
At FoamWorks Concrete Leveling, our team provides fast, minimally invasive polyurethane foam injection leveling across Northwest Ohio, Southeast Michigan, and Northeast Indiana. We fix sunken steps for 30% to 50% less than full concrete replacement, restoring your curb appeal and safety in just a few hours.
Protect your entryway from ongoing structural settlement. Contact our experienced repair team today to schedule your free estimate and learn more about our Professional Concrete Repair Services.