
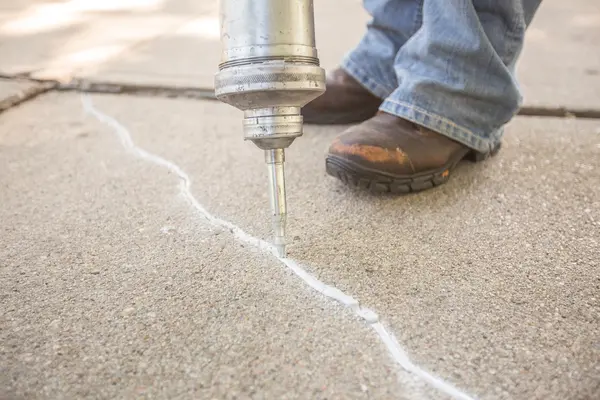
How Concrete Epoxy Injection Repairs a Crack
Concrete epoxy injection bonds the two sides of a stable crack. First, clean the crack and nearby concrete. Set injection ports along the crack, seal the surface between them, and let the seal harden. Then inject epoxy from the lowest port on a wall, or from one end of a slab, moving to the next port as epoxy reaches it. Let the epoxy cure before removing the ports and seal.
Check the cause of the crack before starting. Epoxy will not stop ongoing foundation movement, and an active water leak needs a different approach.
I’m Trey McNamee, owner of FoamWorks Concrete Leveling. My background includes more than 20 years in building-materials marketing and product development; in this guide, I’ll explain when concrete epoxy injection fits a crack repair and how the process works.
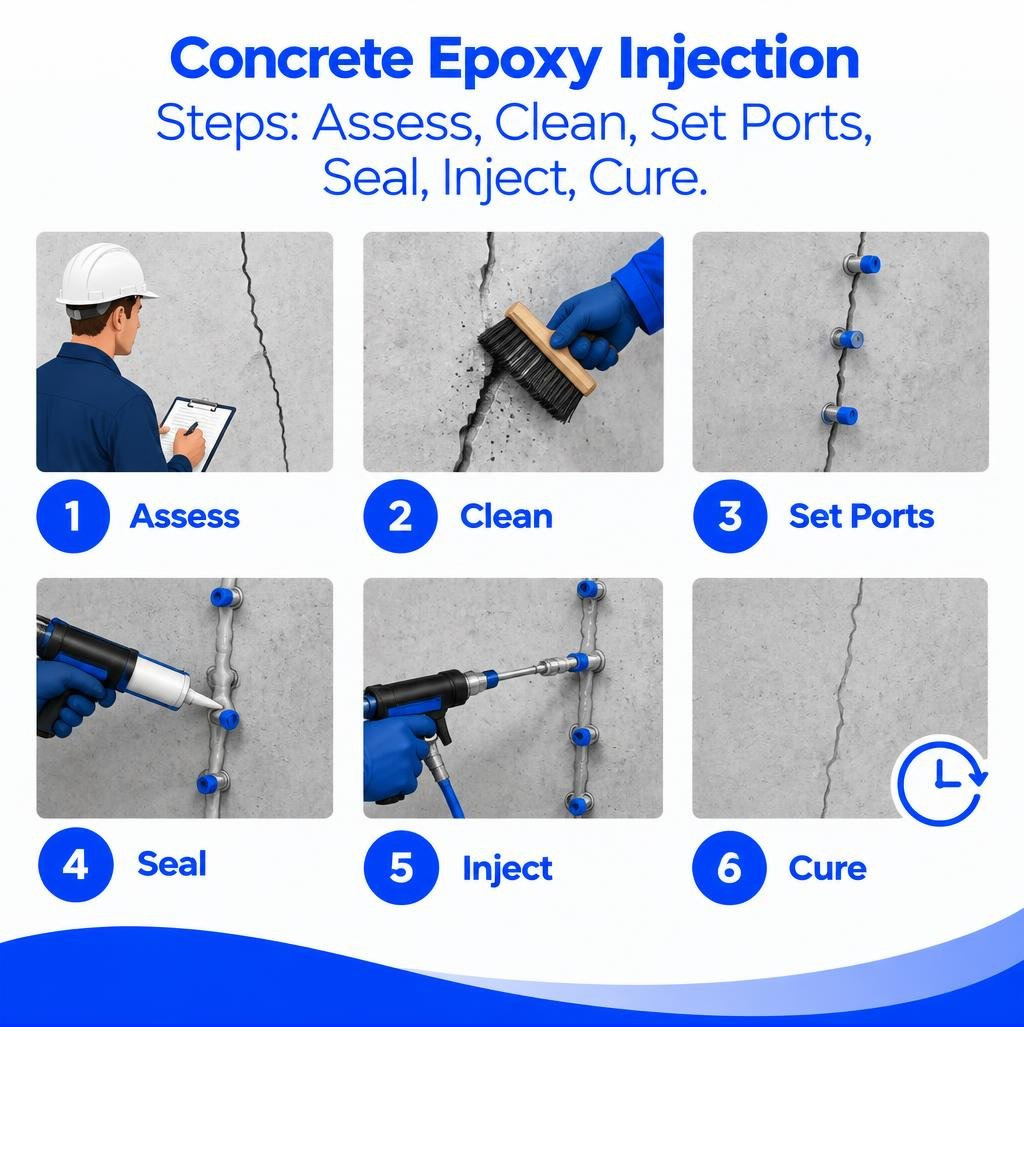
Related content about concrete epoxy injection:
Understanding Concrete Epoxy Injection: Purpose and Material Selection
Concrete epoxy injection is essentially “crack welding.” When performed correctly, pressure-injecting a two-part structural epoxy resin does far more than caulk a gap—it restores the monolithic integrity and load-bearing capacity of the concrete member. In fact, cured structural epoxy boasts tensile and compressive strengths that routinely exceed the strength of the surrounding concrete itself.
The primary engineering goal of structural injection is restoring internal tensile stress transfer across a fracture. According to ASTM C 881 (the standard specification for epoxy-resin-base bonding systems for concrete), repair adhesives are classified into performance types:
- Type I: Formulated for non-load-bearing applications. It requires a minimum 7-day compressive yield strength of 8,000 psi.
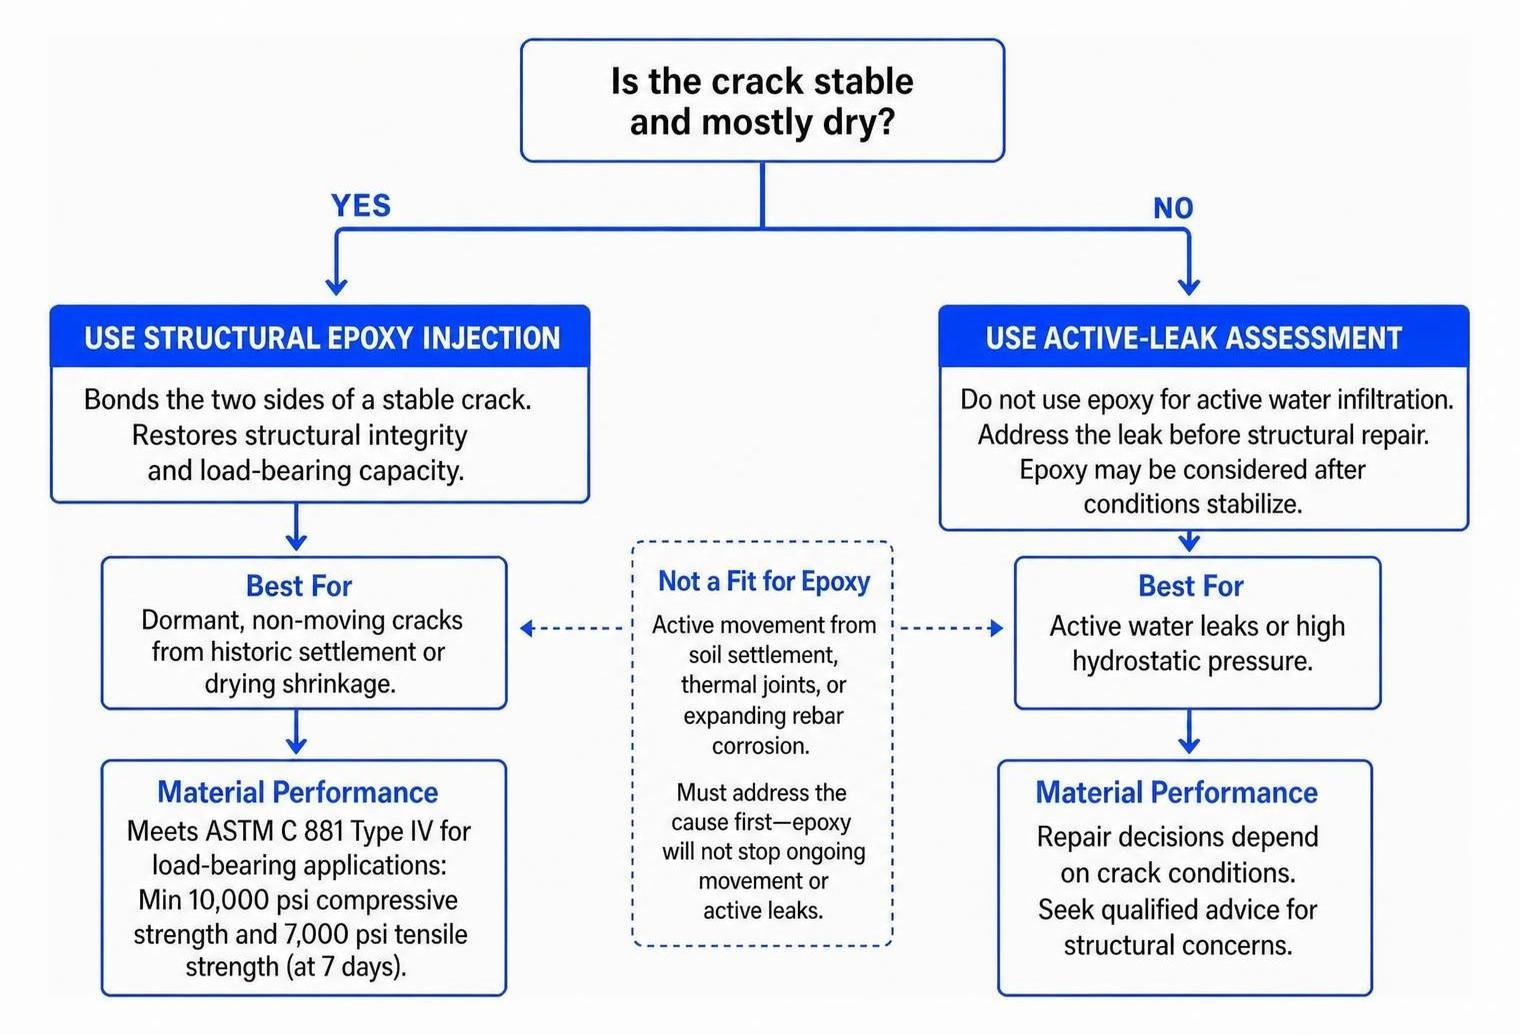
- Type IV: Engineered specifically for load-bearing applications. It requires a minimum 7-day compressive yield strength of 10,000 psi and a tensile strength of 7,000 psi. ASTM C 881 also demands a minimum bond strength of 1,000 psi at 2 days (moist cure) and 1,500 psi at 14 days.
Before reaching for an injection gun, you must understand whether your crack is a viable candidate for rigid bonding. If you are uncertain about the severity of a fissure, start by evaluating if cracks pose a structural risk to ensure you are treating the underlying issue rather than a symptom.
As outlined in engineering standards like Structural Crack Repair by Epoxy Injection published by the American Concrete Institute, epoxy injection is intended strictly for dormant, non-moving cracks. If a fracture is caused by active soil settlement, dynamic thermal expansion joints, or expanding rebar corrosion, rigid epoxy is not appropriate. Corroding internal steel creates expanding iron oxide that exerts radial pressures over 4,500 psi—fracturing concrete anew if the corrosion cycle is left unchecked. Similarly, if subgrade soil is sinking, foundation leveling or stabilization must be completed prior to sealing cracks.
Selecting Concrete Epoxy Injection for Structural Cracks
Whether epoxy is suitable depends on structural conditions and moisture. Epoxy cures into a hard, rigid plastic that bonds broken concrete sections together and is intended for stable, dormant cracks.
If a basement wall has cracked due to historic settlement or concrete drying shrinkage and the movement has ceased, epoxy is the right choice. However, if water is entering through the fissure under hydrostatic pressure, standard epoxy resins cannot form an uncompromised bond. Address the moisture source with appropriate foundation crack solutions before considering structural repair.
Viscosity Selection for Concrete Epoxy Injection
Epoxy injection resins are manufactured in multiple viscosities, measured in centipoise (cps). Using the wrong viscosity is the number one reason DIY and novice repairs fail:
- Ultra-Low and Low Viscosity (Grade 1): Typically rated at 500 cps or less (similar in consistency to light motor oil or water). This grade is mandatory for hairline fractures 0.010 inches (0.3 mm) or smaller. Capable technicians can inject cracks as fine as 0.002 inches (0.05 mm) using low-viscosity resin under steady pressure.
- Medium Viscosity (Grade 2): Rated between 2,000 and 10,000 cps. This grade is best suited for crack widths ranging from 0.010 inches to 0.25 inches (1/4 inch).
- Gel Formulations (Grade 3): Non-sagging pastes used for very wide cracks, vertical surfaces without rear containment, or overhead applications.
Field temperatures drastically affect flow dynamics. As specified in the ACI Specification for Crack Repair by Epoxy Injection, the ideal temperature range for epoxy application is between 40°F and 100°F (5°C to 43°C). In cooler settings near 40°F, resins thicken dramatically. Condition your epoxy cartridges in a warm room (or warm water bath) between 80°F and 100°F prior to dispensing. This uniformly lowers the viscosity, allowing deep penetration into tight micro-fractures without requiring dangerous injection pressures.
Surface Preparation and Injection Port Installation
Successful epoxy injection is 80% preparation and 20% pumping. If the concrete surface is dirty, oily, or crumbly, your surface cap will rupture under pressure, spraying epoxy everywhere except where you want it.
Begin by cleaning sound concrete at least 1/2 inch to 1 inch wide on both sides of the entire crack length. Use a stiff wire brush to abrade the concrete face, removing loose laitance, efflorescence, paint, and contaminants.

Follow wire brushing by blowing out the crack cavity using clean, oil-free compressed air or a high-powered vacuum. Never use standard workshop compressors that mist lubricating oils into their air lines, as oil creates an invisible bond breaker.
A critical caution: Avoid routing or cutting a mechanical V-groove with an angle grinder unless you are dealing with heavily coated concrete. Grinding can pack microscopic masonry dust deep into the crack fissure, clogging internal channels and preventing the resin from reaching full depth. Instead, master clean, non-destructive surface preparation using practical concrete crack sealing techniques as recommended in the U.S. Bureau of Reclamation’s Guide to Concrete Repair.
Safety Protocols and Personal Protective Equipment
Working with two-part chemical resins and pressurized injection equipment requires strict personal protective equipment (PPE):
- Safety Goggles or Full Face Shield: Pressurized ports can blow out unexpectedly. Eye protection is non-negotiable.
- Nitrile or Neoprene Chemical Gloves: Uncured epoxy resins and amine hardeners can cause severe contact dermatitis and chemical sensitization over time.
- Organic Vapor Respirator: Essential when working in confined basement areas or poorly ventilated crawlspaces.
- Long Sleeves and Work Pants: Protect skin from exothermic splashes.
Mixing epoxy components initiates an exothermic reaction (heat generation). A large mass of mixed epoxy left sitting in a mixing cup or bucket can rapidly exceed 200°F, releasing dense smoke and ruining the material. Always mix small batches and handle mixing trays with care.
Surface Sealing and Port Setting Procedures
Injection ports (sometimes called entry ports or tees) provide the gateway for resin to enter the concrete.
Follow these field rules for setting ports and establishing your cap seal:
- Port Spacing: Space ports approximately 8 inches apart along the length of the crack. As a strict rule of thumb, port spacing should equal the estimated depth of the crack or the thickness of the concrete section (e.g., space ports 8 inches apart on an 8-inch-thick basement foundation wall). For hairline cracks, bring the spacing closer (4 to 6 inches) to ensure resin travels between ports without requiring excessive pressure.
- Mounting Ports: Center the open base of the surface port directly over the crack aperture. Apply a small amount of fast-setting two-part epoxy paste-over to the base flange, taking care not to allow paste to occlude or block the internal port hole.
- Applying the Cap Seal: Spread epoxy paste-over along the entire face of the crack between and around all ports. The paste-over must be applied at a minimum thickness of 3/16 inch and a width of at least 1 inch (extending 1/2 inch on either side of the crack centerline). At port locations, mound the paste 1/4 inch thick, extending at least 1 inch outward around the entire base.
- Dissipating Heat: When hand-mixing your cap seal paste on a board, spread the mixed paste into a thin film (about 1/8 inch thick). This dissipates exothermic heat and extends your workable pot life.
- Backside Containment: If the crack penetrates fully through a slab or foundation wall and the backside is accessible, apply a matching cap seal to the reverse side. This prevents expensive epoxy from pumping straight out the back onto the soil or footing.
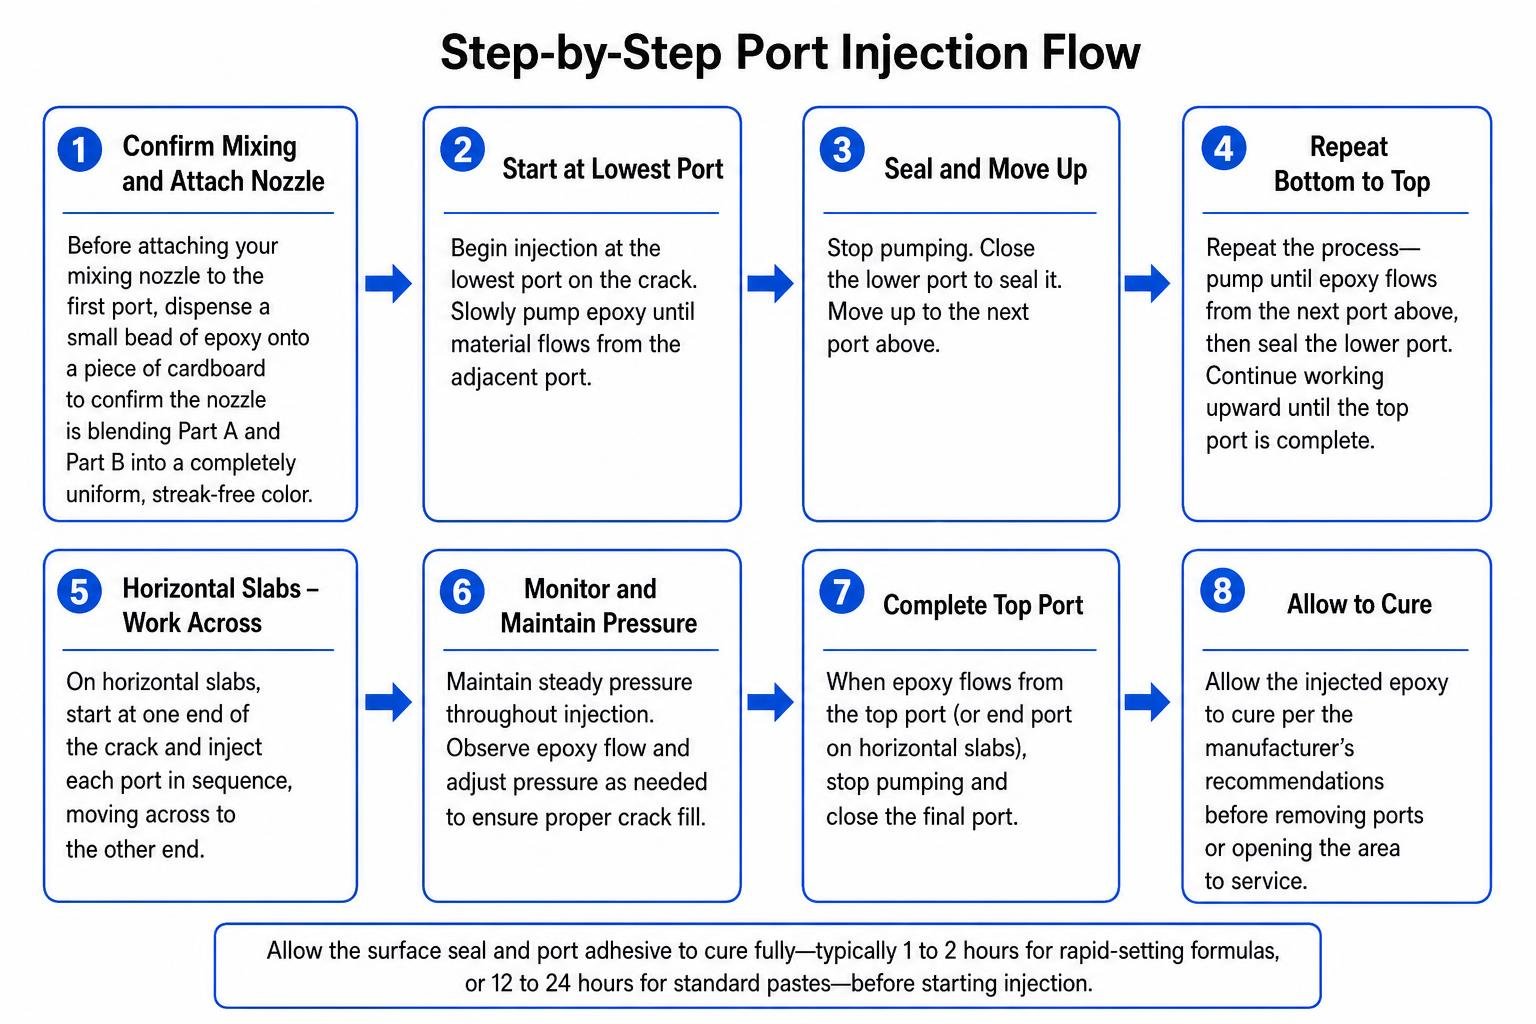
Allow the surface seal and port adhesive to cure fully—typically 1 to 2 hours for rapid-setting formulas, or 12 to 24 hours for standard pastes—before starting injection.
Step-by-Step Injection Process for Basements and Slabs
Once your cap seal has hardened tap-hard (it should ring when lightly tapped with a screwdriver handle), you are ready for pressure injection.
Dispensing is carried out using specialized manual or pneumatic dual-cartridge guns equipped with static mixing nozzles, or automated positive-displacement proportioning pumps for large-scale commercial jobs. As detailed in the TxDOT standard Section 5: Crack Repair – Pressure-Injected Epoxy, continuous mixing equipment must maintain a strict metering ratio tolerance within ±3% of the manufacturer’s specified resin-to-hardener ratio across all operating pressures.
Before attaching your mixing nozzle to the first port, dispense a small bead of epoxy onto a piece of cardboard to confirm the nozzle is blending Part A and Part B into a completely uniform, streak-free color. To learn how modern injection systems achieve this level of precision, see our overview on how professionals master structural concrete repair with modern epoxy injection methods.
Executing Concrete Epoxy Injection on Vertical and Horizontal Slabs
The injection technique varies depending on whether you are repairing a vertical foundation wall or a flat horizontal floor slab.
Vertical Basement Walls (Bottom-to-Top Progression)
- Connect to the Lowest Port: Attach your injection nozzle to Port #1 at the absolute bottom of the vertical crack.
- Inject at Low Pressure: Begin dispensing at low pressure (starting around 20 to 40 psi with a manual gun). Let the fluid pressure slowly fill the internal crack cavity from the bottom up.
- Observe Flow: Continue pumping steadily into Port #1 until you see pure epoxy emerge from Port #2 directly above it.
- Inject to Refusal: Do not uncouple immediately. Maintain steady pressure on Port #1 for another 30 to 60 seconds until you reach refusal (the port will accept no more resin under moderate hand pressure). This forces resin deep into microscopic horizontal branching fractures.
- Cap and Migrate: Cap Port #1 with its integrated plug, disconnect your nozzle, attach to Port #2, and resume injecting until resin emerges from Port #3. Repeat this bottom-to-top sequence all the way up the wall.
Horizontal Concrete Slabs
On horizontal slabs, begin injection at the widest section of the crack or at one extreme end, progressing linearly down the run.
For unsealed through-cracks in floor slabs where you cannot seal the underside, liquid epoxy can drain away into the crushed gravel or subgrade soil below. To prevent material loss, pack coarse, dry silica sand into the bottom of the crack to a maximum depth of 1/4 the slab thickness. The sand creates an internal dam that supports the low-viscosity resin while it cures. On non-structural, shallow slab cracks, low-viscosity epoxy can also be applied via gravity feed without ports, provided the crack is V-grooved and topped off repeatedly as the resin sinks in.
Troubleshooting Common Injection Problems
During field injection, conditions rarely go 100% according to plan. Here is how to handle common hiccups:
- Surface Paste Blowout: If high pressure ruptures your surface seal, stop pumping immediately. Wipe away the escaping resin with a cotton rag and rubbing alcohol. For small pinhole leaks, rub a soft wax crayon or a block of paraffin wax directly into the heated fissure; the wax will instantly plug small pinholes under pressure. For larger ruptures, reapply fast-curing paste-over and let it cure for 30 minutes before resuming.
- Immediate High Backpressure: If a port refuses material instantly, check if the entry hole was blocked by paste during port installation. If clear, the crack internal fissure may be discontinuous, or resin may have hardened inside your static mixing nozzle during a pause. Swap out the mixing nozzle.
- Material Disappears Without Emerging at Next Port: If you have pumped an entire cartridge into one port without material appearing at the adjacent port, stop. The resin is likely running out of an unsealed backside into backfill soil, sinking deep into an internal honeycombed gravel pocket, or tracking along an intersecting perpendicular fracture. Switch to a higher viscosity epoxy (Grade 2) or install intermediate ports closer together.
Cleanup, Port Removal, and Quality Assurance Testing
After injection is complete, allow the assembly to cure undisturbed. Ambient temperature governs the curing timeline:
- Initial Gel Time: 20 to 45 minutes
- Surface Paste Cure: 1 to 2 hours (fast-set) or 12 to 24 hours (standard)
- Full Structural Cure: 24 to 48 hours at 70°F (extend to 72+ hours if temperatures are below 50°F)
Once the epoxy has reached full cure, you can remove the surface ports and cap seal if an aesthetically flush concrete finish is desired.
The easiest removal method involves using a heat gun alongside a sharp scraper or broad cold chisel. Direct moderate heat (around 300°F) at the paste-over cap to soften the epoxy matrix, then shear the port and cap away from the concrete with a hammer and chisel. Alternatively, use an angle grinder fitted with a diamond cup wheel to grind the surface smooth and flush. If you are dealing with recurring floor fractures or deep wall distress across your property, consider pairing injection with professional cracked concrete repair to protect your finished surfaces permanently.
Quality Verification and Core Testing
How do engineers and building inspectors prove that low-viscosity epoxy fully penetrated an 8-inch-thick wall? Several rigorous quality assurance methods exist:
- Core Sampling (ASTM C 42): The gold standard of verification. A diamond core drill extracts a 2-inch diameter core centered directly over the repaired crack line. Visual inspection immediately reveals whether the amber resin filled 90% to 100% of the interior void depth. The core is then subjected to an ASTM C 496 splitting tensile strength test in a laboratory. A successful repair is confirmed when the core sample breaks in the original concrete rather than along the epoxy bond line. (All core holes must be packed immediately with non-shrink structural grout).
- Ultrasonic Pulse Velocity (UPV): A non-destructive acoustic evaluation method. Transducers measure the speed of sound waves passed through the concrete member. Sound waves travel rapidly through solid, well-bonded concrete and cured epoxy, but slow down or scatter when encountering unfilled internal air voids.
- Impact-Echo Testing: An operator strikes the surface with a small steel ball, and a nearby sensor reads reflected stress waves. Resonant frequency shifts clearly pinpoint subsurface delaminations and hollow, unbonded crack zones.
Frequently Asked Questions About Concrete Epoxy Injection
Can epoxy injection repair active water leaks in a basement?
No. Standard structural epoxy resins require a dry or damp surface to achieve chemical adhesion. If water is actively trickling or pouring through a crack under hydrostatic pressure, the water film prevents the epoxy from bonding to the concrete micropores, and the injection pressure will wash the resin out before it cures. Active leaks should be addressed before structural repair is considered. Once water flow is halted and the environment is stabilized, structural epoxy may be appropriate when load rebonding is required.
How do I know if a crack is structural or cosmetic?
Cosmetic cracks (such as hairline drying shrinkage cracks) are typically hairline-thin (under 1/16 inch), run vertically or diagonally across a wall, and show no signs of offset displacement. Structural cracks, by contrast, are typically 1/8 inch or wider, run horizontally along basement foundation walls (indicating exterior soil pressure pushing the wall inward), display noticeable stair-stepping across concrete masonry units, or show lateral shifting where one side of the crack is pushed out past the other. If you notice horizontal bowing or distinct stair-step fractures, consult a structural professional immediately.
How long does concrete epoxy take to fully cure?
While surface paste-over adhesives typically harden within 1 to 2 hours, the low-viscosity structural epoxy inside the crack takes roughly 24 to 48 hours to reach its designated compressive yield strength (typically 8,000 to 10,000+ psi) at an ambient temperature of 70°F (21°C). If working in cold temperatures (40°F to 50°F), allow at least 3 to 5 full days before subjecting the concrete element to heavy dynamic loads or structural backfilling.
Restoring Concrete Strength with FoamWorks
Concrete epoxy injection is the ultimate solution for welding dormant, structural cracks back into solid, monolithic concrete. But remember: structural injection only succeeds when underlying slab settlement and subgrade voids have been stabilized.
At FoamWorks Concrete Leveling, we are a family-owned concrete repair and leveling contractor serving Northwest Ohio, Southeast Michigan, and Northeast Indiana. We bring more than 30 years of industry experience and back our work with a lifetime warranty and a 100% customer satisfaction guarantee.
If your concrete cracks are caused by sunken, uneven, or settled concrete slabs, our high-density polyurethane foam injection levels your surfaces for 30% to 50% less than full tear-out and replacement. Most leveling repairs wrap up in just a few hours with virtually zero landscape damage, zero disposal fees, and surfaces that are ready for immediate use.
Whether you need precision slab leveling or expert concrete repair services, reach out to our team today for a free estimate!