

How Epoxy Crack Injection Repairs a Concrete Crack
Epoxy crack injection bonds the sides of a stable concrete crack so the repaired area can transfer loads again. For a poured-concrete foundation wall, clean the crack, attach injection ports, and seal the surface between them. Once the seal sets, inject epoxy at low pressure from the lowest port. Move up when epoxy appears at the next port, then let the repair cure for the time listed on the product label.
This method is best for cracks that have stopped moving. A leaking crack, a shifting wall, or a sinking slab needs a closer look before you choose a repair.
I’m Trey McNamee, owner of FoamWorks Concrete Leveling, where our team works on concrete repair and leveling. My building-materials background helps me explain when epoxy crack injection makes sense and when a different repair may be needed.
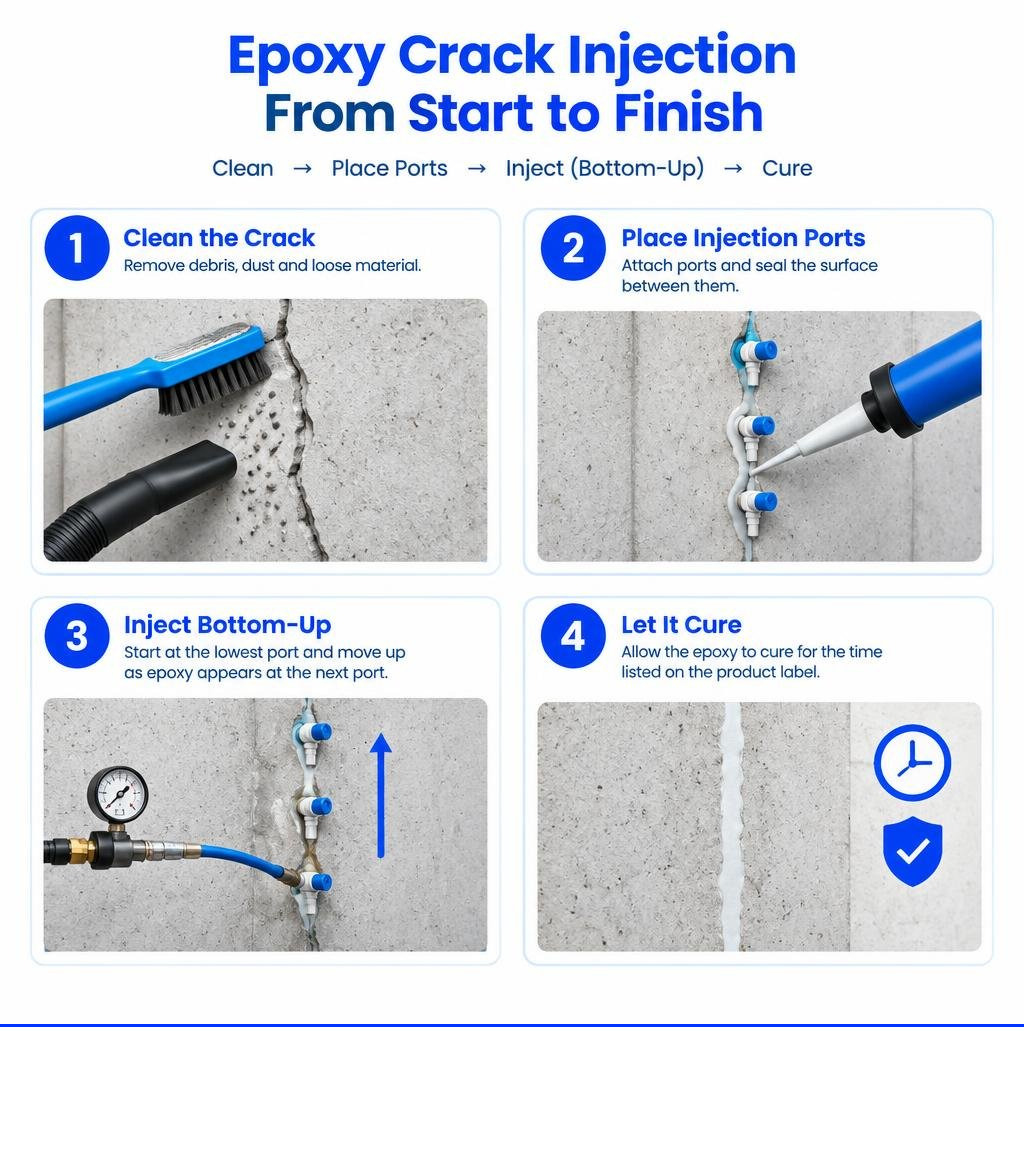
Epoxy crack injection terms at a glance:
Understanding Epoxy Crack Injection: Science, Strength, and Suitability
When concrete fractures under stress, overloading, or initial shrinkage, it loses continuous load-bearing capacity. Epoxy crack injection operates as a concrete welding system. Unlike caulks or hydraulic cements that merely plug an opening at the surface, a structural two-component epoxy resin penetrates deep into the fissure to chemically fuse separated concrete elements together.

Once cured, high-performance structural epoxy creates a monolithic bond capable of transferring compressive, shear, and tensile loads across the fractured zone. High-strength structural epoxies like Epojet [NA] or Crack-Pac® Injection Epoxy demonstrate compressive strengths exceeding 12,000 PSI and slant-shear bond strengths over 2,000 PSI—frequently surpassing the mechanical strength of the surrounding 3,000 to 4,000 PSI concrete matrix.
| Repair Method | Primary Function | Material Behavior | Structural Load Transfer | Water Ingress Resistance |
|---|---|---|---|---|
| Epoxy Injection | Structural restoration | Rigid, high-strength resin | Full (compressive & tensile) | Yes (monolithic vapor barrier) |
| Crack Sealing | Moisture and debris barrier | Flexible, protective sealant | None (non-structural) | High (surface water barrier) |
| Cosmetic Patching | Surface aesthetics | Rigid or semi-rigid mortar | Minimal to none | Temporary surface barrier |
Understanding these mechanical differences ensures property owners choose the correct approach rather than wasting time on temporary cosmetic coatings.
When Epoxy Injection Is Appropriate for Structural Cracks
Epoxy injection is the engineering standard when you must re-establish structural continuity and monolithic strength across a broken element. It is recommended for:
- Dormant settling cracks in poured concrete foundation walls.
- Fractured structural beams, columns, or suspended floor slabs requiring complete load transfer.
- Non-moving stress fractures caused by past overload conditions or missing expansion joints.
- Foundation fissures where subsurface radon or moisture vapor intrusion must be sealed permanently.
When executed properly under appropriate site conditions, comprehensive concrete repair using structural epoxy prevents future crack migration and stops water penetration from deteriorating embedded reinforcing steel.
Ideal Substrates and When to Avoid Epoxy Crack Injection
Structural epoxy injection is primarily designed for solid poured concrete. However, specific situations make epoxy the wrong repair material:
- Hollow Concrete Block (CMU): Epoxy requires a contained cavity to build hydraulic pressure. In hollow cinder block walls, injected resin drains into internal voids rather than filling the crack faces.
- Active Structural Movement: Epoxy cures into an unyielding, rigid plastic. If a foundation wall is actively bowing inward or settling due to unstable subbase soil, injecting epoxy will cause concrete to fracture immediately adjacent to the repair.
- Actively Leaking or Wet Cracks: Standard epoxies cannot displace liquid water, leading to emulsification, debonding, or incomplete cure. Cracks must be completely dry before applying structural epoxy.
- Expansion and Control Joints: Working joints designed to accommodate thermal expansion must never be locked rigidly with structural epoxy; they require an elastomeric joint sealant.
Before proceeding with any rigid injection method, evaluate the site thoroughly to confirm whether concrete cracks indicate foundation issues requiring subbase stabilization first.
Key Technical Properties and Material Standards of Injection Resins
Structural injection resins are engineered to meet strict construction standards, notably ASTM C881 (Standard Specification for Epoxy-Resin-Base Bonding Systems for Concrete) and AASHTO M235. These standards govern viscosity, thermal compatibility, bond strength, and pot life.
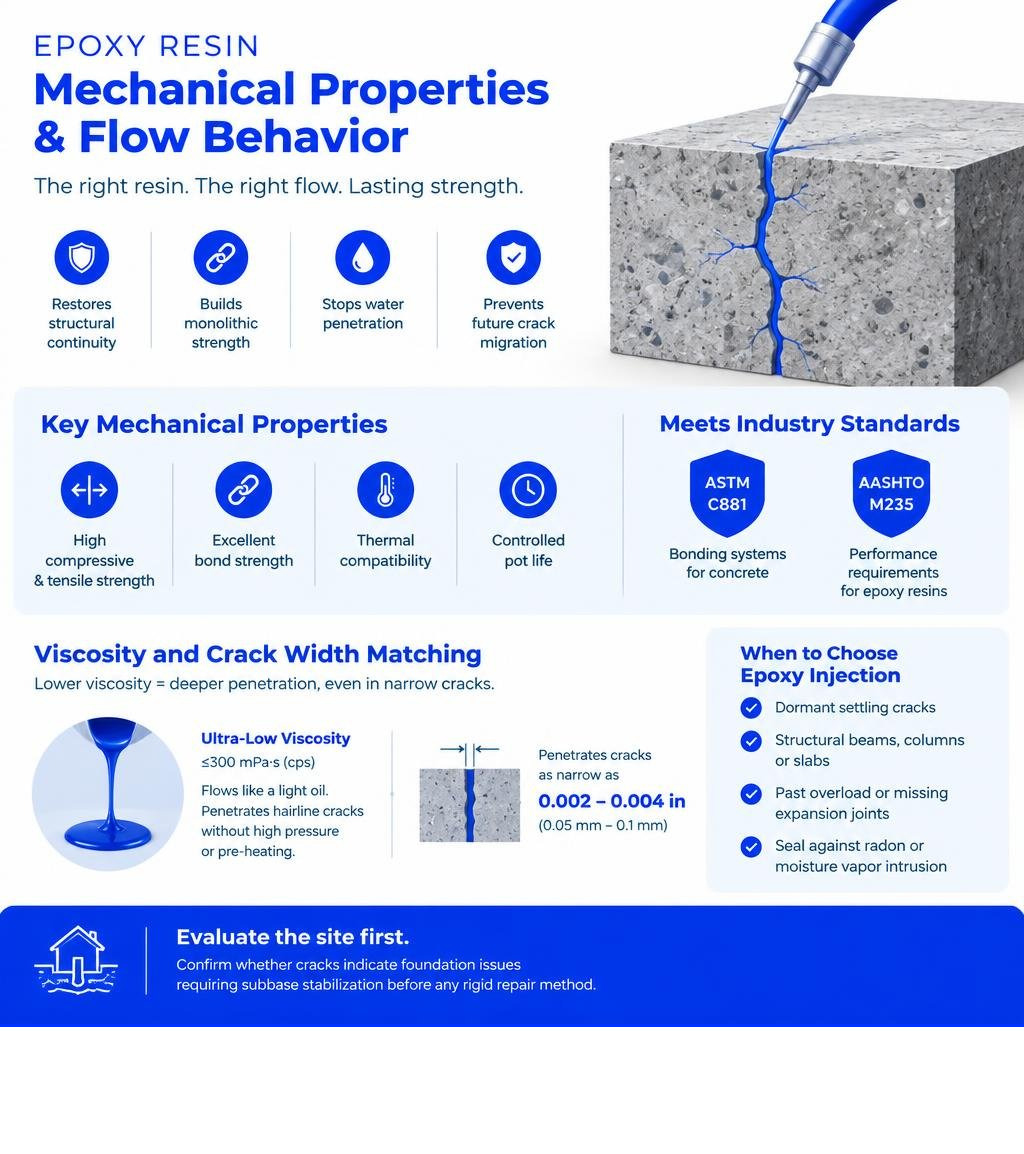
Viscosity and Crack Width Matching
Viscosity dictates how deeply an epoxy resin penetrates narrow fissures under low injection pressure:
- Ultra-Low Viscosity (≤300 mPa·s / cps): Formulations like FSE523 Technical Data Sheet or Epojet LV [NA] (170 cps) flow with a light-oil consistency. They penetrate hairline cracks as narrow as 0.002 to 0.004 inches (0.05 mm to 0.1 mm) without high pressure or artificial pre-heating.
- Low-to-Medium Viscosity (400–1,000 cps): Formulations such as standard MAPEI Epojet (410 cps at 73°F) or Crack-Pac Injection Epoxy – Product Data fill medium fissures from 1/64 inch (0.4 mm) up to 1/4 inch (6 mm) wide.
Matching viscosity to crack aperture ensures the resin fills the entire depth of the wall without draining away before curing.
Bond Strength and Load Transfer Capabilities
The definitive metric of structural epoxy is its slant-shear bond strength according to ASTM C882. Typical specifications demonstrate:
- Compressive Strength: Cures to between 10,000 and 12,720 PSI, far outperforming base concrete.
- Slant Shear Bond Strength: Develops 1,500 to 2,980 PSI after 14 days of curing, producing concrete failure (the concrete breaks before the epoxy bond lets go).
- Tensile Strength: Achieves 6,100 PSI (42.0 MPa) or higher per ASTM D638, ensuring structural resistance against lateral hydrostatic pressure.
Essential Tools and Surface Preparation Requirements
Proper structural crack repair relies on clean surfaces and correct tools:
- Personal Protective Equipment: Chemical-resistant nitrile gloves, safety goggles, and organic vapor respirator.
- Pinless moisture meter (to confirm concrete is dry).
- Wire brush, stiff-bristled utility brush, and HEPA vacuum.
- Surface sealing epoxy paste (such as two-component high-modulus gel).
- Surface-mount injection ports with integrated shutoff caps.
- High-thrust dual-cartridge dispensing gun with static mixing nozzles.
- Putty knives and scrapers.
- Angle grinder with a wire cup brush or diamond cup wheel for post-cure cleanup.
When looking at budget-friendly concrete repair methods, having the right prep tools prevents costly failures.
Substrate Cleaning and Moisture Verification
Epoxy forms a mechanical and chemical bond with concrete pores. Dust, laitance, grease, or moisture film will prevent resin adhesion:
- Scrub the Face: Mechanically wire-brush 1 to 2 inches on both sides of the crack to expose clean, sound aggregate.
- Remove Dust: Vacuum the crack mouth thoroughly using a HEPA-filtered vacuum. Never flush structural cracks with water, as trapped moisture will block epoxy penetration and ruin adhesion.
- Verify Dryness: Test the concrete along the crack length with a pinless moisture meter. If moisture readings remain high or active water is seeping, pause the project until the crack dries thoroughly.
Port Spacing Rules and Surface Seal Application
Setting injection ports correctly ensures the resin travels all the way through the wall:
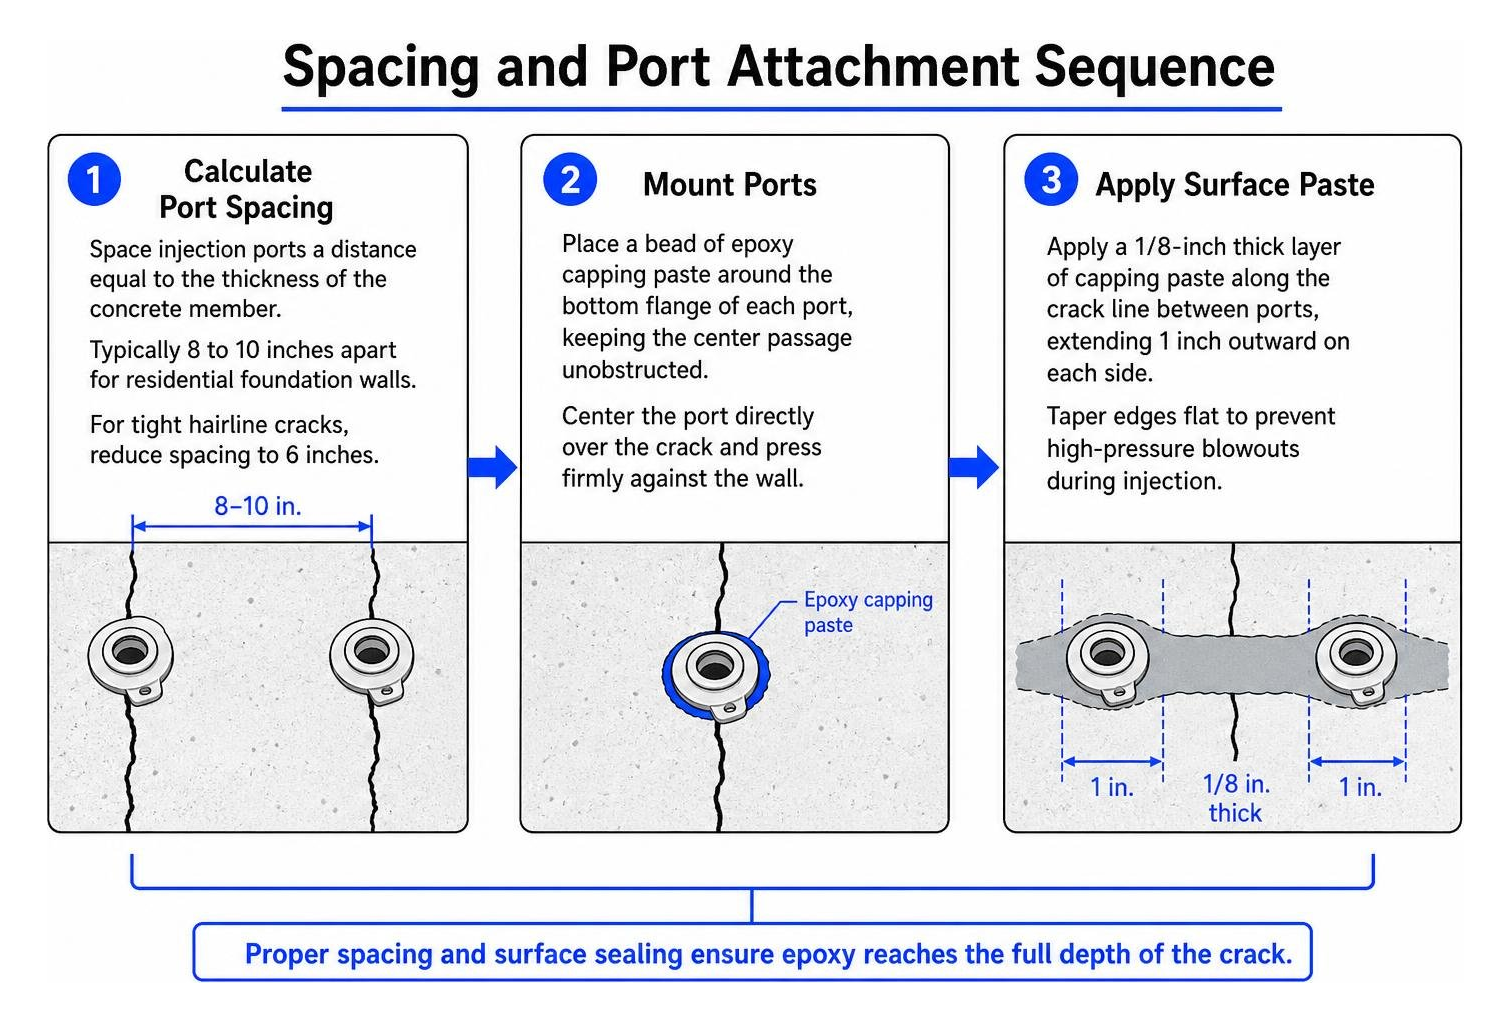
- Calculate Port Spacing: As a baseline, space injection ports a distance equal to the thickness of the concrete member (typically 8 to 10 inches apart for residential foundation walls). For tight hairline cracks, reduce spacing to 6 inches to minimize injection backpressure.
- Mount Ports: Place a bead of epoxy capping paste around the bottom flange of each port, keeping the center passage unobstructed. Center the port directly over the crack and press firmly against the wall.
- Apply Surface Paste: Apply a 1/8-inch thick layer of capping paste along the crack line between ports, extending 1 inch outward on each side. Taper edges flat to prevent high-pressure blowouts during injection.
Step-by-Step Guide to Structural Concrete Crack Repair
Follow this systematic process to achieve a professional structural repair.
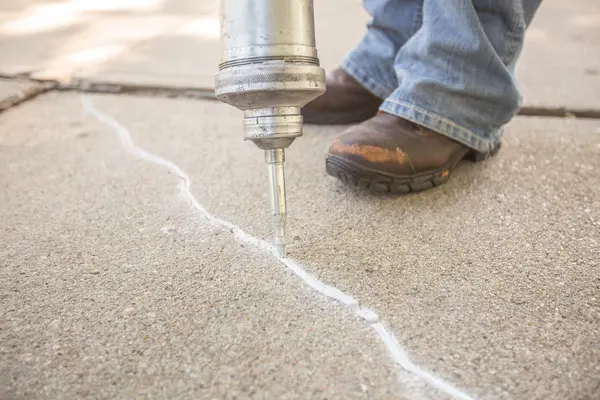
Step 1: Install Injection Ports and Apply the Surface Seal
After marking port locations, mix equal parts of the two-component surface paste until a streak-free, uniform gray color is achieved. Apply the paste firmly around each port base and across the crack length.
Allow the surface seal paste to cure completely according to the manufacturer’s directions (typically 30 to 60 minutes at 70°F, or up to 2 hours in cooler conditions). Inspect the paste carefully for pinholes or thin spots, applying a second coat over questionable areas to prevent resin leaks under pressure.
Step 2: Performing the Epoxy Crack Injection Step-by-Step
Once the surface seal is rigid, begin the resin injection:
- Setup Gun and Mixer: Load the structural resin cartridge into the dual-cartridge dispensing gun and attach the static mixing nozzle. Dispense a small sample to confirm proper Part A and Part B blending.
- Start at the Lowest Port: Insert the mixing nozzle firmly into the lowest injection port on a vertical wall.
- Inject with Steady, Low Pressure: Squeeze the trigger smoothly. Avoid over-pressurizing, which can fracture the surface seal or create hydraulic voids. Allow the low-viscosity resin time to migrate inward and fill deep voids.
- Watch for Rising Resin: Continue dispensing until liquid epoxy begins oozing steadily from the port directly above your injection point.
- Cap and Advance: Once resin appears at the next port, remove the nozzle, cap the current port securely, and insert the nozzle into the port above.
- Repeat Upward: Continue this bottom-up sequence port by port until the entire crack is filled to the top of the foundation wall.
Step 3: Post-Injection Curing and Port Removal
Let the injected epoxy cure undisturbed for 24 to 72 hours depending on ambient temperature:
- Warm Conditions (70°F–80°F): Gel time occurs within 30 to 105 minutes, reaching functional structural cure in 24 hours.
- Cool Conditions (45°F–60°F): Cure times double; allow a full 48 to 72 hours before disturbing ports.
Once cured, use an angle grinder with a wire wheel or diamond cup disc to grind off the surface ports and capping paste flush with the wall. Check the finished repair for complete structural continuity along the settled or cracked concrete profile.
Common Application Pitfalls and When to Seek Professional Repair
Even small mistakes during surface preparation or injection can compromise structural integrity.
Watch out for these common errors:
- Injecting Wet Cracks: Moisture blocks chemical adhesion, turning cured epoxy into a loose plastic sliver rather than a structural weld.
- Rushing Surface Paste Cure: Pressurizing the crack before the paste fully hardens causes messy port blowouts and loss of internal resin pressure.
- Excessive Dispensing Pressure: Pumping epoxy too quickly traps air pockets inside the wall, leaving empty cavities behind the surface seal.
- Ignoring Structural Settlement: Injecting epoxy across a slab or wall experiencing ongoing soil settlement will cause another crack alongside the repair. Slabs that have dropped or settled should first be leveled back to their original elevation using high-density polyurethane foam lifting, followed by crack sealing.
If your foundation exhibits horizontal bowing, stair-step cracks through hollow masonry, or wide fractures exceeding 1/4 inch, evaluate whether professional concrete repair is necessary or locate qualified foundation crack repair contractors for an engineering evaluation.
Frequently Asked Questions
How long does epoxy take to cure before bearing full structural load?
Most structural injection epoxies reach initial gel set in 30 to 105 minutes at room temperature (72°F) and achieve over 90% of their ultimate compressive strength within 24 to 48 hours. Full laboratory cure and maximum slant-shear bond strength (over 2,000 PSI) are attained after 7 to 14 days. In temperatures below 60°F, cure schedules lengthen significantly.
Can epoxy be injected into wet or damp concrete cracks?
Standard structural epoxies require completely dry substrates for proper bonding. While specialized moisture-tolerant epoxies can adhere to damp concrete, actively leaking or wet cracks must be thoroughly dried before injection, as trapped moisture prevents the resin from forming a strong structural bond with the concrete matrix.
How does port-to-port progression confirm a full-depth fill?
As low-viscosity resin is injected at low pressure from the base port, it fills the bottom of the crack and rises through the wall. When liquid resin overflows from the next port up, it confirms the wall cavity below that level is filled front-to-back.
Restoring Concrete Integrity with Confidence
Structural concrete fractures do not heal on their own. Left untreated, water infiltration, freeze-thaw cycles, and shifting loads can turn small stress fractures into major foundation failures. By understanding resin viscosity, setting proper port spacing, and following steady low-pressure injection practices, you can restore full monolithic strength to your concrete.
When repairs require heavy structural stabilization, slab lifting, or complex multi-crack sealing across Northwest Ohio, Southeast Michigan, or Northeast Indiana, our team at FoamWorks Concrete Leveling is ready to help. With more than 30 years of family-owned experience, we lift sunken concrete with expanding polyurethane foam and provide lasting cracked concrete repair services backed by lifetime warranties. Contact us today for a free evaluation and repair estimate.