

Assessing Damage Before Your Concrete Garage Floor Repair
To repair a concrete garage floor, start by grinding the damaged area down to clean, sound concrete, apply a bonding agent while it is still tacky, and pack the area with a polymer-modified repair mortar feathered to a thin edge. This works for surface spalling, pitting, and chipped edges when the slab is still supported by firm soil.
Before mixing any repair mortar, you need to understand what caused the damage in the first place. Garage floors take a beating from heavy vehicles, road salts, temperature swings, and shifting soils beneath the foundation.
Surface defects usually fall into a few categories:
- Spalling and Scaling: Flaking or chipping caused by trapped water expanding during freeze-thaw cycles. Road salts dragged in during winter accelerate this delamination by drawing in extra moisture.
- Pitting and Pop-outs: Small crater-like holes where weak aggregate or trapped pockets of air broke free near the surface.
- Dusting: A chalky residue that forms on poorly cured concrete. It feels like an endless concrete snow globe—no matter how many times you sweep, more fine powder appears.
- Cracking: Ranging from cosmetic spiderweb crazing to deep structural breaks.
When hairline cracks turn into uneven, shifting slabs, standard patching compounds will crack right open again. For larger breaks that threaten the integrity of the concrete, dedicated cracked concrete repair helps bond the concrete back together and stop moisture from eroding the base.
| Damage Type | Visual Signs | Root Cause | Best Solution |
|---|---|---|---|
| Surface Scaling / Spalling | Shallow flaking (1/8″ to 3/8″ deep), rough texture | Freeze-thaw cycles, winter deicing salts | Mechanical grinding, bonding agent, polymer-modified mortar |
| Pitting & Aggregate Pop-Outs | Isolated small craters and chips | Soft aggregate, trapped air pockets | Patching with low-viscosity hybrid polymer or mortar |
| Deep Structural Cracks | Gaps wider than 1/4″, uneven edges across the break | Slab movement, subbase erosion, heavy loads | Flexible joint sealant, structural stitching, foam stabilization |
| Sunken / Uneven Slab | One section sits lower, trip hazards, pooling water | Soil settlement, washouts, void formation underneath | High-density polyurethane foam leveling injection |
Identifying Surface Spalling, Pitting, and Structural Cracks
Distinguishing between a purely cosmetic surface issue and an active structural failure is simple once you know what to look for.
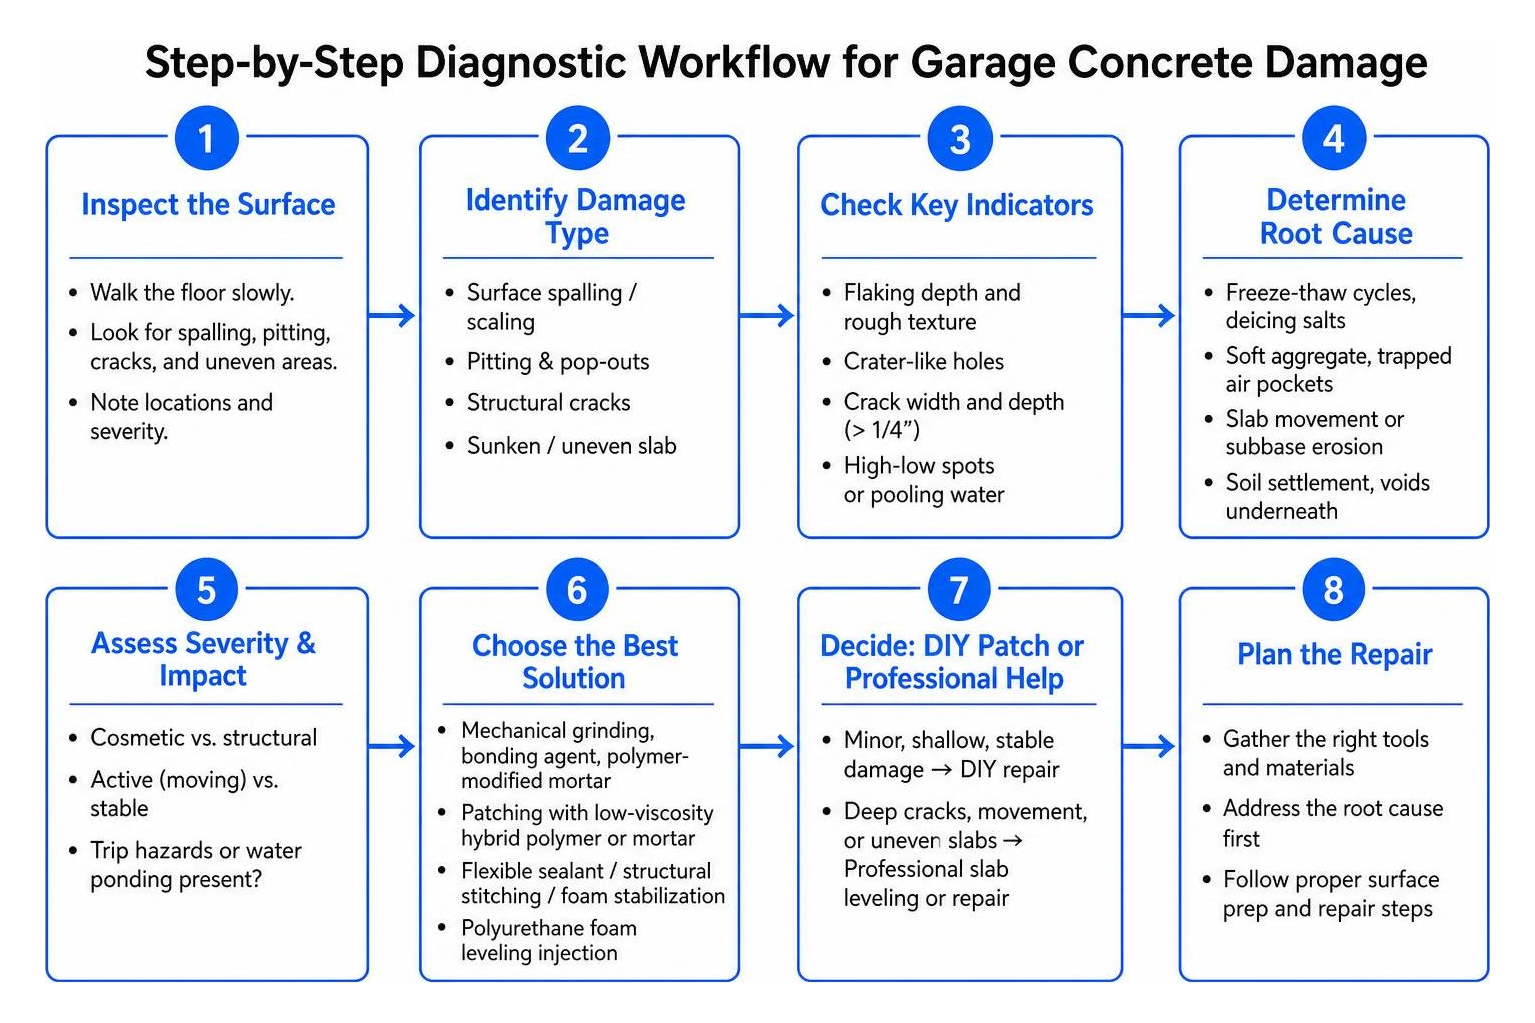
Surface spalling and pitting are shallow defects that leave the core slab intact. You will see thin layers of concrete flaking off, leaving rough, exposed aggregate underneath. While unsightly, the base beneath the concrete has not moved.
Structural cracks, on the other hand, travel entirely through the slab thickness. If one side of a crack sits higher than the other, or if you feel your tires “thump” over a distinct ridge as you pull inside, the underlying soil has settled or washed away.
When to Patch or Seek Professional Slab Leveling
A DIY patch works wonders when the slab rests on a firm base. However, if water runoff or loose fill causes soil erosion under the garage, the concrete will sink under the weight of your vehicle.
Placing a fresh layer of patch material over a sinking slab is like putting a fresh coat of paint over rotten wood—it looks fine for a few weeks, but the real trouble continues underneath. When you notice drops in elevation near the garage door threshold or between expansion joints, exploring options for fixing an uneven garage floor without breaking the bank will save you from constant, frustrating re-repairs.
Essential Tools, Bonding Agents, and Mortars
Getting a repair to bond permanently requires the right materials. Using the wrong bag of concrete is the most common reason DIY patches pop loose after a single winter season.
To repair damaged edges and surface pits, gather these tools:
- Angle grinder equipped with a diamond cup wheel
- HEPA-filtered vacuum and masonry wire brush
- Margin trowel and a flat finishing trowel
- Measuring bucket and mixing paddle attached to a heavy-duty drill
- High-strength bonding agent (epoxy or acrylic latex)
- Polymer-modified repair mortar or concrete surface restorer
- Personal protective equipment: N95/P100 respirator, eye protection, ear protection, and heavy nitrile gloves
Polymer-Modified Mortars for Concrete Garage Floor Repair
Standard bag-mix concrete contains large gravel aggregates and relies on compressive mass to stay together. It requires a minimum pour depth of at least 1 to 2 inches. If you try to spread regular concrete into a shallow 1/8-inch chip, it will quickly dry out, crumble, and lift under vehicle traffic.
Polymer-modified repair mortars contain specialized acrylic or vinyl acetate polymers that dramatically increase tensile and flexural strength. These polymers allow the repair material to stick tenaciously to older concrete and taper smoothly to an ultra-thin 1/8-inch edge without cracking.
For fine pitting, micro-cracks, and aggregate pops, fast-setting polyurethane/polyurea surface restorers like Poly-Strong PS 41 Repair offer an alternative. These low-viscosity materials penetrate micro-defects, provide broad coverage (up to 435–875 sq. ft. per gallon for fine grouting), provide a workable window of 5 to 8 minutes, and can be ground smooth in as little as 40 minutes.
Epoxy vs. Acrylic Bonding Agents and the Tacky Window
Bonding agents serve as the glue between the old, cured concrete and your fresh repair mortar.
- Acrylic Latex Bonding Agents: Excellent for general-purpose repairs, easy to clean up with water, and budget-friendly.
- Epoxy Bonding Agents: Provide unmatched shear and tensile adhesion, making them the superior choice for high-traffic vehicle thresholds and severely damaged slab edges.
When applying an acrylic bonding agent or priming the slab, you must work within its “tacky window.” Clean the concrete and dampen it until it reaches a Saturated Surface Dry (SSD) state—meaning the concrete is dark with moisture, but no standing puddles remain. Apply the bonding agent and wait until it feels sticky to the touch before placing your mortar. If the bonding agent dries completely to a slick, hard shine, it acts as a bond-breaker rather than an adhesive, causing your patch to fail.
Step-by-Step Edge and Surface Restoration Process
Restoring a broken garage floor threshold requires careful preparation. Industry studies show that surface preparation accounts for roughly 90% of a repair’s ultimate longevity.
Mechanical Surface Preparation and Diamond Grinding
Never apply repair mortar directly over dusty, oil-stained, or loose concrete.
- Chisel Loose Aggregate: Use a cold chisel and hammer to knock away loose concrete. Chip straight down rather than at a shallow angle to create a vertical shoulder rather than a paper-thin wedge.
- Grind the Concrete Profile: Attach a diamond cup wheel to your angle grinder. Grind the repair zone until you reach solid, sound concrete with an open texture matching Concrete Surface Profile (CSP) 3 to 4 (similar to medium-grit sandpaper).
- Clean Thoroughly: Vacuum all concrete dust using a HEPA vacuum. Scrub away any oil or grease deposits with a degreaser, rinse thoroughly, and let the area dry.
Applying the Feathering Technique for Concrete Garage Floor Repair
A smooth transition prevents car tires from snagging the patch and popping it loose.
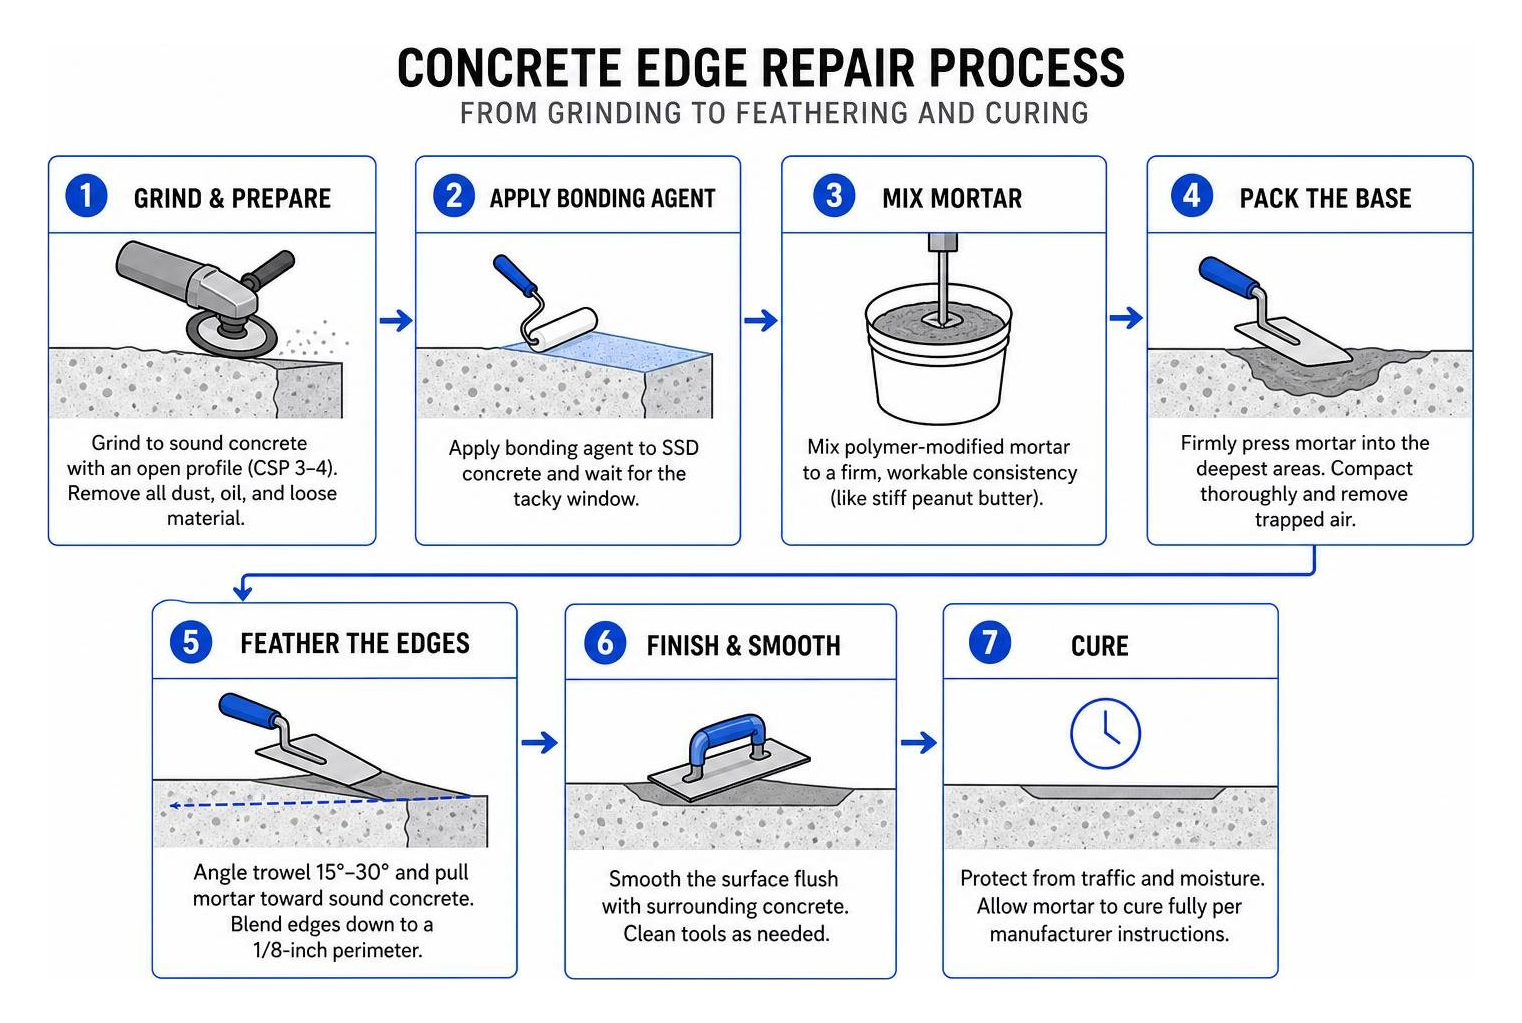
- Prime the Surface: Apply your chosen bonding agent to the SSD-prepared concrete, watching for that ideal tacky state.
- Mix the Mortar: Mix your polymer-modified mortar with clean water using a drill paddle. Aim for a firm, workable consistency—similar to stiff peanut butter. It should hold its shape without slumping.
- Pack the Base: Firmly press the mortar into the deepest sections of the damage using a margin trowel, working out any trapped air pockets.
- Feather the Edges: Angle your trowel at roughly 15 to 30 degrees and pull the mortar outward toward the surrounding sound concrete. Blend the repair flush down to an 1/8-inch perimeter edge.
Troweling, Flush Finishing, and Proper Moisture Curing
Once the mortar is placed, use a flat steel trowel to smooth the surface level with the rest of the floor. Match the surrounding texture:
- Use a damp sponge or light broom stroke for a non-slip, textured finish.
- Use firm, flat passes with a steel trowel for a slick, smooth surface.
Allow the material to cure properly. While high-early-strength polymer mortars set quickly, maintaining surface moisture prevents shrinkage cracks. Cover the patch with plastic sheeting or mist it lightly with water over the first 24 to 48 hours.
Keep all foot traffic off the fresh repair for at least 8 hours, and wait a full 72 hours before parking vehicles on it.
Managing Sinking Concrete and Failing Slab Foundations
Surface mortars cannot fix a garage floor that is actively sinking or breaking apart due to hollow pockets beneath the foundation.
When soil washes away or settles, heavy garage slabs tilt, creating trip hazards and pooling water. While cosmetic overlays or resurfacers can address minor surface wear, if the slab has shifted physically, surface treatments alone will not hold up.
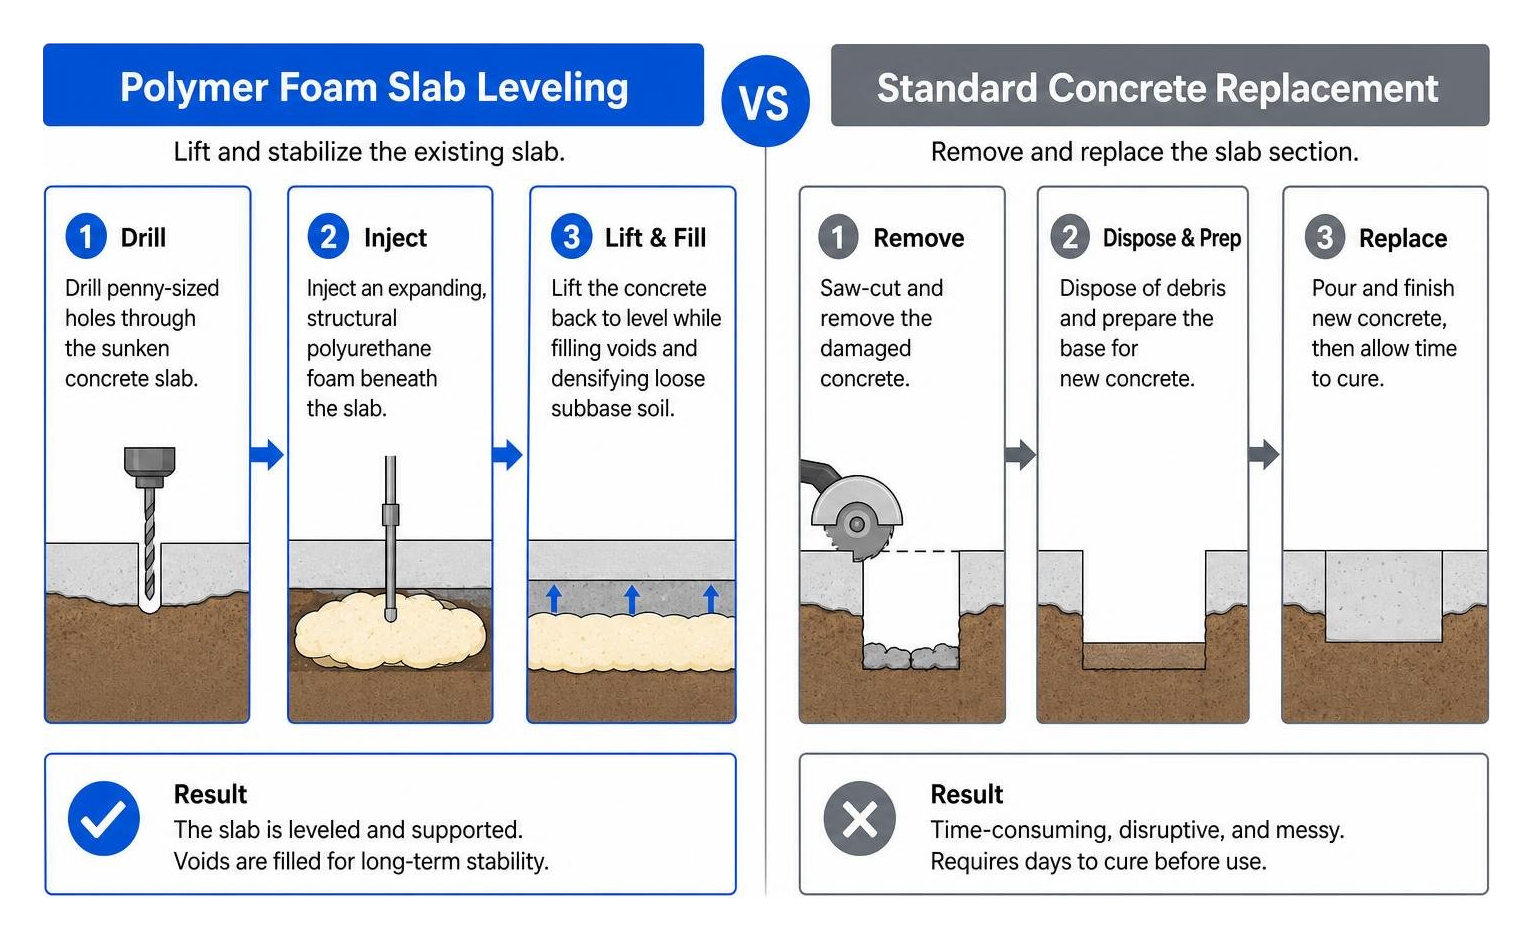
At FoamWorks Concrete Leveling, we fix uneven garage slabs using high-density PolyLevel concrete leveling injection. Our process works by:
- Drilling penny-sized holes through the sunken areas of your garage slab.
- Injecting an expanding, structural polyurethane foam beneath the floor.
- Lifting the concrete back to a level position while expanding to fill voids and densify loose subbase soil.
This polyurethane injection method fixes uneven slabs for 30% to 50% less than full tear-out and replacement. Most residential leveling jobs take just a few hours to complete, and the floor can handle full vehicle traffic almost immediately. You avoid the heavy equipment, torn-up yards, high labor costs, and disposal fees that come with pouring a brand-new slab.
Our crews regularly perform interior slab leveling throughout Northwest Ohio, Southeast Michigan, and Northeast Indiana. We have leveled dropped slabs and restored garage thresholds in communities like Perrysburg, Toledo, Port Clinton, Mansfield, and Flat Rock.
Frequently Asked Questions
How long does a professional-grade garage floor edge repair last?
A high-quality edge repair completed with a diamond-ground profile, an epoxy bonding agent, and a polymer-modified mortar typically lasts 10 to 15 years. Longevity depends almost entirely on how thoroughly the surface was cleaned and ground before applying the patch.
Can you apply concrete repair mortar over an old, peeling garage floor finish?
No. Repair mortars and coatings will not bond to peeling paint, old sealers, or failing epoxy coats. You must mechanically grind the surface down to bare, open concrete before patching. If you try to coat over an old, failing finish, your new patch will simply peel away along with the old layer beneath it.
Do you need to build a wooden form when repairing broken garage slab edges?
For shallow chips and minor spalling along the edge, you can sculpt and feather the repair by hand using a stiff mortar mix and a margin trowel. If you are rebuilding a deep, vertical threshold corner that has broken away completely, clamping a straight wooden 2×4 wrapped in plastic wrap or coated with a form-release agent against the slab edge gives you a clean, square line to pack your mortar against.
Conclusion
Restoring damaged garage concrete is an achievable DIY project when you catch surface scaling, small pits, and chipped edges early. By using diamond grinding for surface preparation, applying a dependable bonding agent, and using polymer-modified mortar, you can keep your garage floor functional and looking great for years.
If your garage floor has sunken sections, deep structural cracks, or water pooling near the entryway, surface patching will not solve the underlying problem. Reach out to our team at FoamWorks Concrete Leveling to schedule an interior slab leveling assessment and receive a free estimate to permanently stabilize your concrete.