

Start by Matching the Repair to the Problem
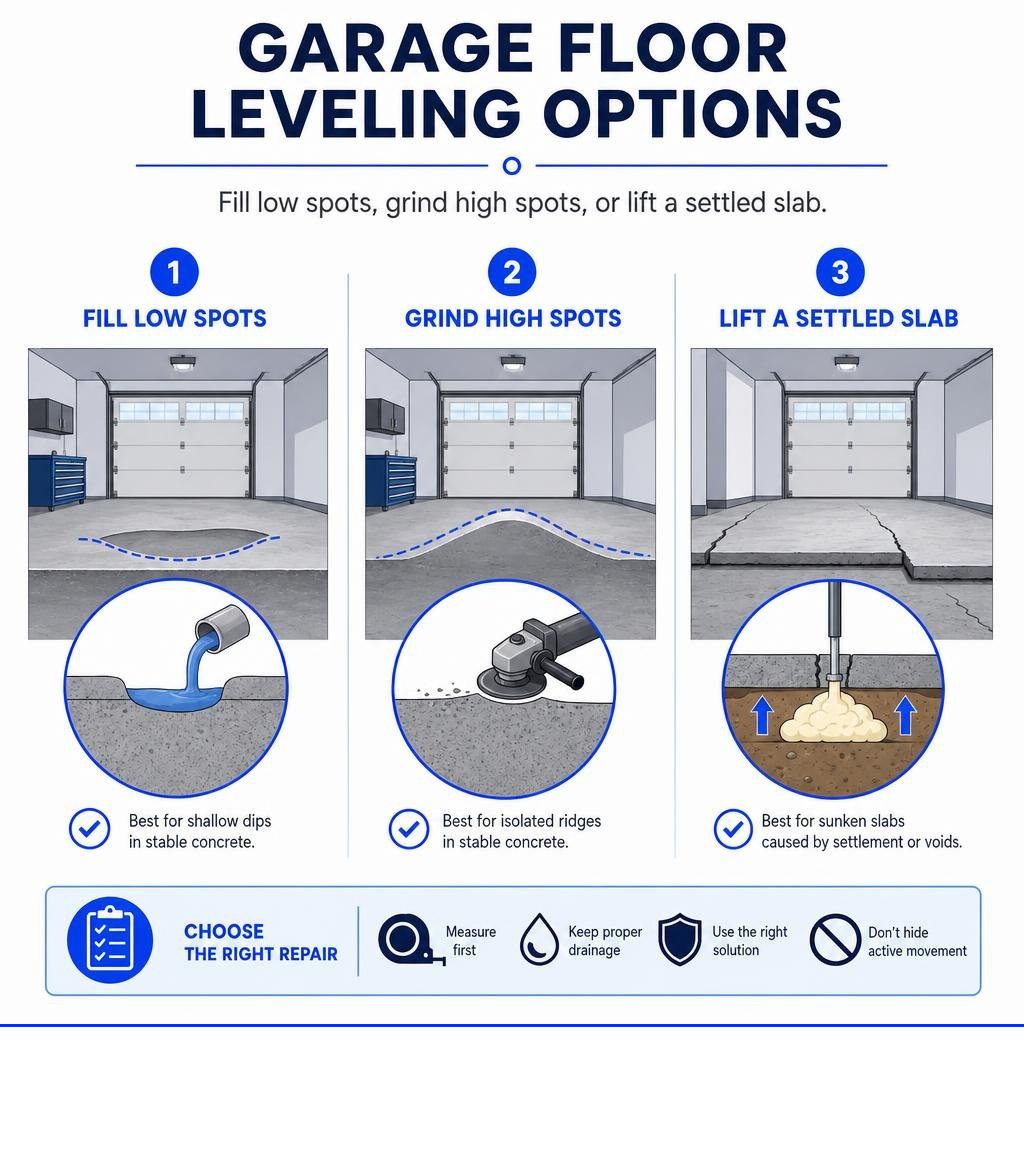
How to level a garage floor depends on what made it uneven. Shallow dips can often be filled, high spots can be ground down, and a slab that has settled because of weak soil or a void underneath may need to be lifted instead of covered.
- Measure the floor first. Use a long straightedge, laser level, or 4-foot level to map dips, ridges, and the direction of drainage.
- Keep needed drainage. Garage floors often slope toward the door. A fall of about 1/4 inch per foot helps water leave the garage rather than pool inside.
- Choose the right repair. Use a garage-rated leveling or resurfacing product for stable, shallow low spots; grind stable high spots; and call a slab-lifting professional when concrete is sinking, cracking, or sounds hollow.
- Do not hide active movement. An overlay may crack again if soil settlement, water erosion, or an open void remains below the slab.
A level garage floor is not always perfectly horizontal. The goal is a smooth, stable surface that supports vehicles, keeps water moving in the right direction, and does not create a trip hazard or a gap under the garage door.
I am Trey McNamee, owner of FoamWorks Concrete Leveling, and our team has decades of combined experience helping homeowners understand how to level a garage floor when settlement is the real issue. We use polyurethane foam injection to lift sunken concrete with less disruption than replacement, often completing repairs in a few hours.
Diagnosing Causes and Assessing Garage Slab Damage
Before jumping into materials and mixing tools, you must understand why your garage floor became uneven in the first place. Concrete slabs rarely sink or crack without an underlying trigger. In our service areas across Northwest Ohio, Southeast Michigan, and Northeast Indiana, climate and soil conditions play massive roles in slab movement.
Common causes of an uneven garage floor include:
- Poor Soil Compaction: When homes are constructed, sub-base soil inside the foundation walls must be compacted in thin lifts. If the contractor rushed this step, the soil gradually consolidates under the weight of the slab and heavy vehicles, leaving empty gaps beneath the concrete.
- Water Erosion & Washout: Roof runoff from overflowing gutters or poor grading near the garage foundation can channel water beneath the slab. Over time, this water washes away supportive sand and sub-base aggregate.
- Freeze-Thaw Cycles: Water trapped in sub-base soil freezes and expands during harsh winter months, causing the concrete to heave upward. When the ice thaws in spring, the slab drops onto unstable ground, leading to major cracking and differential settlement.
- Heavy Vehicle Loads: Daily weight from trucks, SUVs, and heavy shop equipment accelerates settlement over uncompacted soil or subsurface voids.
- Surface Pitting and Spalling: Deicing salts carried in on car tires breakdown the concrete binder, causing surface scaling, pitting, and crumbling rather than structural sinking.
Understanding these mechanics is essential because pouring an overlay over a slab that is actively settling will only result in reflective cracking and material failure. To learn more about why slabs drop over time, read our guide on why is my concrete driveway sinking?.
Evaluating Floor Slope and Subsurface Voids
Diagnosing your floor requires a systematic survey of surface flatness, pitch, and slab integrity.
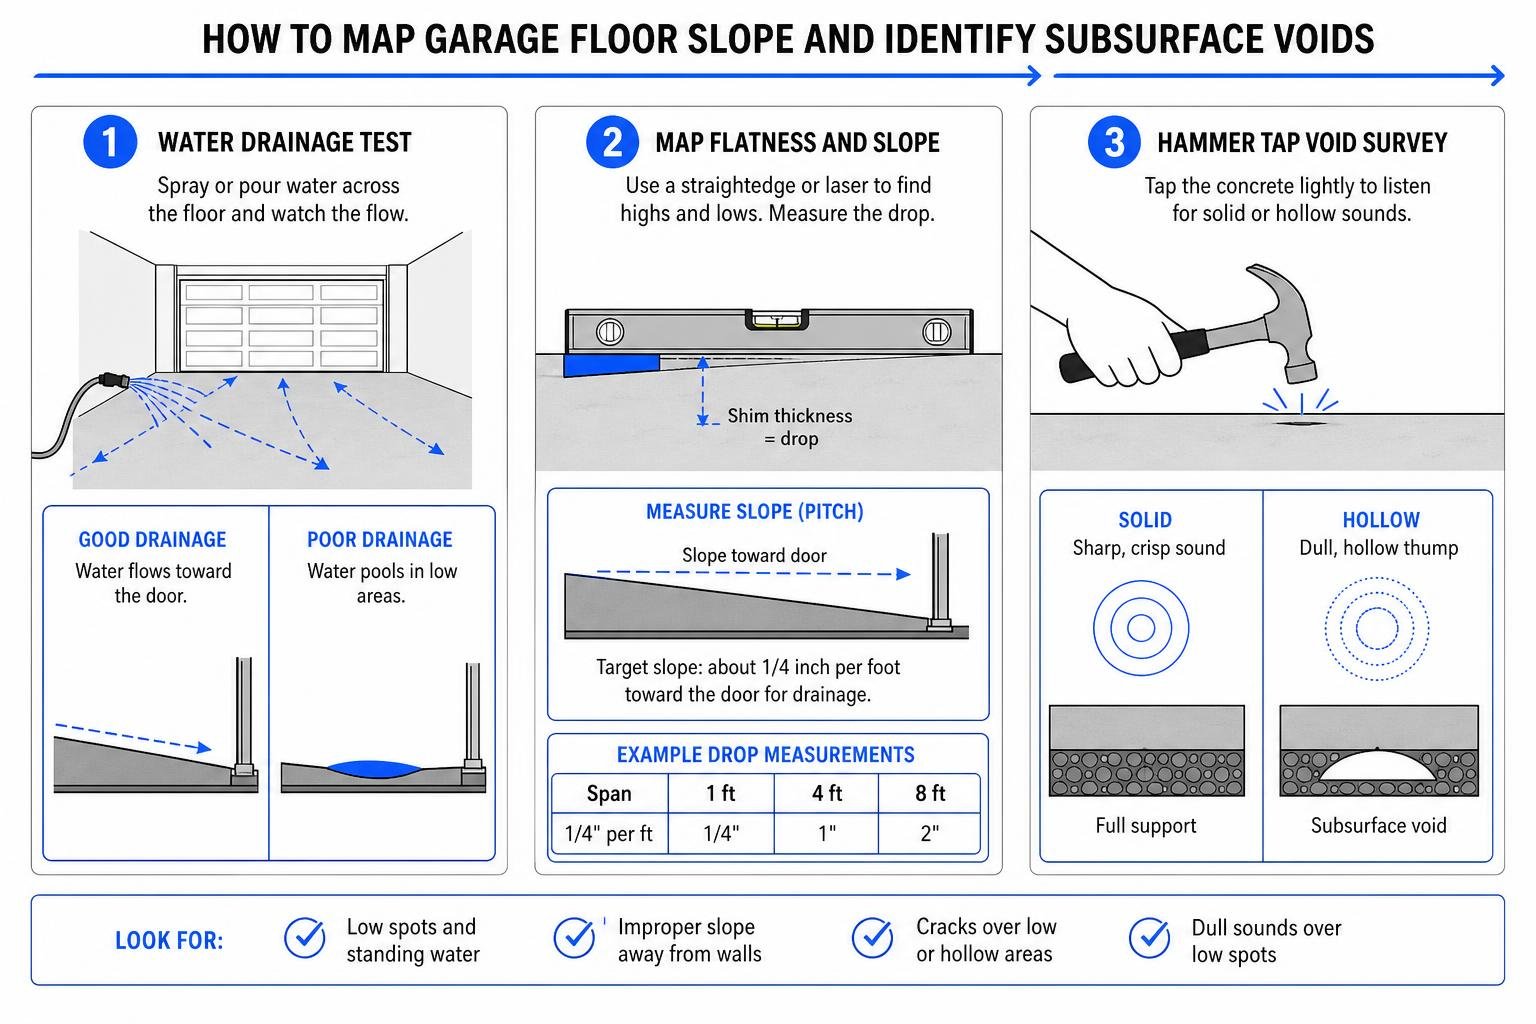
- Perform a Water Drainage Test: Spray water across the floor using a hose or bucket. Watch where it pools and where it flows. If water collects against interior walls instead of draining toward the overhead door, you have an improper slope.
- Map the Flatness with a Straightedge or Laser: Place a 4-foot or 8-foot level on the slab. Slide tapered shims under the low side until the bubble centers, then measure the shim thickness to calculate the drop. For large two-car garages, setting up a rotary laser level or string line allows you to map high and low points across the entire floor quickly.
- Conduct a Hammer Tap Void Survey: Tap a hammer light-to-medium across the slab near cracks and low spots. A solid, sharp rebound indicates intact sub-base contact, whereas a dull, hollow “thump” signals a subsurface void where soil has washed out or settled.
Evaluating Methods for How to Level a Garage Floor
There is no single “one size fits all” technique for fixing garage concrete. Choosing the correct approach depends on whether you are removing surface bumps, filling shallow dips, lifting an entire settled slab, or preparing the space for a room conversion.
| Repair Method | Best For | Typical Thickness Range | Main Advantage | Key Limitation |
|---|---|---|---|---|
| Self-Leveling Compound | Filling shallow dips, micro-smoothing | 1/8 inch to 1 inch | Creates flat, smooth finish naturally | Naturally flattens out, eliminating required drainage slopes |
| Concrete Grinding | High spots, ridges, adhesive removal | N/A (Removes up to 1/2 inch) | Removes localized humps without raising floor height | Creates heavy silica dust; cannot fix sunken slabs |
| Polyurethane Foam Lifting | Sinking slabs, sub-base voids | Unlimited lift height | Restores original height; fills voids underneath | Requires specialized professional injection equipment |
| Polymer Screed Topping | Re-establishing directional slope | 1/4 inch to 1.5 inches | Allows custom pitching toward garage door | Requires manual screeding expertise and edge cutting |
Bonded Toppings vs. Sleeper Subfloor Systems
When homeowners evaluate how to level a garage floor, their intended use for the space heavily dictates the material choice.
Bonded Concrete Toppings are polymer-modified cement mixtures applied directly over clean, primed concrete. They bond mechanically and chemically to the original slab, creating a thin, durable wear surface that can handle rolling vehicle traffic, tool carts, and oil drips. Bonded toppings preserve precious headroom and maintain seamless transitions at driveway thresholds.
Sleeper Subfloor Systems are designed primarily for garage-to-living-space conversions. This method involves laying down a 6 mil polyethylene vapor barrier, anchoring 2×4 or 2×2 wooden sleepers over the sloped concrete, shimming them perfectly level, and covering them with 3/4-inch tongue-and-groove OSB subflooring. While sleepers allow you to incorporate rigid foam insulation and level out dramatic floor drops, they take up several inches of vertical headroom and cannot support vehicle traffic.
Self-Leveling Compounds vs. High-Density Foam Injection
A common point of confusion when learning how to level a garage floor is deciding between self-leveling cement compounds and professional polyurethane foam injection.
Self-leveling underlayments are cementitious, polymer-enhanced slurries designed to flow out like pancake batter and seek their own level across flat or dipped surfaces. However, self-leveling compound adds dead weight on top of the slab. If the slab is sinking because the underlying soil is weak, adding hundreds of pounds of cement compound only accelerates further settlement.
By contrast, polyurethane foam injection addresses the root cause of concrete settlement. By injecting high-density liquid polyurethane through tiny 5/8-inch holes drilled into the slab, the expanding foam expands underneath, fills hollow sub-base voids, compacts loose soil, and gently lifts the concrete back to its original position. Explore our full range of concrete leveling solutions to see how non-invasive foam injection works.
Furthermore, foam injection provides massive cost savings compared to traditional tear-out and replacement. Polyurethane foam injection costs 30% to 50% less than full concrete removal and re-pour. Most foam lifting repairs are completed in just a few hours, allowing you to park your vehicle on the floor almost immediately. It eliminates heavy excavation, landscape destruction, high labor charges, and expensive landfill disposal fees.
Step-by-Step DIY Guide to Concrete Self-Leveling
If your garage slab is structurally sound, resting firmly on solid soil, but features shallow dips or surface pitting up to 1 inch deep, self-leveling compound is a popular DIY project. For complete step-by-step instructions on cement overlays, you can review this step-by-step garage floor guide.
Tools and Equipment Required for How to Level a Garage Floor
To execute a successful pour, collect all necessary tools before mixing your first bag:
- Heavy-duty 1/2-inch drill (minimum 650 RPM) and eggbeater mixing paddle
- Large 5-gallon or 15-gallon mixing barrels
- Gauge rake (adjustable depth pins) and heavy-duty floor squeegee
- Spiked roller (breaks air bubbles and aids blending)
- Spiked shoes (allows walking across wet compound without ruining surface finish)
- Stainless steel finishing trowels and margin trowels
- Personal Protective Equipment (PPE): NIOSH-approved silica respirator, eye protection, chemical-resistant gloves, knee pads
Surface Prep, Crack Repair, and Priming
Preparation accounts for 80% of any concrete coating or leveling project’s success. Skipping prep steps guarantees that your new leveling layer will delaminate or crack within a year.
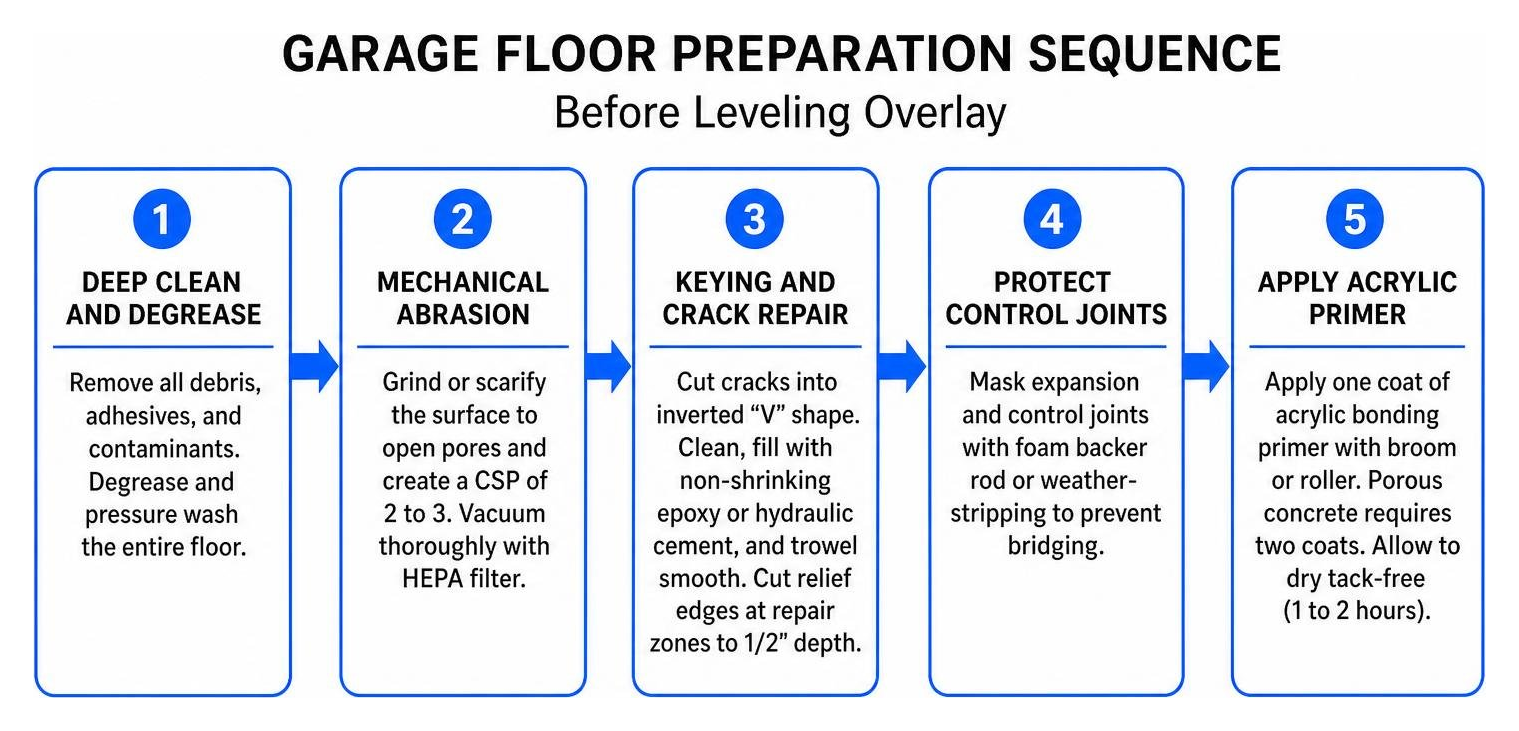
- Deep Cleaning and Degreasing: Scrape away old paint, carpet adhesive, or drywall mud. Apply a heavy-duty commercial concrete degreaser over oil stains, scrub with a stiff wire brush, and pressure wash the entire floor.
- Mechanical Abrasion: Mechanical grinding or scarifying is needed to open concrete pores, creating a Concrete Surface Profile (CSP) of 2 to 3. Vacuum all concrete dust thoroughly using a HEPA vacuum.
- Keying and Crack Repair: Never pour self-leveler over open cracks. Use a circular saw with a diamond blade or an angle grinder to cut existing cracks into an inverted “V” shape. Clean out debris, treat cracks with a non-shrinking epoxy filler or hydraulic cement, and trowel smooth. Cut perimeter relief edges along repair zones to a depth of 1/2 inch; feathering thin concrete edges under car tires leads to premature edge chipping.
- Protect Control Joints: Mask expansion and control joints using weatherstripping or foam backer rod so self-leveling compound does not flow into them and bridge active movement joints.
- Apply Acrylic Primer: Apply a coat of acrylic concrete bonding primer using a broom or roller. Porous concrete requires two coats. Primer prevents the dry slab from sucking moisture out of the wet leveler, which causes rapid drying, pinholes, and poor adhesion. Allow the primer to dry tack-free (1 to 2 hours).
Mixing, Pouring, and Layer Thickness
Precision during mixing and pouring is essential. Self-leveling compounds have a working time of only 15 to 20 minutes before they begin setting.
- Water Ratio: Measure water precisely using a graduated bucket according to the manufacturer’s directions (typically 5 to 6 quarts per 50 lb bag). Always add water to the bucket first, then gradually pour in dry powder while running the mixer paddle for 3 to 5 minutes to avoid clumps.
- Testing Consistency (Slump Test): Perform a quick field test by filling a 9 oz cup (bottom removed) set on a clean sheet of glass. Lift the cup; proper fluid mix should spread into an even 8-inch diameter pool.
- Pouring and Spreading: Begin pouring at the farthest corner from the exit, pouring in continuous, overlapping ribbons roughly 0.5 meters from walls. Use a gauge rake set to your target depth (typically 1/8 inch to 1 inch thick per pour) to distribute compound evenly.
- Removing Trapped Air: Immediately roll a spiked roller over the wet pour in crosswise directions. This releases trapped air bubbles, prevents micro-pitting, and seamlessly blends separate pour ribbons together.
- Deep Pour Fillers: If a low spot exceeds 1 inch in depth, many manufacturers permit blending clean 3/8-inch pea gravel into the compound as an aggregate fill to build thickness while reducing material costs.
Managing Drainage Slopes, Thresholds, and Common Mistakes
A major trap when learning how to level a garage floor is failing to plan for water drainage and doorway height transitions.
Creating a Drainage Slope vs. Flat Surface Resurfacing
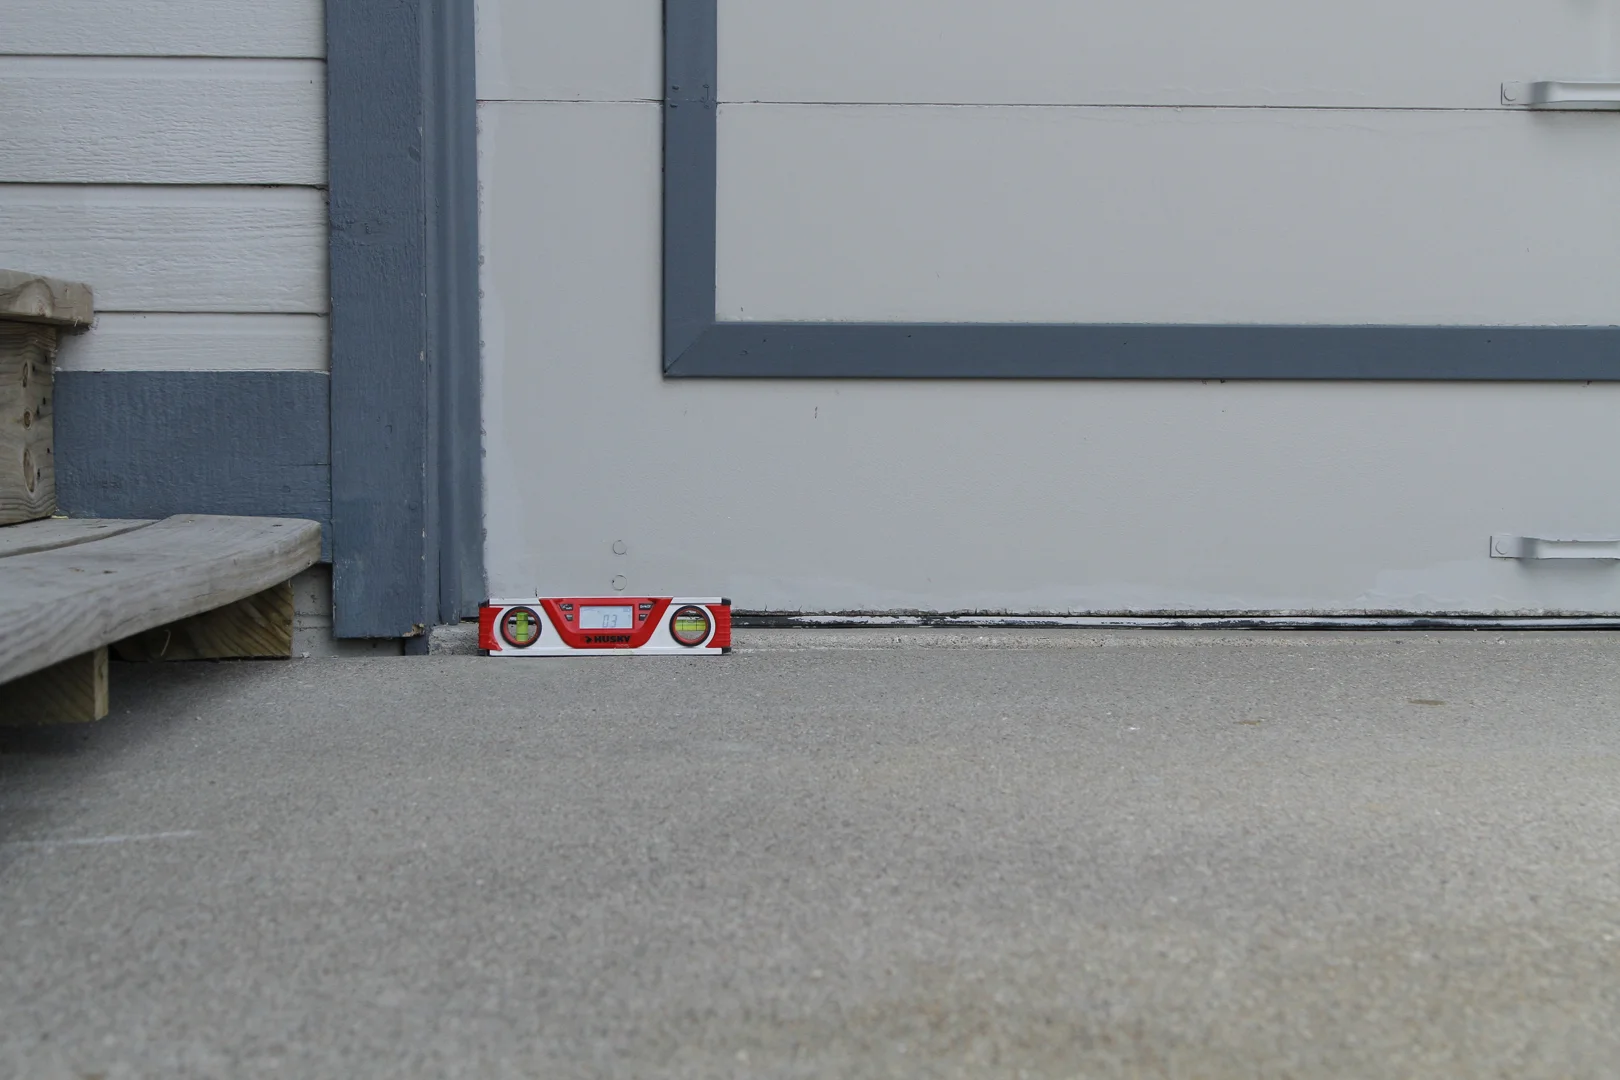
The industry standard slope for residential garage floors is 1/4 inch per foot (with absolute minimum code allowances between 1/8 inch and 1/4 inch per foot) sloping directly toward the main vehicle door. This pitch prevents rainwater, melted snow, and vehicle wash water from pooling beneath home foundation walls.
Because self-leveling cement flows out naturally flat, it will completely destroy your garage’s drainage slope if poured across the entire floor. To maintain an intentional slope while repairing uneven surface texture, you must use a polymer-modified resurfacing mortar rather than a self-leveler. For a deeper breakdown of slope mechanics, consult these garage floor sloping guidelines.
When building a pitch manually, screed polymer resurfacer in 4-foot wide strips using custom-notched guide boards or story poles, working from the rear wall down toward the overhead door threshold.
Threshold Adjustments and Slip-Resistant Finishes
Raising your garage floor height by 1/2 inch to 1 inch using an overlay impacts garage doors and entryways.
- Door Threshold Transitions: Raising floor elevation near the overhead door can leave gaps or cause the door bottom to bind. Remedy this by installing a flexible rubber astragal door bottom seal or fitting a tapered threshold transition strip.
- Creating Slip-Resistant Finishes: Wet self-leveling or polymer overlays cure to a smooth, glass-like finish that becomes extremely slick when tires track in water or snowmelt. To ensure safety, apply a light broom finish as wet polymer resurfacers set up. If applying clear epoxy topcoats over cured leveler, broadcast fine silica sand or polymer anti-slip grit into the wet coat.
When to Hire a Contractor for How to Level a Garage Floor
While minor surface fills are manageable DIY projects, certain structural conditions mandate professional intervention.
Call a professional when you observe:
- Slab drops greater than 1.5 inches across short distances
- Active sinking, severe cracking, or slabs breaking into separate tilting sections
- Water actively seeping through perimeter foundation walls or floor cracks
- Subsurface hollow sound patterns indicating widespread soil washout
For severe structural damage, exploring specialized concrete repair techniques is critical to protect your home’s foundation and overall structure.
Frequently Asked Questions About Garage Floor Leveling
Can self-leveling concrete be used to create a slope toward the garage door?
No. Self-leveling concrete relies on high fluidity to spread out horizontally, meaning it naturally flattens itself out to zero slope. If you pour self-leveling concrete on a sloped floor, it will run toward the lowest point, collecting at the garage door and eliminating the built-in drainage pitch. To create or preserve a slope, use a polymer-modified concrete resurfacer or screed mortar that holds a shape when troweled.
How thick can self-leveling compound be applied in a single pour?
Most standard self-leveling concrete products can be applied in single-pour thicknesses ranging from 1/8 inch to 1 inch. Pours thinner than 1/8 inch risk cracking or failing to bond properly under car tires. For dips deeper than 1 inch, you can either apply compound in multiple lifts (allowing curing between layers) or mix clean, dry 3/8-inch pea gravel directly into the wet mix as an aggregate filler per manufacturer guidelines.
How long does leveled concrete need to cure before driving a vehicle on it?
Curing times vary based on temperature, humidity, and compound formulation, but typical timelines include:
- Foot Traffic: 24 to 48 hours
- Applying Surface Coatings (Epoxy/Paint): 48 hours to 7 days
- Driving & Parking Vehicles: 7 full days
Driving a heavy car or truck onto freshly leveled concrete before full hydration occurs can crush thin overlays or rupture new bonds.
Conclusion
Understanding how to level a garage floor boils down to making the right diagnosis before spending time and money on materials. Shallow dips and surface pitting can easily be corrected with proper surface preparation, bonding primers, and garage-rated polymer overlays. However, if your garage floor is sinking, cracking, or resting over hollow soil voids, pouring cement on top only hides a problem that will soon return.
At FoamWorks Concrete Leveling, we specialize in permanent, non-invasive polyurethane foam injection. Serving communities across Northwest Ohio, Southeast Michigan, and Northeast Indiana—including Toledo, Perrysburg, Mansfield, Port Clinton, Avon Lake, Monroe, and Fort Wayne—we lift sunken concrete back to grade quickly and affordably.
By choosing high-density foam injection, you save 30% to 50% over full concrete replacement while enjoying a fast repair that backed by a lifetime warranty. Ready to fix your uneven garage floor for good? Explore our interior slab leveling services or contact FoamWorks Concrete Leveling today to request your free estimate!