

Understanding What Causes Cracks in Concrete
Before picking up a trowel or opening a tube of sealant, it helps to understand why concrete breaks down in the first place. Concrete is a rigid material with high compressive strength, but its tensile strength is relatively weak. When internal stress or external movement exceeds what the concrete can endure, a crack forms. Understanding these underlying causes helps prevent repeat repairs and ensures long-term success.
Primary Causes of Concrete Surface Cracks
Most residential concrete surface issues stem from natural physical processes during or after installation:
- Drying Shrinkage & Water Evaporation: When fresh concrete is poured, it contains more water than necessary for chemical hydration. As this excess water evaporates during curing, the slab contracts. Restraint from subbase friction or adjacent structures creates internal tension, causing hairline and narrow shrinkage cracks.
- Thermal Expansion & Contraction: Concrete expands in hot weather and contracts in freezing temperatures. Without adequate control joints cut at proper intervals, thermal stresses force the slab to crack along natural weak lines.
- Freeze-Thaw Cycles: In Midwest climates across Ohio, Michigan, and Indiana, moisture seeps into unsealed concrete pores. When water freezes, it expands by approximately 9%, creating severe internal pressure. Over repeated seasons, this moisture pressure causes surface spalling, flaking, and wider longitudinal cracking.
For a deeper look into the factors behind slab failure, review our detailed guide on the causes of concrete damage.
Subgrade Settlement and Heavy Loads
Beyond climate and drying factors, subgrade instability plays a primary role in structural slab cracking.
When soil underneath a concrete slab shrinks due to drought, washes away from improper gutter drainage, or suffers from inadequate initial compaction, it creates empty voids beneath the heavy concrete. Without solid subgrade support, heavy parked vehicles or even standard pedestrian loads place excessive bending stress on the unsupported slab sections, causing them to crack and sink.
Assessing Damage: DIY Repair vs. Professional Replacement

Not all concrete cracks are created equal. Properly assessing crack dimensions, movement, and vertical alignment determines whether you can tackle the job as a weekend DIY project or need an advanced repair strategy.
Identifying Hairline, Narrow, and Wide Cracks
- Hairline Cracks (Less than 1/16 inch): These fine surface cracks are usually cosmetic shrinkage lines. They require minimal surface preparation and can be sealed with thin liquid concrete sealers or gravity-feed resins.
- Narrow Cracks (1/16 inch to 1/4 inch): Standard residential cracks caused by minor settlement or thermal movement. These are ideal for DIY repair using flexible caulk or self-leveling sealants.
- Medium Cracks (1/4 inch to 1/2 inch): These cracks require deeper cleaning and depth control using a flexible foam backer rod before filling with flexible sealant or vinyl patching compound.
- Wide Cracks (1/2 inch or wider): Cracks of this scale indicate significant slab stress or ongoing movement. They require chiseling, undercutting, backer rods, and heavy-duty structural patching compounds.
If you are evaluating structural integrity on larger or commercial properties, the American Concrete Institute offers technical guidelines in their Guide to Concrete Repair.
When to Replace Concrete Instead of Repairing
While minor cracks are easily patched, surface sealants cannot fix severe structural failure. Consider professional intervention or high-density foam injection when:
- Active Vertical Displacement Exists: If one side of the crack is significantly higher than the other (1/2 inch or more), the slab has dropped due to subgrade soil failure. Patching this creates a severe trip hazard and will fail quickly.
- Widespread Concrete Crumbling: If the surface is crumbling into loose gravel over large areas, the concrete mix itself has degraded beyond simple patch repairs.
- Ongoing Subgrade Washouts: If underlying soil erosion continues unaddressed, new cracks will constantly form.
Instead of paying thousands for full tear-out and replacement, sunken slabs can often be lifted and stabilized using modern concrete leveling services.
Choosing the Right Concrete Crack Repair Products
Selecting the right repair product depends on whether the crack is horizontal or vertical, whether it continues to move, and how wide the gap is.
| Material Type | Recommended Crack Size | Ideal Location | Flexibility | Typical Cure Time |
|---|---|---|---|---|
| Thin Liquid / Gravity Feed Resin | Hairline (< 1/16") | Horizontal Slabs | Rigid | 24 – 48 Hours |
| Polyurethane / Self-Leveling Caulk | 1/16″ to 1/2″ | Driveways, Patios, Walkways | High | 24 – 72 Hours |
| Non-Sag Polyurethane Sealant | 1/16″ to 1/2″ | Vertical Walls, Steps, Slopes | High | 24 – 48 Hours |
| Vinyl Concrete Patching Compound | 1/4″ to > 1/2″ | Large Voids, Broken Edges | Moderate | 24 Hours |
| Hydraulic Cement | Any Size with Active Leaks | Basement Walls, Foundations | Rigid | 3 – 5 Minutes |
For detailed product overviews, consult the comprehensive Concrete Crack Repair Guide.
Flexible Sealants vs. Rigid Patching Compounds
Using rigid patching mortar on a crack that expands and contracts with temperature changes will cause the repair to pop out within a single season.
- Polyurethane Caulks & Sealants: Polyurethane caulk remains flexible over years of freeze-thaw cycles, making it the best choice for residential driveways and sidewalks. Self-leveling formulas flow smoothly into horizontal cracks without tooling, while non-sag formulas stay put on vertical walls or angled slopes. Explore your material options in our guide to concrete sealant options.
- Vinyl Concrete Patches: Vinyl-reinforced mortar offers higher bond strength than standard concrete mixes. It works exceptionally well for wide, stable gaps or damaged slab edges where structural shape must be restored.
Backer Rods and Epoxy Injection Resins
For cracks deeper or wider than 1/2 inch, fill materials can slump out of reach or fail to cure properly if poured into an endless void.
- Foam Backer Rods: Flexible closed-cell foam rods inserted into deep cracks control material depth (ideally 1/4 to 1/2 inch below the surface) and prevent three-sided adhesion, allowing the sealant to stretch naturally.
- Low-Viscosity Resins: For non-moving structural cracks on flat horizontal decks, ultra-low viscosity epoxies or high molecular weight methacrylates (HMWM) can be poured directly into thin cracks. As detailed in the standard Crack Repair by Gravity Feed with Resin technical bulletin, resins with viscosities under 200 centipoise (cps) penetrate narrow cracks purely through gravity.
How to Repair Concrete Cracks: A Complete Step-by-Step Guide

Proper surface preparation accounts for the majority of long-term repair success. Dust, loose gravel, oil, and organic weeds prevent repair compounds from bonding to sound concrete.
How to Repair Concrete Cracks Under 1/4 Inch Wide
For narrow cracks on flat horizontal surfaces like driveways or walkways, follow this streamlined approach adapted from expert guidelines, including the DIY Driveway Crack Repair Guide and the comprehensive How to Repair Concrete Cracks Guide.
Step 1: Clean and Prep the Crack
Remove trapped weeds, soil, and debris using a flathead screwdriver or stiff wire brush. Vacuum out all fine dust with a heavy-duty wet/dry shop vacuum. Ensure the crack interior is completely dry before applying products; moisture prevents proper sealant adhesion.
Step 2: Apply Flexible Polyurethane Sealant
Load a cartridge of self-leveling polyurethane caulk into a caulking gun. Cut the nozzle tip at a 45-degree angle to match the crack width. Insert the nozzle tip deep into the crack and pull slowly, filling the void smoothly. Allow self-leveling sealants to flow level automatically, keeping the bead slightly below the surface of the slab.
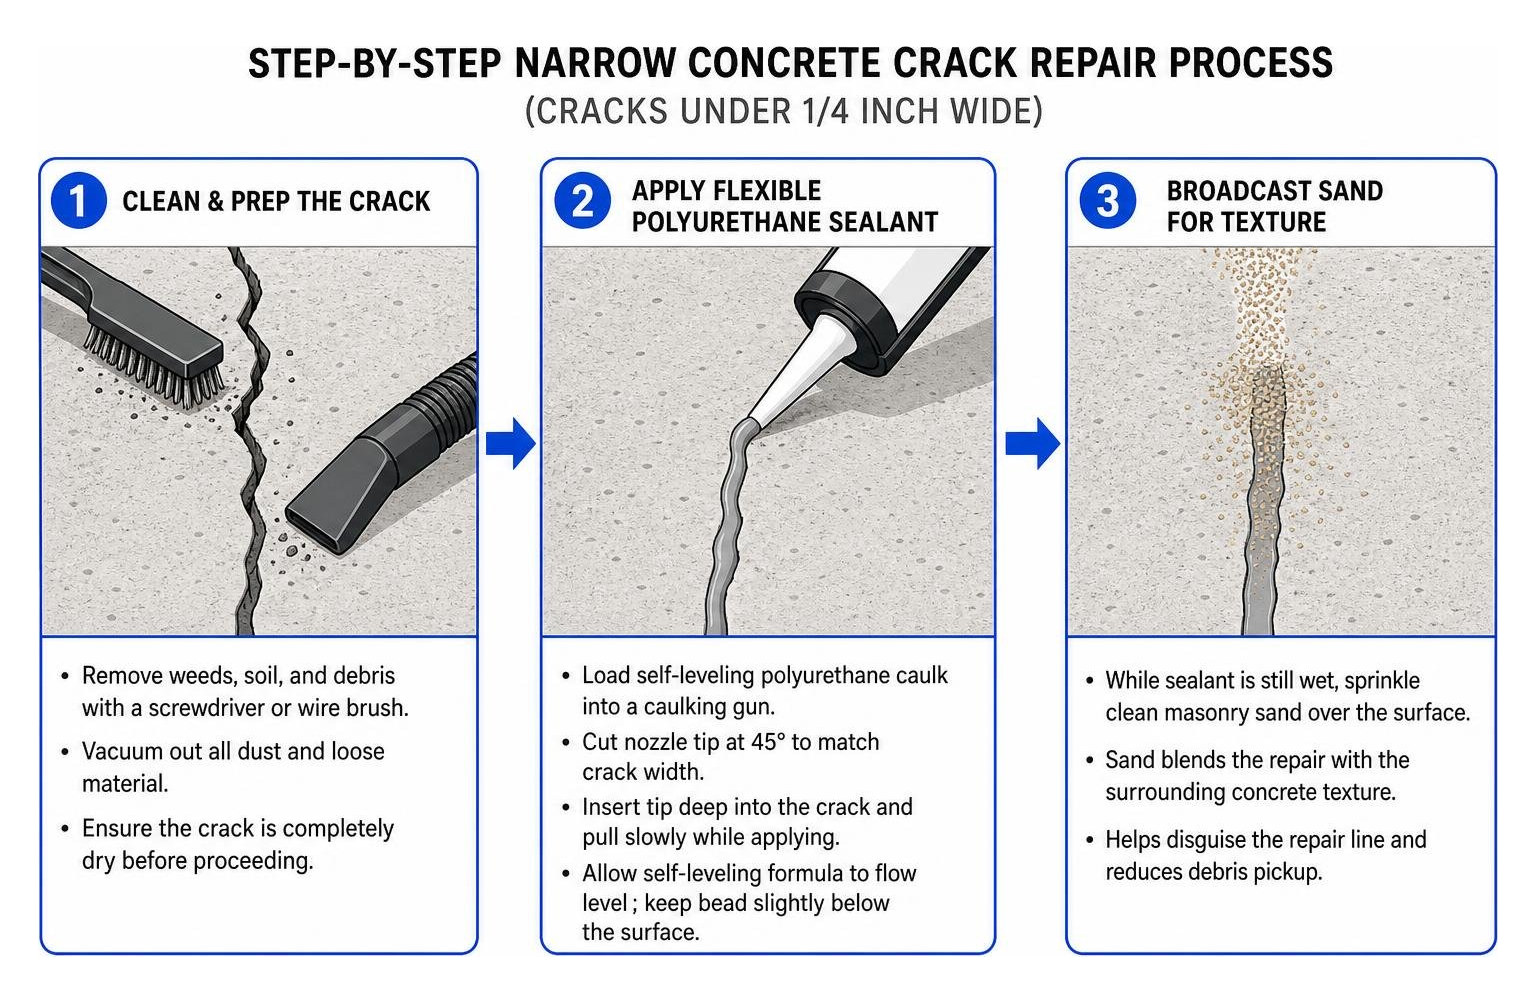
Step 3: Broadcast Sand for Texture and Camouflage
While the polyurethane caulk is still wet, sprinkle a light layer of clean masonry sand directly over the surface. This matches the repair to the surrounding concrete texture, disguises repair lines, and keeps debris from sticking to the fresh sealant. For specific driveway tips, see our guide on concrete driveway repair.
How to Repair Concrete Cracks 1/2 Inch Wide or Deeper
Wider or deeper gaps require structural support and undercutting to ensure patching materials stay locked in place.
Step 1: Chisel and Undercut the Edges
Use a hammer and cold chisel to chip away loose or crumbling concrete along the crack edges. Undercut the edges by angling the chisel inward so the base of the crack is slightly wider than the top opening, creating an inverted “V” shape. This mechanically locks the cured patch into place.
Step 2: Insert Foam Backer Rod
Measure the crack depth. For deep voids, press a closed-cell foam backer rod (slightly larger in diameter than the crack width) into the gap using a blunt tool. Position the top of the backer rod roughly 1/2 inch below the concrete surface.
Step 3: Apply Bonding Agent and Patching Compound
Brush a latex bonding adhesive directly onto the exposed concrete inside the crack to improve adhesion. Mix vinyl concrete patching compound according to manufacturer directions and trowel it tightly over the backer rod with a margin trowel. Press firmly to eliminate air pockets, then smooth the surface level with the adjacent slab.
Common Repair Mistakes to Avoid for Lasting Results
Avoid these frequent mistakes that lead to premature repair failure:
- Skipping Thorough Prep: Applying sealant over dusty, oily, or damp surfaces leads to bond failure within months.
- Choosing the Wrong Material: Filling flexible expansion joints or moving cracks with rigid cement mortar results in cracking during thermal shifts.
- Filling Deep Voids Without a Backer Rod: Squeezing caulk directly into deep voids leads to improper curing, material slumping, and excessive product waste.
- Ignoring Slab Settlement: Applying cosmetic surface patches over hollow, sinking slabs masks the real problem while subgrade erosion worsens underneath.
Frequently Asked Questions About Concrete Crack Repair
How long do concrete repair materials take to cure?
Cure times vary depending on the product type, layer thickness, ambient temperature, and humidity:
- Polyurethane Caulks: Skin over in 20 to 40 minutes, surface harden within 1 to 2 hours, and achieve full cure in 24 to 72 hours.
- Vinyl Concrete Patches: Set firm in 2 to 4 hours and tolerate light foot traffic in 24 hours.
- Hydraulic Cement: Hardens rapidly in 3 to 5 minutes.
Keep ambient application temperatures above 50°F (or a minimum of 40°F for specialized caulks) and protect fresh repairs from rain for at least 24 hours. Find more maintenance answers in our concrete sealant FAQ.
Why is my concrete driveway sinking around the cracks?
When water enters unsealed cracks, it saturates the subgrade soil underneath. Subgrade soil erosion forms empty voids, leaving heavy concrete slabs unsupported.
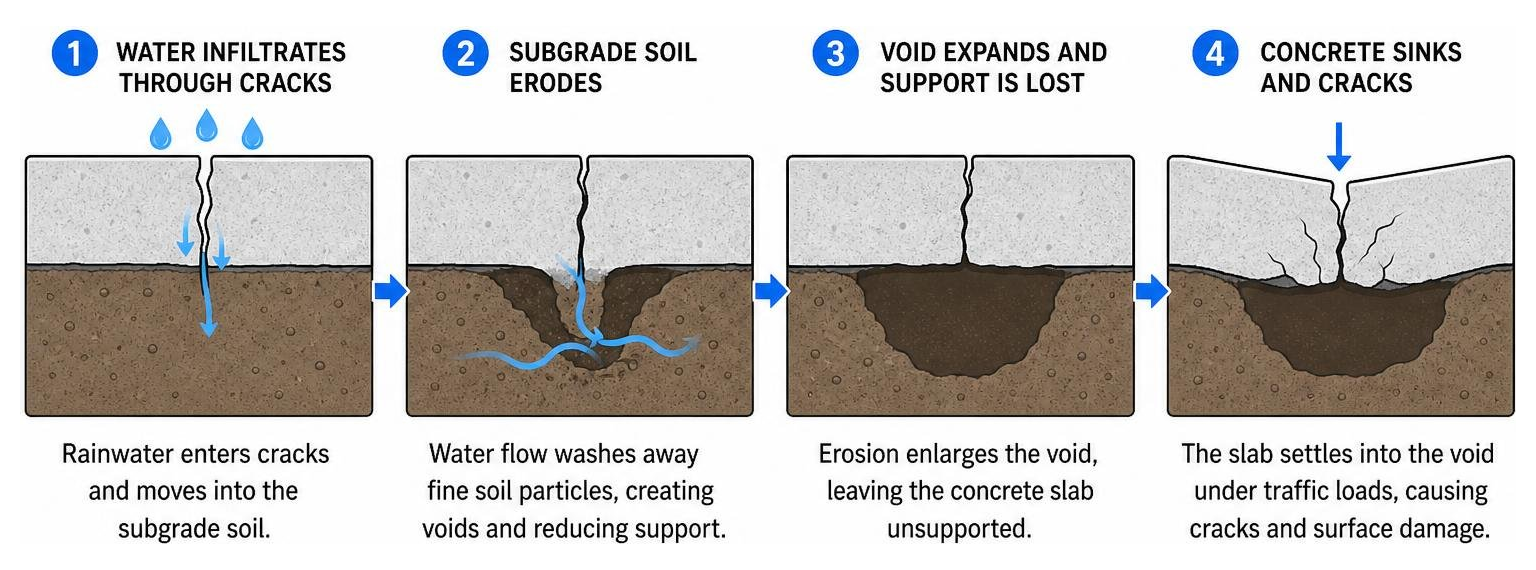
As vehicles drive over unsupported slab edges, the concrete breaks and settles into the underlying void. To learn more about this condition, check out our breakdown on why concrete driveways sink.
How do I prevent concrete cracks from returning?
To protect your repaired concrete and prevent future cracking:
- Apply Concrete Sealer: Apply a silane-siloxane deep-penetrating concrete sealer every 2 to 5 years to block moisture penetration.
- Maintain Effective Drainage: Ensure gutter downspouts discharge at least 3 to 5 feet away from driveways, walkways, and foundation walls.
- Avoid Harsh Chemical Deicers: Use sand for winter traction instead of ammonium-based or calcium chloride deicers that degrade surface concrete.
Conclusion
Fixing hairline and narrow concrete cracks yourself is an easy, budget-friendly project that keeps water out and extends the life of your flatwork. By thoroughly cleaning voids, selecting flexible polyurethane sealants or vinyl patches, and using backer rods for deep gaps, you can achieve durable results for under $100.
However, if your concrete cracks are accompanied by uneven edges, sunken slabs, or deep soil voids, surface patching alone won’t solve the underlying issue. At FoamWorks Concrete Leveling, we fix uneven or sinking concrete across Northwest Ohio, Southeast Michigan, and Northeast Indiana using high-density polyurethane foam injection.
Our eco-friendly foam injection process stabilizes subgrade soils and lifts sunken slabs back to their original position for 30% to 50% less than the cost of full concrete replacement. The process takes just a few hours, leaves your landscaping intact, and includes a lifetime warranty. Contact us today for a free estimate and discover how simple long-lasting professional concrete crack repair can be.