

Common Causes and Emergency Steps for Concrete Ceiling Leaks
Identifying Primary Water Leak Sources
Water moving through an overhead concrete slab rarely takes a straight path. Because concrete contains microscopic capillary pores and cold joints, water travels along the path of least resistance before dripping into your living space.
When evaluating a leaking concrete ceiling, the source usually falls into one of these common categories:
- Plumbing Pipe Failures: Embedded water supply lines or overhead drainage pipes can crack, burst, or develop leaking joints.
- Roof and Terrace Membrane Failures: Flat concrete roof slabs, upper-floor balconies, or outdoor patios rely on surface membranes. When those weatherproofing layers degrade, rainwater pools and seeps directly into the slab.
- Floor-to-Wall Joint Gaps: Cold joints created when concrete walls and ceiling slabs are poured at different times often shrink, creating thin pathways for water migration.
- Hydrostatic Pressure and Subterranean Migration: In subterranean structures, upper basements, or hillside concrete buildings, groundwater exerts pressure against the exterior slab, forcing water up and across interior ceiling surfaces.
Understanding these root triggers is vital because superficial cosmetic fixes won’t hold up under active hydrostatic pressure. To learn more about how water impacts structural slabs, review our breakdown on Concrete Repair Causes.
Immediate Actions During an Active Leak
When water actively drips from an overhead concrete slab, quick intervention limits structural damage and protects your property.
Take these immediate triage steps:
- Contain the Dripping Water: Place a large plastic bucket or bin directly under the leak over spread-out towels to protect your floor. Move furniture, rugs, and electrical appliances out of the splash zone.
- Relieve Water Pressure (If Bulging): If water collects behind a layer of ceiling paint or plaster, creating a flexible water-filled blister, carefully puncture the center of the bulge using a screwdriver. This releases standing water in a controlled stream into your bucket, preventing a sudden ceiling collapse.
- Shut Off Main Plumbing Valves: If you suspect an interior plumbing leak, immediately turn off your structure’s main water valve and open a low-level faucet to drain remaining water from the lines.
- Document Everything for Insurance: Take clear, high-resolution photos and video recordings of the active leak, wet structural elements, and damaged personal items before starting cleanup.
- Start the Drying Clock: Mold growth can occur within 24 to 48 hours of water exposure. Run heavy-duty floor fans and industrial dehumidifiers as soon as standing water is contained.
How to Locate the Origin of a Concrete Ceiling Leak

Because water can enter a concrete slab on one side of a room and travel horizontally along interior micro-fissures before dripping down the opposite side, finding the exact origin requires deliberate diagnostic steps.
- Thermal Imaging (FLIR): Infrared cameras detect minute temperature differences caused by evaporative cooling. Wet concrete appears distinctly cooler than dry concrete on a thermal scan, allowing technicians to map hidden water tracks inside the ceiling without tearing down structures.
- Pinless Moisture Meters: By moving a pinless moisture meter in a grid pattern across the wet ceiling, you can follow rising moisture percentages back to the highest concentration point, which pinpoints the leak source.
- The Aluminum Foil Test: If you aren’t sure whether dampness on a basement ceiling slab comes from water seepage or interior condensation, tape a 1-foot square piece of aluminum foil flat against the bare concrete. Leave it for 48 hours. If water droplets collect on the room-facing side, high humidity is causing condensation. If water droplets collect on the side touching the concrete, you have an active external water leak.
- Positive-Side vs. Negative-Side Inspection: Always check the upper side of the ceiling (the positive side, such as an upstairs bathroom floor or roof deck) for standing water, cracked tile grout, or damaged roof flashing before evaluating the underside (the negative side).
Step-by-Step Concrete Ceiling Leak Repair Process
Surface Preparation and Materials for Concrete Ceiling Leak Repair
Fixing an overhead concrete leak requires specialized repair materials designed to resist gravity and hold up against moisture. Standard joint compound, soft spackle, or plain cement will fail because plain cement shrinks as it cures, losing its mechanical bond.
Before applying sealants, mechanical preparation is critical:
- Use an angle grinder fitted with a V-groove diamond blade to chase cracks, opening them slightly to accept repair compounds.
- Clean all concrete dust out of the crack using HEPA-filtered vacuum extraction or oil-free compressed air.
- Clean away oil stains or ambient grease using a specialized concrete degreaser.
To choose the right patching products, explore our guide to Concrete Sealant options. For additional structural sealing approaches, refer to Stopping Ceiling Leaks: Concrete Sealing Techniques.
Permanent Concrete Ceiling Leak Repair via Injection
When positive-side exterior access isn’t feasible, injecting hydro-active polyurethane resin into the core of the concrete ceiling creates a permanent internal barrier. Polyurethane resin reacts with internal water, expanding up to 20 times its liquid volume to form a closed-cell, flexible rubber gasket deep inside the slab.
The chemical injection process follows these step-by-step actions:
- Drill Injection Ports: Using a hammer drill, make holes at a 45-degree angle along alternating sides of the crack, spaced 6 to 12 inches apart. Angle the drill so the hole intersects the target crack at roughly the mid-depth of the concrete slab.
- Install Mechanical Packers: Insert metal injection packers (ports) into the drilled holes and tighten them securely with a wrench to expand the rubber sleeve against the concrete walls.
- Flush and Inject Resin: Hook up a high-pressure injection pump to the lowest port. Pump hydro-active polyurethane resin into the concrete until expanding foam begins to push out of the adjacent port.
- Leap-Frog Along the Crack: Disconnect the line, cap the filled port, move to the next port along the line, and repeat the process until the entire crack is filled.
- Cure and Flush Cut: Allow the polyurethane resin to cure completely for 24 to 48 hours. Knock off the protruding injection ports with a hammer, and seal the shallow entry holes using non-sag hydraulic cement.
For an in-depth breakdown of overhead structural injection, check out this guide on How to Repair a Leaking Concrete Ceiling.
Repairing Spalling Concrete and Corroded Rebar
When chronic water leaks reach internal steel reinforcement bars (rebar), water causes the steel to rust. When steel corrodes, it can expand up to seven times its original volume, exerting massive internal force that the concrete’s tensile strength cannot withstand. This internal pressure fractures the concrete, causing thick chunks to crack and fall away from the ceiling—a structural defect known as concrete spalling.
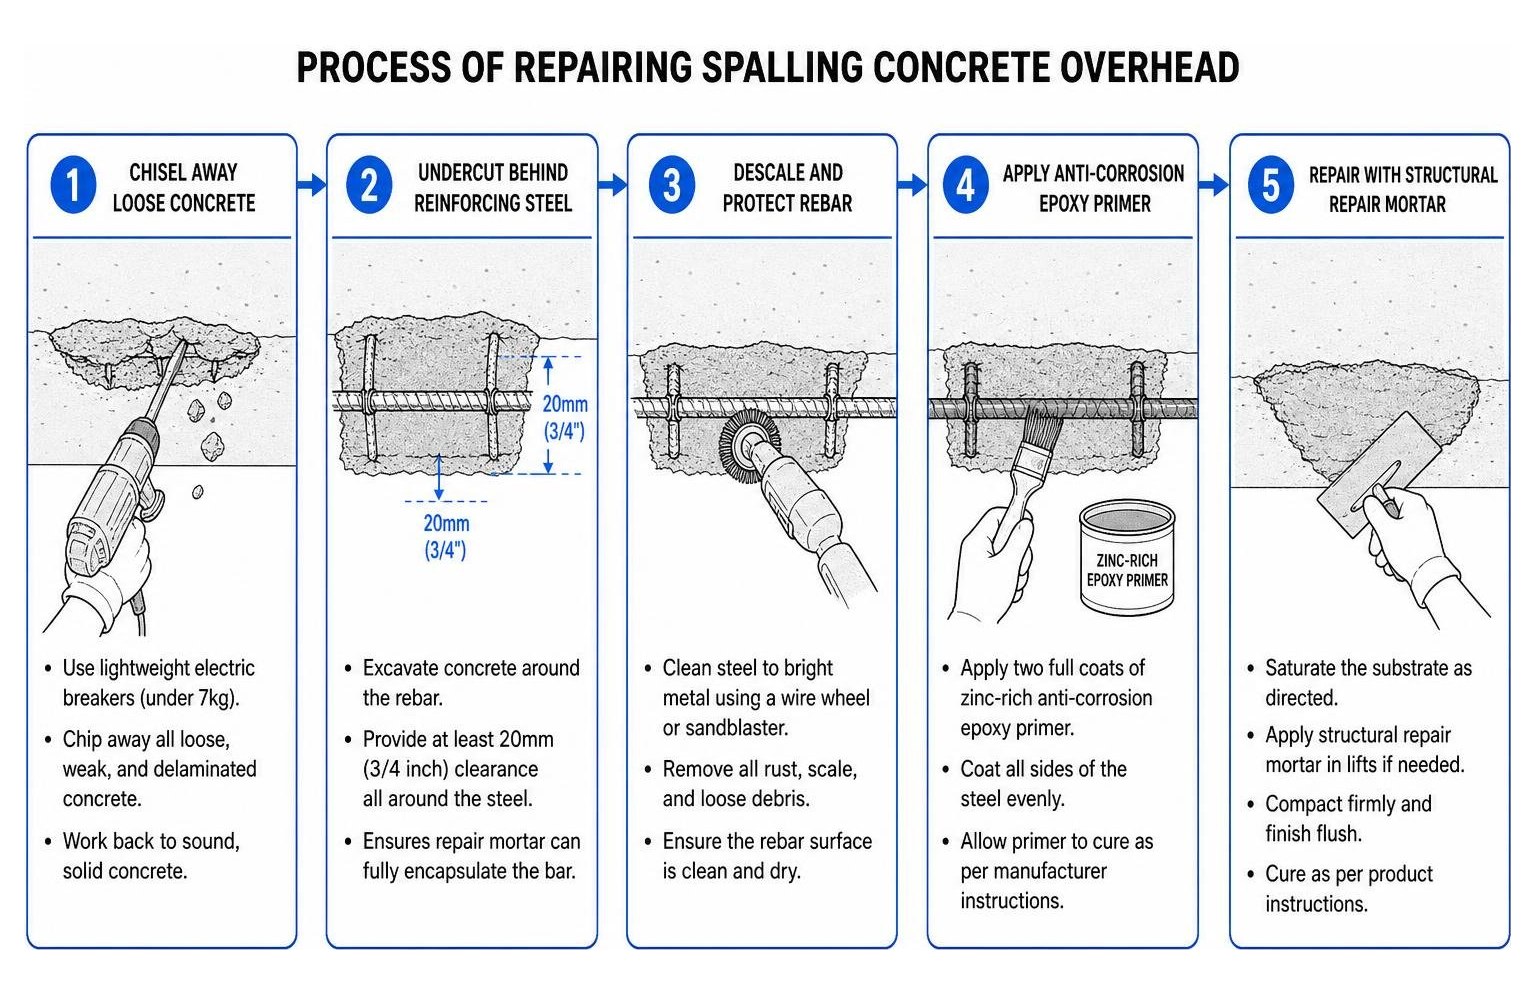
Restoring overhead spalled concrete requires strict structural methods:
- Chisel Away Loose Concrete: Using lightweight electric breakers (under 7kg to avoid micro-shattering surrounding concrete), chip away loose material until reaching sound concrete.
- Undercut Behind Reinforcing Steel: Excavate concrete around the corroded steel rebar, creating at least 20mm (3/4 inch) of clear space all the way around the bar. This allows the new repair mortar to wrap around the steel and create a strong mechanical anchor.
- Descale and Protect Rebar: Scrub embedded steel back to clean bright metal using a wire wheel or sandblaster. Immediately coat the cleaned steel with two coats of a zinc-rich anti-corrosion epoxy primer.
- Apply Thixotropic Repair Mortar: Dampen the surrounding concrete substrate to a saturated surface dry (SSD) condition, apply a polymer bonding slurry, and press a lightweight, thixotropic polymer-modified repair mortar into the patch area in thin 20mm layers until flush with the ceiling. Wood float the surface to keep pores open while curing.
For a deep dive into treating overhead structural spalls safely, follow this detailed walkthrough on How to Repair Spalling Concrete Ceiling.
Concrete Ceiling Repair Duration, Costs, and Prevention
Timeline Expectations and Hiring the Right Specialist
Understanding your repair timeline helps you manage property disruption effectively.
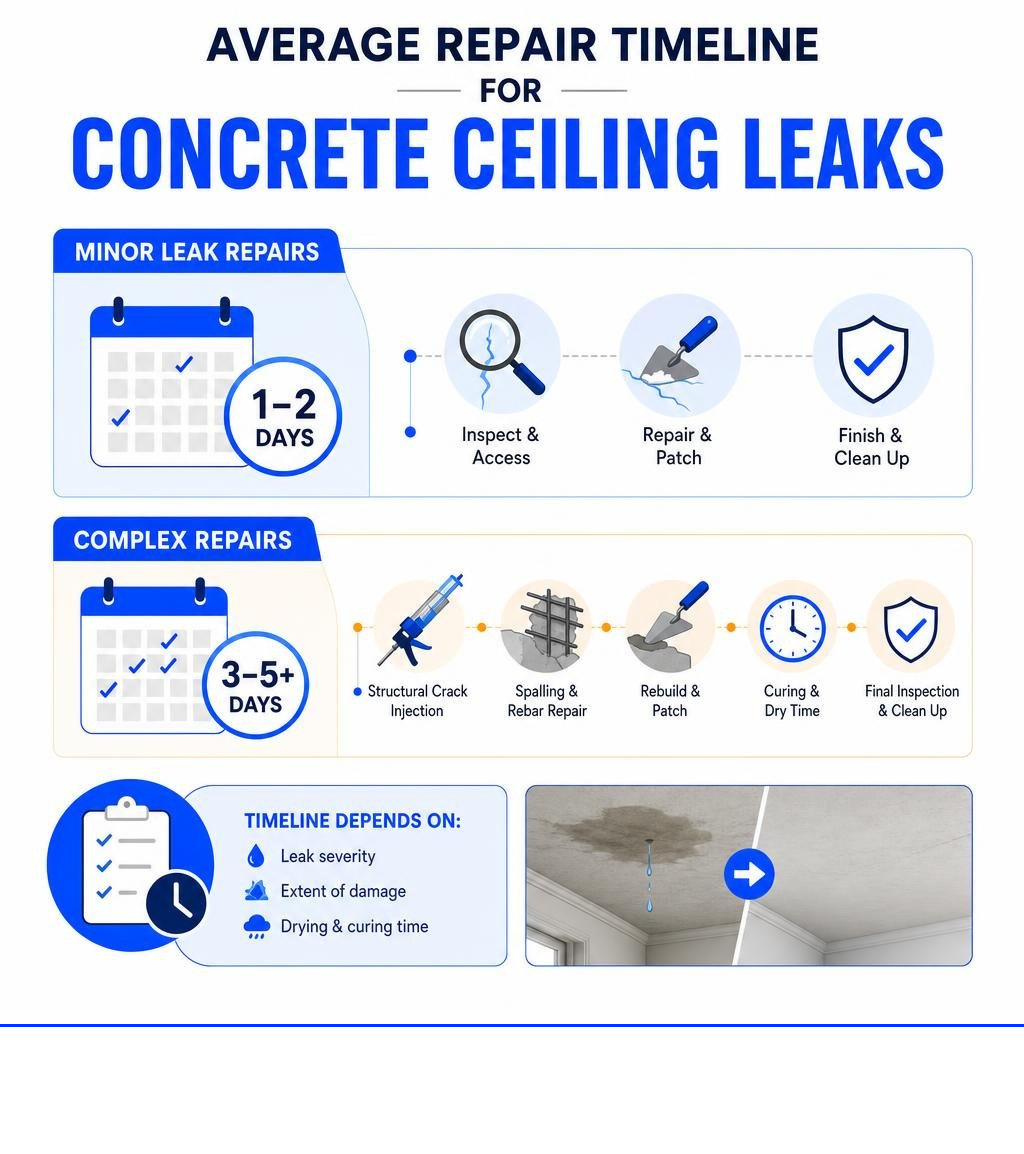
- Minor Leak Repairs (1 to 2 Days): Simple surface cracks or accessible pipe joint fixes where moisture damage is minor typically wrap up within 24 to 48 hours, including surface patching.
- Complex Repair Timelines (3 to 5+ Days): Deep structural crack injection, spalling rebar restoration, or embedded pipe burst remediation generally requires 3 to 5 working days. This accounts for material curing phases and dry-out times.
When choosing a repair professional, keep these roles in mind:
- Plumbers: Hire a licensed plumber when water pipes embedded within or running above the concrete ceiling burst or leak.
- Roofers: Contact a professional roofer when water infiltrates flat concrete roof decks or exterior perimeter flashings.
- Waterproofing and Concrete Specialists: Contact a concrete repair team when structural cracking, high-pressure polyurethane injection, overhead rebar spalling, or foundation movement needs remediation.
Be sure to ask your insurance representative about trace and access coverage. Many building policies cover the costs associated with opening up structural elements to locate hidden plumbing leaks within concrete slabs.
Preventative Maintenance to Stop Recurring Leaks
Long-term protection relies on proactive maintenance rather than reactive patching.
| Feature / Repair Method | Surface Patching & Painting | High-Pressure Polyurethane Injection | Positive-Side Waterproofing Membrane |
|---|---|---|---|
| Primary Function | Cosmetic stain coverage | Deep internal crack waterproofing | Exterior water intrusion prevention |
| Durability | Low (Fails if moisture returns) | High (Permanent flexible inner seal) | Very High (Protects overall slab mass) |
| Water Pressure Resistance | Poor | Excellent | Superior |
| Ideal Use Case | Final aesthetic finishing | Inaccessible, active internal leaks | Roof slabs, balconies, and decks |
To maintain dry concrete ceilings year-round:
- Reapply breathable silane-siloxane hydrophobic sealers to exterior concrete surfaces every 3 to 5 years.
- Clean upper-floor roof gutters and downspouts regularly to prevent standing water backups.
- Keep downspouts discharging water at least 6 feet away from exterior structural walls.
Frequently Asked Questions About Concrete Leak Remediation
Can I fix a concrete ceiling leak strictly from the inside?
Yes, you can fix a concrete ceiling leak from the interior using high-pressure hydro-active polyurethane resin injection. The injection pushes expanding resin completely through the crack to the exterior surface, forming a dense, watertight seal inside the slab even when top-side exterior access is unavailable.
How long does it take for a repaired concrete ceiling to cure completely?
Polyurethane resin injection cures within 24 to 48 hours. Polymer-modified structural concrete repair mortars typically take 1 to 3 days to achieve sufficient strength. Always confirm that internal moisture levels have dropped below 4% before applying interior primers or paints.
When should I hire a professional contractor instead of attempting DIY repairs?
While basic surface preparation can be tackled by experienced DIYers, you should hire a professional contractor if the crack is wider than 1/16 inch, shows signs of structural displacement, involves active high-pressure water flow, or exhibits visible rebar corrosion and spalling.
Conclusion
Detecting and executing a concrete ceiling leak repair requires a clear, methodical approach: find the true water entry source, contain active moisture quickly, select expanding polyurethane injection or thixotropic repair mortars, and treat corroded steel properly. Quick action prevents minor ceiling dampness from developing into costly structural spalling or widespread mold growth.
At FoamWorks Concrete Leveling, we bring over three decades of practical concrete experience to property owners throughout Northwest Ohio, Southeast Michigan, and Northeast Indiana—including communities like Monroe, MI, Adrian, MI, Toledo, OH, Defiance, OH, and Fort Wayne, IN.
While our primary daily focus centers on fast polyurethane foam leveling for sunken slabs, we believe in giving property owners accurate diagnostic advice for all concrete challenges. Whether you need slab stabilization or guidance on maintaining your structural surfaces, we offer clear evaluations, lifetime warranties, and 100% customer satisfaction guarantees.
Reach out to our team today to learn more about our comprehensive Concrete Repair solutions and schedule your free estimate!